• Hi Guest!
    You can help ensure that British Car Forum (BCF) continues to provide a great place to engage in the British car hobby! If you find BCF a beneficial community, please consider supporting our efforts with a subscription.

    There are some perks with a member upgrade!
    **Upgrade Now**
    (PS: Subscribers don't see this gawd-aweful banner
Tips
Tips

Drilling out snapped bolts - tips and techniques?

tdskip

Yoda
Country flag
Offline
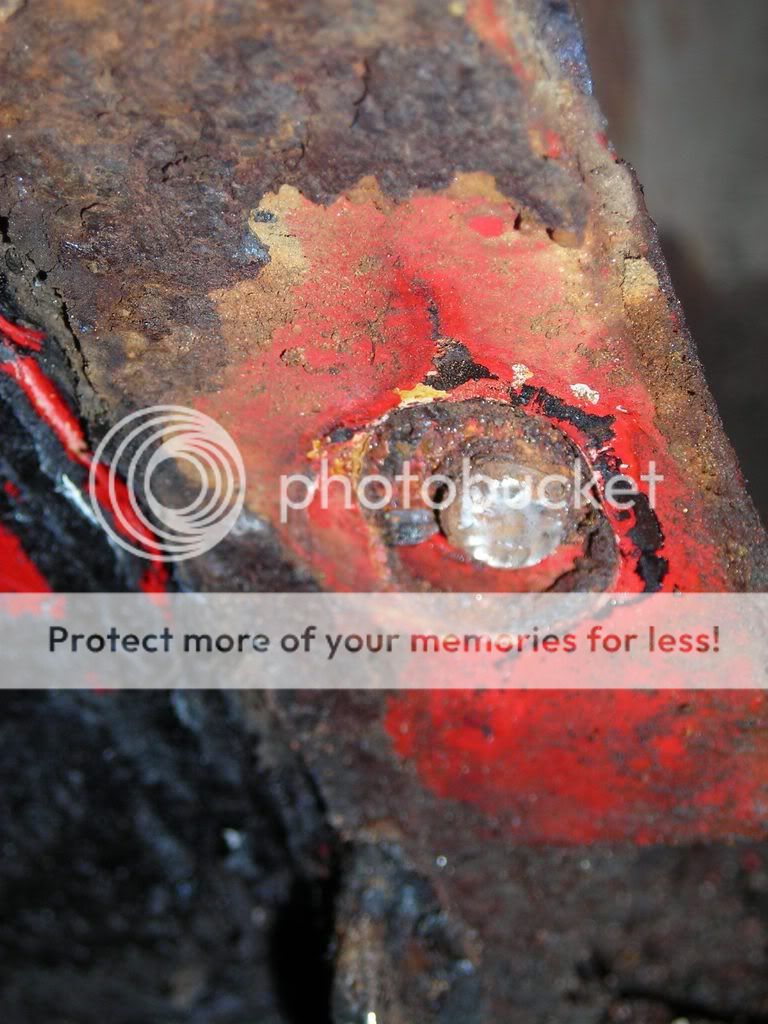
So when removing the splash guard from my earlier post the bolt snapped.

Tips and techniques for removing it?

This is what is left from the bottom inner fender bolt head that secures the splash guard to the wheel well. Even California cars get wet some times. Metal here will be cleaned up or replaced prior to reassembly...

TR4Afendersplashguardboltsnapped.jpg
 
The basic technique is to slowly drill it out starting with a small bit, and then slightly larger bit each time. You need a set of bits which are very close in diameter for this to work properly. Eventually you will have enlarged the hole enough to see the threads, without ruining them by drilling them out. Once you can see the threads, the remainder of the bolt will be sufficiently weakened that it will come out easily.

However in this case, since it doesn't look like that hole is blind, it might be easier to heat it up red hot, once or twice and then try drilling it. It may just spin out.
 
If that's a welded on plate nut drill it out with new or newly sharpened bits to within an 1/8 inch of its diam. then heat with a torch (preferably hotter and faster ie, mapp or oxy-acet.) and use an 'easy out'. If the surrounding metal looks too weak to take it, drill to size and rethread one bolt size up. If it's a caged nut, you'll have to grip it from behind with visegrips, etc.
 
What I always use to drill out broken bolts etc. is a combined drill and countersink. I buy them in size #4 which has an 1/8" drill part which will work for most applications. The advantage is that the initial drill part is very short while still being small. This will allow you to center properly and not have to worry about the drill bending when starting the hole. If you start a little of center, this drill will allow you to easily crank the drill around and force the bit to go where you want. Once the starter hole is there, then just use regular drills to finish the job.
 
In my opinion, you need to ensure ....... you drill it straight and in the center. Because ...... if you don`t drill it centered the drill bit will reach the threads on one side before the other. If the drilled hole isn`t straight, the bit will reach the threads ... again one one side {both ends eg. entrance and exit} before the other. Making it nearly impossible to use a tap to re-thread the hole in the original location,
Looking at your picture, It is possible that you will need to replace at least some of that panel. I see, what could be considerable rust through. It has been my experiance that once you clean an area like this up, the damage seems to "GROW"
IF this is the case, it may be that you will need to replace the area that has the broken bolt as well, and/or it may be more convienient to do so rather than trying to muck with drill bits and such.
Were it me, I would make the cleaning and preperation of the panel repair my #1 priority. Then decide which way to proceed with the broken bolt area.
But then some say i`m a left handed thinker too ! *SMILE*
Just my 2 cents.
 
As Kerry said - it must be drilled right in the center. Take some time to center punch it first. Drill bits can "walk" off center very easily. If the bolt is not flat where it broke (usually they are not) it may be necessary to lightly grind it flat to get a good center punch. Living in the tropics, we go through this a lot.
 
If there is enough of the bolt on the back, you may be able to soak the bolt with PB blaster or such then from the back, with vice grips, continue to screw it through, away from what was the bolt head.
 
Hi guys - thanks for the advice.

There isn't enough of the bolt head left on the back, but I might be able to grab the front with a pair of pliers. Let me give that a go and then move on to trying to the drill methods.
 
Go to a good hardware store and buy a left handed drill bit. Reverse the direction of your drill, and after finding center on the broken bolt, start drilling perpendicular to the fastener. If you are lucky, the combination of heat and the counter-rotation of the bit will break it free. If not lucky, use an easyout. Between drilling and using the easyout, try a penetrant. Sometimes, the quick cooling and lubrication from the penetrant will be enough to break it loose.
If it doesn't break free, a long soaking and a lot of prayer may be necessary...nobody likes dealing with broken fasteners.
 
I have also found that heating and rapid cooling (ice) will sometimes help to break a stuck bolt loose. I used that method on the breech of an antique muzzle loading shot gun. Heat it up and plunge it in cold water. The rapid change of temp will most likely break the thing loose. OK, ya can't plunge it so do the next best thing.
 
TR6oldtimer said:
If there is enough of the bolt on the back, you may be able to soak the bolt with PB blaster or such then from the back, with vice grips, continue to screw it through, away from what was the bolt head.

This may be the only way with this bolt. There is no room in that tight space to work with a drill, even a right-angle drill. Try the trick from the engine compartment, if it is one of those bolts.
 
If you are going to clean up the metal anyway, one other thing that sometimes works is a good soaking with penetrating oil, followed with grinding a slot for a flat head screwdriver.

Even if the screwdriver doesn't work, you can sometimes crack it with a center punch in the slot - hit it at a tangent to the outside of the bolt.
 
After doing this alot, one thing I do to get a good drill bit started, and to keep it from walking off center, is to use a small deburring bit for my Dremel tool. Hit the bolt with plenty of WD40, then very carefully start grinding the surface of any burrs that will force the drill bit off center. Then once it is relatively flat, take your bit and grind a small starter pit as centered as can be for the drill bit. I use a deburring bit that is shaped like an elongated dome. They sell them at any hardware store carrying Dremel stuff.
 
If you have access to the bolt shank from behind it would be better to but some heat to it and try to back it out by pre-drilling the broken end and using an e-zy out.

If you have a MiG welder you can place a nut over the broken end and weld through the hole like your doing a plug weld on a replacement panel. Now you have a hex head to grab a hold of with a wrench. Use plenty of penetrating fu lid be for and after welding. It may take several times. That's my favorite way.

If all else fails you can hire an engineer and have him draw it out. Sorry that's and old joke we told during my apprentice machining days.
 
GT6_Mark said:
I've had good results over the years using screw extractors.
I'm glad to hear SOMEONE can get those things to work! For every time I've managed to remove something with them, there have been 3 others where the extractor snapped, leaving me with a much worse problem than I started with. Now, I only use them when the broken fastener isn't stuck or rusty, but broke for other reasons (like your grease nipple being hit with something).

Home Shop Machinist has published several sets of plans for a home-brew EDM machine (Electrical Discharge Machining), and I've promised myself that the next time I have the problem, I'm going to build one of my own.
 
When you install reinstall the fastener, lightly coat it with anti-seize so you won't have to deal with it again.
If you purchase a good set of drill bits, with 135 degree split points, they will greatly reduced the drills tendency to walk. But don't use them on wood, as they can burn up quickly. They are primarily made for metals.
Most hardware stores carry 118 degree drills. They are less expensive and are better with wood, but don't compare in metal applications.
 
Back
Top