• Hi Guest!
    If you appreciate British Car Forum and our 25 years of supporting British car enthusiasts with technical and anicdotal information, collected from our thousands of great members, please support us with a low-cost subscription. You can become a supporting member for less than the dues of most car clubs.

    There are some perks with a member upgrade!
    **Upgrade Now**
    (PS: Subscribers don't see this gawd-aweful banner
Tips
Tips

Door stop assembly for BN-2

roscoe

Jedi Knight
Silver
Country flag
Offline
Hello All,
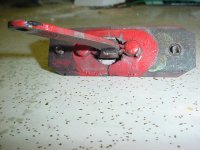
Does anybody have a photo they could post that shows an assembled door stop for the BN-2 (later version). I got my car in boxes and I've got all the parts for it, but it seems as though the hole in the mounting plate (that has the 2 captive nuts on it) is too small to allow assembly. It may be a new part. I have no problem hogging out the hole, but I'd love to see one that is put together correctly. It's a little puzzle that looks so simple, but never seems to go together. Is there perhaps A RETIRED ENGINEER out there who can help?
Thanks,
Jon Robbins
 
If you are talking about "this monstrosity" see pic. The LH side is shown.

The spring tabs spring over the two central metal bars. It takes a lot of force to spread the springs so that they will snap into place when the arm is fully extended to the open position . There is a rubber bumper on the back side.

Maybe you haven't gotten to the "fun" part yet. Tie a strong security string to the end of the arm. If you ever drop it after getting it through the door post mounting hole, it's very difficult to retrieve.

Believe it or not, the whole thing will slip through the hole & into place. If I remember right, it requires not having the arm fully extended (not locked in the open position) & a fair amount of twisting, turning, etc. to find the exact combination where it will go through the door post hole.

Once it is through the hole secure the two mounting screws, remove the string but DON'T let the arm fall back into the inner cavity, get the end of the arm into the door bracket, & secure with an ice pick through the holes.

Use the door leverage to force the arm with springs to lock the arm into the fully extended position. Remove the ice pick & insert the screw.

The whole thing will fit through the hole & go into place. It just "seems" impossible for a while.
D
 

Attachments

  • 6300-BN2DoorCheck.jpg
    6300-BN2DoorCheck.jpg
    140.6 KB · Views: 151
Dave,
Why did I know you would have a photo of this? I can see that I have to enlarge the holes in my mounting plates quite a bit. I'm not sure why they are undersized. Thanks so much for your trouble.

Jon
 
Hi Roscoe,
Perhaps the hole is smaller because your car is a BN1? That model had a slightly different doorcheck with the mounting screws above & below the mechanism. There is a picture of the "check strap" in the Service Manual: page P/6, figure 19. I fitted new doorchecks to my BN1 during the restoration and had to modify the mounting as the only ones available were BN2 type, but I did it before the outer panels were installed. If your car is a BN2, then this may be another case of changes made randomly during the production run instead of at the model changeover.
 
Pan,
I've got a BN2 and most of the parts were original, but this one looks exactly like the photo Dave posted, but the hole is smaller. Thanks.

Jon
 
The door checks were not changed at the BN2. They were changed at the end of August 1954, roughly half way through the BN1 production run. This coincided with the change to the later door hinge arrangement with offset hinges. Before that the hinges were very flat with a large welded hinge mounting protrusion on the front of the door casing.
The opening in the door hinge pillar was the size of the red painted area on Dave's picture. It was large enough to be able to fish this assembly through the hole, and bring it back to the inside surface, line up and install the mounting screws and fasten the pinch plate to the inside of the hinge pillar.

Rich
 
Back
Top