• Hi Guest!
    You can help ensure that British Car Forum (BCF) continues to provide a great place to engage in the British car hobby! If you find BCF a beneficial community, please consider supporting our efforts with a subscription.

    There are some perks with a member upgrade!
    **Upgrade Now**
    (PS: Subscribers don't see this gawd-aweful banner
Tips
Tips

TR2/3/3A Door pocket rivets

RC64

Jedi Hopeful
Country flag
Offline
I'm in the process of restoring the interior panels on a 1959 TR-3A. I've built new door panels and since the door pockets are still serviceable I'll be using them. The original rivets that secured the pocket to the panel could not be salvaged so I'm trying to find some type of rivet to replace the old ones. A nice feature of the original ones was a very thin and flat head that did not leave a bulge in the vinyl covering.

Does anyone know of a source for the original rivet or a similar rivet that would serve that same purpose? I have a work around in mind but I'll hold that thought for the moment to see if the rivets are available.

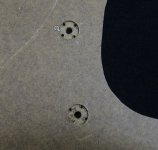
Here's a "fuzzy" photo of the original rivets.

Door pocket rivets.jpg

Rick...
 
I would look in hardware store wall of box hardware and look for split rivets.
 
Peter...

Thanks for that. Now that I know what they are called, after a quick google search I see that there are quite a few options online if I can't find them locally.

Rick...
 
Don't do like I did! I pop riveted my pockets on and then realized I would not be able to glue the upholstery down inside the pocket hole. So I had to drill out the pop rivets. Now I'll be looking for split rivets as well. Doh!!!
Regards,
Bob
 
Paul...

I considered building new pockets too. Would be a relatively easy task if I could find the heavy "cardboard" similar to what was used originally. Boone, NC isn't a hot spot for finding a variety of materials. What did you use and where did you find it?

(Later) I was reading through your "new skills" thread and see that you found the cardboard at an upholstery shop. I'll have to see if there is one around here.

Rick...
 
Rick
Another carboard source would be an art supply store. The cardboard matting is about the correct thickness.
Paul
 
Jesus...

Those are a couple of very good threads. They give me a couple of more ideas on how to attack this problem. The one about adding a "hook" on the inside to support the door pull cable was a good one. That would eliminate the wear on the sides of the pocket.

At this point I'm leaning away from the split rivets. It's going to be awfully difficult to bend the tabs of the rivets over after the vinyl is installed without damaging the vinyl. As I see it I'll need to secure the tag ends of the vinyl on the inside of the pocket openings before the pocket is installed. I need to think some more about how I might secure those tag ends after the pocket is installed. I've got some glue that might do that trick. I'll have to do a test run. It would be interesting to know the sequence that Triumph used back in the day.

Rick...
 
Rick,

Glad of having been useful…

When I restored the interior of my TR3A, I fabricated new door panels, but used the old pockets, after having reshaped them to their original form. Then, I glued them to the door panels with white cement (as used for wood, paper and cardboard), since I imagined that using those split rivets would be somehow tricky, as you describe. The white glue is usually very effective with cardboard, if the pieces are pressed together until the glue is completely dry. Of course, the cardboard material must be consistent (like when you use new cardboard) since the glue only bonds to the mating surfaces.

JesĂşs
 
I have decided to use 3/4 inch 10-24 bolts to attached the pocket. I got flat headed bolts and cut a short slot in the threaded end so I could use a screw driver to hold the bolt while I tightened the nut on the back side of the panel. I put the bolts into the panel and finger tightend the bolts. Then I proceeded to install the vinyl over the panel. This way I can get to the back of the panel to pull and glue down the vinyl that wraps around the pocket hole. Once the vinyl is all glued down, I will then place the pocket over the bolts and put the nuts on the bolts to hold the pocket. If I ever need to take the pocket off, I can easily unbolt the nuts and remove the pocket. By using very flat headed bolts (or grind down the head), they do not show behind the vinyl any more than the original split rivets.
Regards,
Bob
 
Peter, Bob...

Between the two of you I think you've just provided the fuel for an answer to my problem. I have a large assortment of blind nuts and threaded rod that I use in building R/C model planes. With these I can fabricate my own custom "elevator bolts" as pictured in the google link. I'll use some of the heavy duty thread lock red to secure the rod in the blind nut and with a slight indentation around the hole on the outside of the panel it should sit perfectly flush with the surface under the vinyl. The pointed tabs on the blind nut should keep it from rotating when the pocket and then the nut is added. Here I have all this hardware sitting around and this application never crossed my mind. I'll see if I can post some photos when it comes together.

Rick...

Glad it looks like a plan Rick. But in all honesty, when I remade my door panels, I purchased new door pockets from Moss I glued them on to the hardboard (rough side) and it worked just fine. Also if you are making your own pockets, mine have a slut cut into the pocket for the cable to pass just below the top of the pocket when the pocket meets the door panel.
 
Peter...

I put in an order to Moss yesterday that included a couple of new pockets. I had hoped to build my own, but I still can't seem to find any material (locally) that is sturdy enough on the one hand, yet flexible enough to make the bends. I'll probably go with the new ones and spend my time on more practical issues.

Rick...
 
Problem solved! I now have a way to securely attach the door pocket to the back side of the door panel "after" the vinyl covering has been fitted around the opening in the door panel and the tag ends have been stapled to the inside of the panel. Here's the sequence I've used...

1) Position the pocket on the back side of the panel and mark the center of the holes in the flange around the pocket.
2) Drill a very small hole at those center points.
3) From the front side use a 1/2" Forstner bit to drill a very slight recess to allow a 6-32, 1/2" flange, blind nut to sit flush with the front surface. The small initial hole makes it easier to center the Forstner bit.
4) Drill a larger hole to accept the shank of the blind nut. I think it was a #19 bit that worked for the 6-32.
5) Fit a blind nut in the recess and tap it with a hammer to mark the location of the tabs on the blind nut. Then drill a small hole to seat those tabs. I used Masonite for my panels which is quite hard so it was necessary to drill the extra holes to accept the tabs without folding them over. This probably wouldn't be necessary if a softer material is used.
6) To check the fit, from the back side mount the pocket in place and secure it with hex cap 6-32, 1/4" machine screws and washers. When your comfortable, I'd suggest using a dab of epoxy or CA to hold the blind nuts in place. You can then remove the pocket, cover the panel, and then reinstall the pocket. I'd also suggest using some Thread Lock when the pocket goes back on.

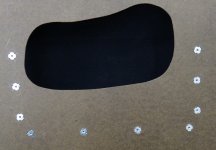
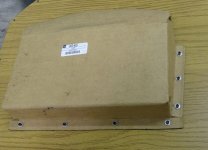
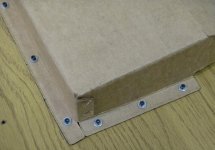
Here are a couple of photos to illustrate...

Snap1.jpgSnap3.jpgSnap4.jpgSnap5.jpg
 
Back
Top