• Hey Guest!
    British Car Forum has been supporting enthusiasts for over 25 years by providing a great place to share our love for British cars. You can support our efforts by upgrading your membership for less than the dues of most car clubs. There are some perks with a member upgrade!

    **Upgrade Now**
    (PS: Upgraded members don't see this banner, nor will you see the Google ads that appear on the site.)
Tips
Tips

TR2/3/3A door fitting problem

sp53

Yoda
Country flag
Offline
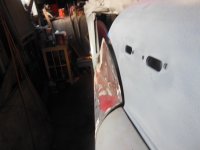
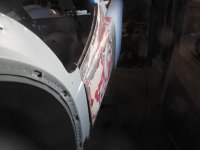
Here are some shots of my tr2 project. The pictures of the passenger door show how the door does not come in enough at the bottom and does come in at the top. The revel gaps are good enough for me, and they can be fine-tuned, but I need the door to come in some

What I am trying to do is bend and twist the door so as to make it huge the jam better. I have put some tr3A doors on and they fit very nice, so the problem is in the door.

I could plug the door handle hole and use a tr3A door, but I would rather not. So anyone have any ideas on how to get the door to fit better.

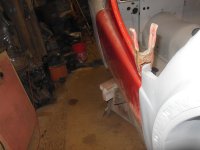
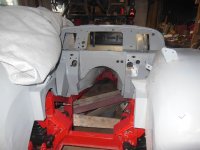
I used this product called CRE primmer and sealer and found it impressive for what I am doing out in the Barn. The red paint on the frame is a little much, but that is how the car was done at the factory.
 

Attachments

  • DSCN0892.JPG
    DSCN0892.JPG
    3 MB · Views: 23
  • DSCN0890.JPG
    DSCN0890.JPG
    3.1 MB · Views: 21
  • DSCN0889.JPG
    DSCN0889.JPG
    3 MB · Views: 20
  • DSCN0888.JPG
    DSCN0888.JPG
    3.3 MB · Views: 20
  • DSCN0883.JPG
    DSCN0883.JPG
    3.3 MB · Views: 19
I'm afraid it's not an easy fix...sorry?!?

It's best to not attach any sheet metal to the body until you get a pre-fit of the doors. The rear quarter has some adjustment, but I see it is already tack welded. The scuttle has almost no adjustability. So...

The easiest fix I see is to pop the door skin away where it folds over the inner door frame. This breaks the box of the door that gives it stiffness. You can then work the frame to the required curvature, and then capture it by locking the skin back down to it. It sounds severe, but I never had any luck trying to bend a finished door...they are amazingly stiff.
 
John, to my eyes it looks like the door frame is twisted as if holding it by the A-pilar side in right hand and B-Pilar in left hand, and rotating right hand back toward you and left hand away.
I know the TR2 and early 3 doors have basically no stucture at the top compared to the later all metal TR3A doors. A block of wood a the top of the B-Pilar between the door and the post, and a good push at the bottom of the door at the B-pilar woudn't move that TR2 door twist a enough?
 
When I started working on my TR3A the passenger side door looked very much like yours. I tried bending the door with no avail. So I looked at the inner structure of the door and realized that the inner structure would not allow the reshaping of the outer door. At least in its existing configuration. But I did identify a spot in the inner structure where I could make a cut to remove material to allow the outer shell to bend. That is what I did, I removed/ cut a wedge of material until I could bend the outer door to match the adjacent body. Then I welded the inner structure in that position.
Sorry no pics of what I did to the inner structure.
Charley
 

Attachments

  • 20211130_205011.jpg
    20211130_205011.jpg
    1.2 MB · Views: 14
@charleyf, that makes a lot of sense.
Looking at how little metal goes across the top of the early door frames, I figured it would be pretty easy to twist it back into shape. Always learn something new here.
 
You would think the door would twist...but that is not the case. The inner door frame alone, and the door skin alone, are very flexible and can be easily twisted any way you need them to twist. But, once they are joined, it becomes a reinforced "box" structure. I'm not saying it can't be twisted...just that it takes a LOT of force to do it. I chickened out before achieving any more than about 1/8" of twist. As Charley pointed out, you must "break" the box to make an adjustment. He figured out a place to make a cut to break it. I preferred to part the skin. Once the skin is off, the frame will easily bend to conform to the scuttle, front wing, and quarter panels. You must leave about 1/8" space to allow for the skin addition. Once the Frame is good, then the skin can be easily tacked back on while maintaining the door's shape. Once it is fully tacked, then you can reweld...or re-crimp the skin, locking the shape forever.

This is why pigot always said that the restoration begins "around" the doors. As flimsy as they seem, the finished door is a rigid assembly. The other very rigid assemblies are the "A" post up to the front scuttle, and the "B" post. There is some flexibility when welding on the rear quarter panels, and also a lot of adjustment room when bolting the front wings. The front scuttle has little or no ability to conform to the top of the door...the door must be fit to the front scuttle.
 
Last edited:
Oh, Steve...one thought. You may be able to "pull" the top of the "B" post inward, to match the door. It will take a cum-a-long or the like, but you may be able to do it. I would run a few string diagonals before bending the "B" post, though, just to make sure you are not pulling the body farther out of whack to match a damaged door. If you decide to try this, I would attempt to remount the door to align the front scuttle first, then the front wing to match the new door mounting...finishing by pulling the "B" post to match the door twist.
 
John, one question if you have the time.
My doors are pretty good and the fit is decent right now. They have a bit of work needed at the bottom edge, as usual, but I don't think a total re-skin will be needed. The front fenders on the other hand are pretty swiss cheezed at the back.
I was going to use the doors to align the car when the sills and floors go in, one side at a time. Make sure the body aligns with the doors along the B-Post/Rear Quarter area and along the front curve of the scuttle.
Once I'm confident sills and A/B posts are solid and the doors are fitting, then do any repairs to the firewall and kick panel.
The front fenders would be the next order of buisness. But I am probably looking at needing to build an entire new rear flange rear sections of the front fenders, so I was going to use that as the adjustment area to get a good gap.
Do I need decent fenders as well as doors before I go fitting the inner and outer sills?
Thanks,
Robby
 
Robby, the front wing has some adjustment range, so is the last part to fit to the doors. The top of the wing at the scuttle can be pushed in or shimmed outward up to about 1/8" either way. The bottom is matched the same way, washer shims to move it outward, or pushed inward...at least 1/4" as needed. Then, the bolts inside the hinge flange area have large holes to allow moving the wing in and out in the middle of the door. Compared to the scuttle at the front top and quarter panel at the rear, you should not have too much trouble fitting the wing.

The door hinges are adjustable, to get the proper door to front scuttle fit. You can use shims under the hinges to set the front door to wing and door to scuttle gaps. Oddly, the front wing has little fore and aft adjustment range. Once the hinges are set for the best door to scuttle fit and front gap you can get, then check the door to rear quarter. If you are lucky the rear fit will line up, like Steve's left side.

The lower sill should be the last thing you fit to the door. Make sure all the other areas are fit to the final position before you even think about fitting the sill. It must fit the door, front wing, and rear quarter panels. The sill has room to fit, but once it is welded, all you have is bondo to adjust?!?
 
Back
Top