• Hi Guest!
    You can help ensure that British Car Forum (BCF) continues to provide a great place to engage in the British car hobby! If you find BCF a beneficial community, please consider supporting our efforts with a subscription.

    There are some perks with a member upgrade!
    **Upgrade Now**
    (PS: Subscribers don't see this gawd-aweful banner
Tips
Tips

DIY Temp gauge repair - Solder issues

Hairyone said:
I would have no hesitation using a torch, as long as it's away from petrol.
The problem is, the working fluid is ether, the main ingredient in starting fluid, more flammable than gasoline. It's an unnecessary risk to use an open flame.

Hairyone said:
Can you take the whole thing out & put it on an electric stove on low as some background heat?
Unfortunately that would involve baking the whole gauge head to a rather high heat. It is also unnecessary as the tube can be soft soldered following proper cleaning and using good flux.

Hairyone said:
OR Is the capillary tube stainless steel?

The capillary tubes are copper. OEM tubes have something like a zinc or cadmium plating on them. Aftermarket donor gauges typically are bare copper.

You can indeed solder stainless steel but you cannot use resin flux NOR can you use resin core solder. You can prep the surface and have some success with regular acid flux. However, there are some additional tricks needed for consistent results. There are better fluxes made for stainless. Regardless, it doesn't apply here as the tubes are copper and plated copper.
 
another solution might be to bring the whole project to a rad shop, I suspect they could solder it up in no time. This especially if you are anxious about your abilities. I discovered with my car that if I want it on the road, I don't have to know everything
 
Yes, you could have someone else solder this, but it's a very tiny tube that must not be plugged by too much solder being applied. It's also not the sort of part a radiator shop is used to working on.

I encourage you to practice a bit more on the end of the old gauge's capillary tubing. Lightly sand the tubing, apply a decent flux, and make sure your soldering iron is hot first before applying solder to the joint. I have made this repair a couple of times and no special equipment is required.
 
Thanks guys -

Doug - everything is definitely clean. I want to pick up some of the solder you mentioned. When I tried the plumbing solder, the iron was hot and I was using a wide tip to help disburse heat along the tubing. It simply wouldn't get hot enough to melt the solder. I could get it to pool on the gun tip, but the tubing just wasn't heating enough. Hopefully a lower-temp solder will suit my needs well :smile:
 
clean material is where is at! Also use a good quality paste some of them if they get to hot will leave a residue that solder just wont stick to. Take a piece of scotch brite to the surfaces prior to the paste this will also assure a good joint.
 
As Chris said above. I mentioned sanding, ScotchBrite is good too.

I suggest first you practice on just a solid piece of copper wire, like something you'd peel out of a piece of Romex cable. That should be a piece of cake to solder since you said you were using a big tip on your iron. If you can solder to the copper wire, there's no reason you can't solder to the capillary tube.

Before leaving that subject though... Is there a chance your capillary tube has a clear coating on it? Try cleaning it with a bit of ScotchBrite dipped in lacquer thinner or similar then apply a good paste flux.

Try to use something other than resin flux if you have an alternative. For example, I mentioned Nokorode flux earlier. Another possibility is Staybrite. Staybrite is a hobby solder typically supplied with a bottle of very good flux. See these links:
https://www.rectorseal.com/index.php?site_id=1&product_id=239
and
https://www.fdjtool.com/ProductInfo.aspx?productid=54.452
 
One point with using a soldering gun like a weller. Each time you use it before you heat it up. Loosen and then retighten the screws holding the copper tip on. many times these contact points get oxidized and the gun takes forever to heat up. tighten these spots and it should heat up very quickly. We are only talking about 3 volts DC but a lot of current, but that low voltage can give all the contact problems of a flashlight. Clean the copper or brass with emery cloth and take a tissue with rubbing alcohol on it and pull your solder through it to clean it up. Its all about getting things really clean for a good solder joint.
 
Hey Kim. I've been wondering where you were and hoping you'd add to this thread.

Regarding the set screws for the Weller gun tips... I've been doing that for several years now and apparently I've reached the point where that is no longer effective. I think the plating on the gun is worn out and/or heavily oxidized. I did get a brief improvement by disassembling the outer portion of the gun and using SMALL wire bristle bottle brushes to clean the holes the tips go in, the insides of the securing collars, and sanding the legs of the copper tip. I'm just sick to the teeth of having to "repair" my soldering gun every time I want to use it.
 
Radio shack sells new copper ends for the weller types that might help. I keep a spare in case I am working on something that I can't afford to screw up the first time. What I really need is an old midget gas tank that someone has replaced so I can cut it up and use it too check and set the depth of the senders. I will be glad to calibrate senders and fuel gauges this winter if anyone needs. Its the only way to get an accurate and reliable gauge. I have mine set to where it reads full when full and still has 1.5 gallons left when it reads empty. About 5.5 gallons of usable range with that 1.5 of reserve.
 
Kim did Miss Agathas the same way and it has worked flawlessly.
 
I recently used this method to repair the temperature gauge on my MGA. The repair worked – now when I place the bulb in boiling water, the gauge reads 212 degrees.

Some notes about what I did:
1. The capillary of my Jaegers gage has a diameter of 0.070”, and the donor gauge capillary had a diameter of 0.042”. For optimum solder wicking, the splicing sleeve should only be only a bit larger than the capillary, so that a simple piece of copper or brass tubing would not work well in my case.
What I did was make a custom splicing sleeve from a 1 ½” piece of 1/8” brass rod. With a #48 drill bit, I drilled a 0.076” hole about half the length of the rod. In the other end of the rod, I drilled a 0.046” hole (#56 bit) until it met the first hole.
I used a drill press to do the drilling. A lathe would have also worked.

2. Solder could easily wick to the end of the capillary, and close off the hole, and that would ruin the repair. To prevent this, I used a soft-lead pencil to put a layer of graphite on the capillary near the end. Graphite is heat resistant, and solder will not stick to it.

3. To cool the bulb of the donor gauge, I got some dry ice at a grocery store, and put it into a thermos. I then added rubbing (isopropyl) alcohol. This mixture is -110 degrees Fahrenheit, which is above the freezing point of ether, but well below the 0 degrees that a water-salt-ice mixture produces. When I cut the tube, there was no ether odor, and I used a small torch to heat the parts for soldering without any problem.

4. The bulb is sealed against a machined surface in the engine block, with a special nut used to press against the bulb. After the donor gauge is cut, the nut that is on it needs to be removed, and replaced by the one from the original gauge – the one that fits the threads on your engine. I forgot to do this, and had to redo part of my work.

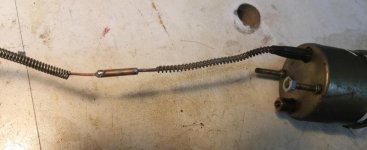
The photo shows the splice. I need to add some sort of flexible splint to protect it.

MGA temp gauge.jpg
 
I've done a few of these. The above poster, the tubes were not the same sized. I used some thicker walled tubing and drilled out one end. I used saltwater bath and a soldering gun.
 
I have used the method about a half dozen times now and I also made sleeves with different diameters on each end.

I much prefer using dry ice to the salt/ice bath. It is so much cleaner and colder.

I had not thought of masking the ends of the tubes to prevent solder wicking in from closing the cut ends. Thanks a lot for the suggestion. I will use that next time!
 
Before doing any soldering I give tinning the solder gun tip a try to make sure everything is up to snuff. I have an old Miller but I think any gun with replaceable tips will give trouble with heating up from time to time. The Miller is the only one I've gotten useful life out of.

BTW, how many of you guys have done this with success? I have a pile of dual gauges with cut off capillary tubes from DPO's. Can you find cheap sacrificial gauges with good bulbs and the correct threaded fitting?

Kurt.
 
Didn't read the second page.:rolleye: So never mind. my questions are pretty well answered! Thanks!

Kurt.
 
As a succinct answer to your question, there are lots of donor temp gauges available for under $20, often at the local parts store. You just have to look to make sure the capillary tube is covered with a spring instead of the newer style covered with a vinyl sleeve. The common expansion bulb is the right size and the common securing method is a male threaded nut 5/8-18. That will fit right into A-series cylinder heads. However, on some heads the temperature sender port is too shallow and a spacer/adapter is needed so everything seats right ( Mini Mania 11K2846, Mini Spares TE5).
I cannot comment on what Bugeyes and other cars with radiator mounted sending units may require. Some Jags use an expansion bulb where the nut is the opposite gender but you can re-use the old Jag parts if you have them.
 
Thanks Doug. My Lotus needs a dual gauge and uses a female nut rather than the common male. I'll have to haunt the Jag E-bay as well to maybe come up with nut.....or send one of my gauges along with cash to Nisonger!

Kurt.
 
Several years ago I made an adapter for the Jag type expansion bulb. I took a 3/8 NPT brass pipe nipple (hex in the middle) and rethreaded it to 5/8-18 on both ends. I also bored it out to just take the expansion bulb and its conical seat. That allowed the female nut Jag type expansion bulb to be used on a Mini. I didn't use the gauge... I sold it to a guy who said it worked fine for him.
 
Back
Top