-
 Hi Guest!
If you appreciate British Car Forum and our 25 years of supporting British car enthusiasts with technical and anicdotal information, collected from our thousands of great members, please support us with a low-cost subscription. You can become a supporting member for less than the dues of most car clubs.
There are some perks with a member upgrade!**Upgrade Now**
(PS: Subscribers don't see this gawd-aweful banner

Tips
- We have a special forum called "Member Articles" where you can submit actual articles for consideration for publication. Learn More
- Don't have an Avatar? If not, your avatar will default to the 1st character in your username. Go into "Account Details" to change your Avatar.
- Some basic forum navigation info: click
 Hey - did you know if you click on the title of a thread it will take you to the first unread post since you last visited that thread?
- Hey Guest - Is your British Car Club in our Clubs database? If not, send me a PM - Basil

- Looking for a local club? Click the "Clubs" tab above and browse hundreds of clubs world-wide.
- Add Android or iPhone APP: click
- Did you know - any picture or video you add in your posts in any marque-specific forum will also get added to the Media Gallery automatically.
- A few more tips about posting and replying: click
- Hey there Guest - be sure to keep your profile page up to date with interesting info about yourself: learn more
- More tips and tricks on Posting and Replying: click
 but were afraid to ask:
  STOP!! Never post your email address in open forums. Bots can "harvest" your email! If you must share your email use a Private Message or use the
  smilie in place of the real @
- Want to mention another member in a post & get their attention? WATCH THIS

- So, you created a "Group" here at BCF and would like to invite other members to join? Watch this!
- Hey Guest - A post a day keeps Basil from visiting you in the small hours and putting a bat up your nightdress!
- Hey Guest - do you know of an upcoming British car event?
 Pretty Please - add it to our Events forum(s) and add to the calendar! >> Here's How <<
- Hey Guest - you be stylin' Change the look and feel of the forum to fit your taste. Check it out
- If you run across an inappropriate post, for example a post that breaks our rules or looks like it might be spam, you can report the post to the moderators: Learn More
- If you would like to try some different "looks" or styles for the site, scroll to the very bottom, on the left and click the Style Selector.
You are using an out of date browser. It may not display this or other websites correctly.
You should upgrade or use an alternative browser.
You should upgrade or use an alternative browser.
DIY Dash
- Thread starter Morris
- Start date

G
Guest
Guest
Guest
Offline
Not bad at all.
G
Guest
Guest
Guest
Offline
KNowing Morris I'm surprised it isn't aluminum.
OP
Morris
Yoda
Offline
Ha! Billy I did contemplate aluminum for a long time. But decided to go the cheap and easy route.
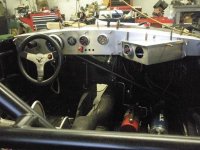
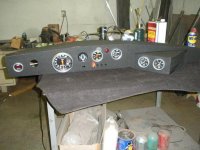
How I did it:
1) Remove ugly, cracked dash cover
2) Cut away foam with sawzall so that dash face is basically flat
3) fill holes, valleys and canyons with light weight filler. I used "Rock Hard" because I had some on the shelf. If I did it again, I would use spackle. Rock Hard is difficult to sand.
4) Buy a couple of yards of vinyl from the fabric store. Using bull dog clips, secure the vinyl to the bottom of the dash and gently stretch the vinyl around. Slowly trim away excess fabric.
5) Secure the vinyl to the dash using contact cement and Super 77.
6) Use a scalpel to cut out instrument and switch holes.
I will probably redo it at some point. When I do, I will place a thin foam layer between the dash and the vinyl. They had headliner material at the fabric store that looked like it would work nicely.
Jim_Gruber
Yoda
Offline
Morris,
Looks a lot easier than replacing with a fiberglass dash and substantially cheaper. I've got a new prototype fiberglass dash in the back of my garage that has been sitting there for past 5+ years. Never had the courage nor a MOWOG available to unbolt the old dash and chase the grounding issues a fiberglass dash presents. Geat job.
Looks a lot easier than replacing with a fiberglass dash and substantially cheaper. I've got a new prototype fiberglass dash in the back of my garage that has been sitting there for past 5+ years. Never had the courage nor a MOWOG available to unbolt the old dash and chase the grounding issues a fiberglass dash presents. Geat job.
Hap Waldrop
Yoda
Offline
Hap Waldrop
Yoda
Offline
bill_powell
Jedi Trainee
Offline
Good job, Morris. I've always liked a nice custom dash.
And Hap: that's awesome. I really like the 'wrap-around' idea. If I ever decide to eighty-six my passenger I just might go there.
Here's a quick shot of mine; typical, simple home-made wood job:
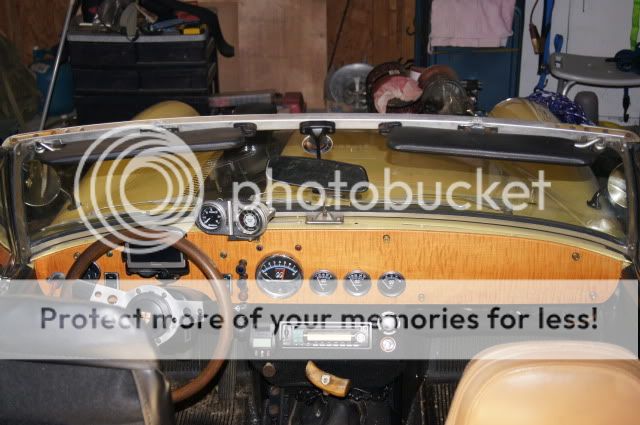
I know; the car's filthy. So's the garage. Need to spend a little less time driving around and spend a little more time cleaning.
And Hap: that's awesome. I really like the 'wrap-around' idea. If I ever decide to eighty-six my passenger I just might go there.
Here's a quick shot of mine; typical, simple home-made wood job:
I know; the car's filthy. So's the garage. Need to spend a little less time driving around and spend a little more time cleaning.
bill_powell
Jedi Trainee
Offline
Kurt, once I've got the dash as I want it, I'll do just that. I'm still tinkering, so for now all I do is a bit of paste wax.
I do love curly maple; I've done four Mini dashes with it.
I do love curly maple; I've done four Mini dashes with it.
G
Guest
Guest
Guest
Offline
Morris said:That is beautiful Bill. Is that a gps mounted in front of the wheel?
Nope, that's a TV so he don't miss any Honey Boo Boo.

Gerard
Luke Skywalker
Offline
Jim_Gruber
Yoda
Offline
Interesting transmission tunnel treatment. Custom or something available way back when?
Gerard
Luke Skywalker
Offline
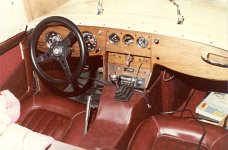
nomad said:Wow, Gerard!! Are you sure thats a picture of a bugeye interior!!
Kurt.
Quite sure...
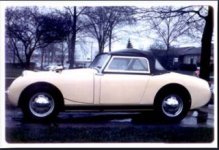
Here's my original (same) car circa 1969
Attachments
Gerard
Luke Skywalker
Offline
Jim_Gruber said:Interesting transmission tunnel treatment. Custom or something available way back when?
All hand made by yours truly. The seats are obviously later seat foams, covered in leather, Everything was professionally upholstered, including a headliner for the hardtop. The seats are waiting to go into my current Bugeye project. I still have the dash and the console, but not sure if I'll continue to use them in this car.