
-
 Hey Guest!
British Car Forum has been supporting enthusiasts for over 25 years by providing a great place to share our love for British cars. You can support our efforts by upgrading your membership for less than the dues of most car clubs. There are some perks with a member upgrade!**Upgrade Now**
(PS: Upgraded members don't see this banner, nor will you see the Google ads that appear on the site.)

Tips
- We have a special forum called "Member Articles" where you can submit actual articles for consideration for publication. Learn More
- Don't have an Avatar? If not, your avatar will default to the 1st character in your username. Go into "Account Details" to change your Avatar.
- Some basic forum navigation info: click
 Hey - did you know if you click on the title of a thread it will take you to the first unread post since you last visited that thread?
- Hey Guest - Is your British Car Club in our Clubs database? If not, send me a PM - Basil

- Looking for a local club? Click the "Clubs" tab above and browse hundreds of clubs world-wide.
- Add Android or iPhone APP: click
- Did you know - any picture or video you add in your posts in any marque-specific forum will also get added to the Media Gallery automatically.
- A few more tips about posting and replying: click
- Hey there Guest - be sure to keep your profile page up to date with interesting info about yourself: learn more
- More tips and tricks on Posting and Replying: click
 but were afraid to ask:
  STOP!! Never post your email address in open forums. Bots can "harvest" your email! If you must share your email use a Private Message or use the
  smilie in place of the real @
- Want to mention another member in a post & get their attention? WATCH THIS

- So, you created a "Group" here at BCF and would like to invite other members to join? Watch this!
- Hey Guest - A post a day keeps Basil from visiting you in the small hours and putting a bat up your nightdress!
- Hey Guest - do you know of an upcoming British car event?
 Pretty Please - add it to our Events forum(s) and add to the calendar! >> Here's How <<
- Hey Guest - you be stylin' Change the look and feel of the forum to fit your taste. Check it out
- If you run across an inappropriate post, for example a post that breaks our rules or looks like it might be spam, you can report the post to the moderators: Learn More
- If you would like to try some different "looks" or styles for the site, scroll to the very bottom, on the left and click the Style Selector.
You are using an out of date browser. It may not display this or other websites correctly.
You should upgrade or use an alternative browser.
You should upgrade or use an alternative browser.
Dist cap
- Thread starter NutmegCT
- Start date

OP
Offline
This is interesting. I originally removed the cap to put in the new rotor I got from TRF a few days ago.
I found the old rotor very easy to remove, but the new rotor seemed "tight" and difficult to push down.
I wonder if the new (red) rotor is actually too high, or not fitting properly?
Maybe that's what pushed the carbon contact up into the cap.
Anyone ever have a problem with the TRF red rotor? It came in the kit with the cap, wires, condenser, and points.
Thanks.
Tom
TR3driver
Great Pumpkin - R.I.P
Offline
NutmegCT said:Anyone ever have a problem with the TRF red rotor? It came in the kit with the cap, wires, condenser, and points.
Mine seems fine, but I bought it (from TRF) separately rather than in a kit. Now that you mention it, it was a bit tighter on the shaft, but not enough to keep it from sliding fully into place with reasonable applied force.
sd80mac7204
Jedi Warrior
Offline
The TRF red rotors come from Advanced Distributors.
OP
Offline
Thanks gentlemen. I just removed the new rotor, and checked as I put it back in place. It's tight - but does go down with some hand weight, and stop at (apparently) the right height. The previous rotor just dropped down in place (probably because it was 50 years old?).
I was also able to pry loose the carbon contact in the old dist. cap. Some carbon powder was down inside, and I guess that's why it stuck. But still wondering why it stuck *all the way down* in the cap.
Edit: the new plug wires I got from TRF seem very good quality, but are a bit short, especially with the right angle plug connectors.
Tom
Geo Hahn
Yoda
Offline
NutmegCT said:...Edit: the new plug wires I got from TRF seem very good quality, but are a bit short, especially with the right angle plug connectors...
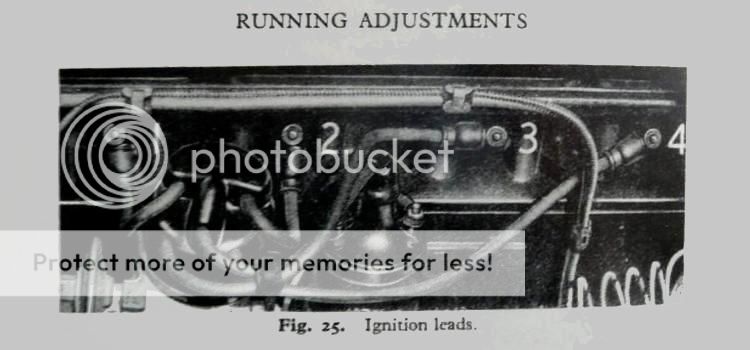
I personally like short plug wires (like the photo in Practical Hints), makes it look very neat there, no 'spaghetti' ignition.
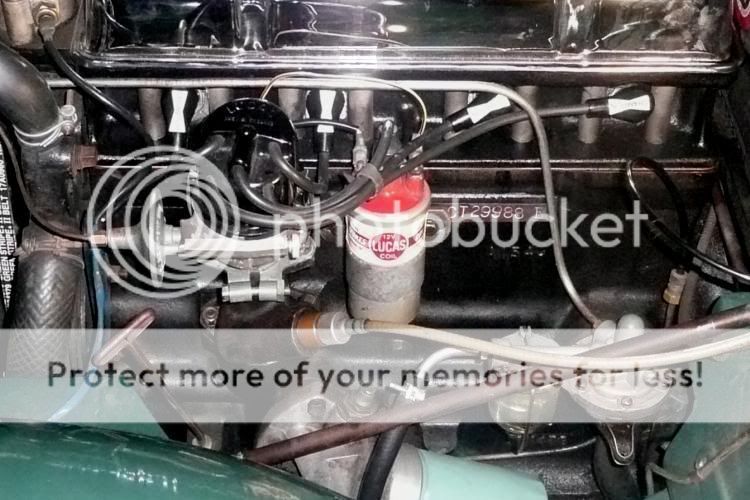
I have never experienced any crossfire even with them very close (actually strapped together) and the short-as-possible wires make it impossible to connect all 4 in any sequence but the correct one.
TR4nut
Yoda
Offline
I bought the same plug wires from TRF and although they are well made I am also not a fan of the plug design. The right angle makes it tough to attach/detach. Geo, your setup is indeed tidy but it would be a little more crowded if you ran the heater line - that is the main issue for me as you can't orient the plugs like you have with the pipe there.
TR3driver
Great Pumpkin - R.I.P
Offline
Geo's is a bit farther clockwise than is usual; but it really doesn't matter as long as the ignition timing is right.
'Fixing' it involves removing the distributor pedestal and the gear inside it, then reinstalling the gear on a different tooth where it engages the gear on the camshaft. Then you get to fight with getting the oil pump drive engaged. Once it's all back together, then you have to reset the timing as well. Not worth the hassle IMO.
PS, I don't have a photo yet, but I plan to make up some wires with copper core wires and 145 degree plug boots (with integral resistor). Similar to Geo's setup, but easier to R&R. I wish I could buy another set of these, but they appear to be NLA.
HerronScott
Darth Vader
Offline
Randall,
Interesting, I had those on my TR4A as well back in the 80s! It's escaping me the manufacturer though.
Scott
Interesting, I had those on my TR4A as well back in the 80s! It's escaping me the manufacturer though.
Scott
TR3driver
Great Pumpkin - R.I.P
Offline
Whitaker, I believe. I got those from JC Whitney around 1984. Three of them are still in good operating condition and in use today, the 4th one seemed to have a little extra resistance so it got replaced. (I'll do the others when I run out of better things to fixHerronScott said:Interesting, I had those on my TR4A as well back in the 80s! It's escaping me the manufacturer though.
) The silicone boots and insulation are in great condition, especially considering how many miles they have on them.TR3driver
Great Pumpkin - R.I.P
Offline
Geo Hahn said:Not sure how they got the wires to stay like that though -- copper core yes, but those must be solid core.
They all look pretty natural to me, except for #3. I think #3 was tucked behind the coil tower, just for the purposes of the photo.
angelfj1
Yoda
Offline
TR3driver said:Geo's is a bit farther clockwise than is usual; but it really doesn't matter as long as the ignition timing is right.
'Fixing' it involves removing the distributor pedestal and the gear inside it, then reinstalling the gear on a different tooth where it engages the gear on the camshaft. Then you get to fight with getting the oil pump drive engaged. Once it's all back together, then you have to reset the timing as well. Not worth the hassle IMO.
PS, I don't have a photo yet, but I plan to make up some wires with copper core wires and 145 degree plug boots (with integral resistor). Similar to Geo's setup, but easier to R&R. I wish I could buy another set of these, but they appear to be NLA.
Tom: messing about with that gear is a pain in the arse! Its a helical cut gear and real tricky to get just right. if you have enough clearance now, I would suggest you leave it alone!
HerronScott
Darth Vader
Offline
TR3driver said:Whitaker, I believe. I got those from JC Whitney around 1984. Three of them are still in good operating condition and in use today, the 4th one seemed to have a little extra resistance so it got replaced. (I'll do the others when I run out of better things to fixHerronScott said:Interesting, I had those on my TR4A as well back in the 80s! It's escaping me the manufacturer though.
Whitaker that's it! I knew it started with "W".
I very well may have gotten them from JC Whitney as well since I was restoring the TR4A in 1984-1985 and a few things came from there (Halogen headlights for example).
Scott