Hey Guest!

 Hey - did you know if you click on the title of a thread it will take you to the first unread post since you last visited that thread?
 but were afraid to ask:
  STOP!! Never post your email address in open forums. Bots can "harvest" your email! If you must share your email use a Private Message or use the
  smilie in place of the real @
 Pretty Please - add it to our Events forum(s) and add to the calendar! >>
RestoreThemAll
Jedi Warrior
Offline
Hey guys,
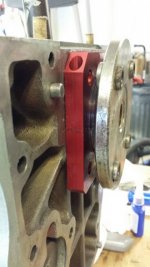
I installed a rear crank seal conversion this past weekend. I like the seal. It went together fine with no struggles or issues.
I used the template supplied with the kit to cut out the back engine plate giving space to clear the new seal frame. If I put the template up to the back plate it looks like a perfect modification. I'd have to double check but I think the finished product came to 7 5/16". I don't have it in front of me.
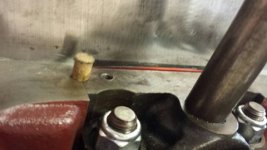
There is a small gap of maybe an 1/8th inch or so between the rear main cap and the plate where it meets the back of the oil pan. The plate before it was modified come down over the block and sealed with the gasket. My concern is that road dirt, rain, etc... will enter that gap and cause damage to the crank seal or clutch. What should I do with that gap? Has anyone who has installed the seal experienced the potential problem?
Thanks for your input.
Dale
I installed a rear crank seal conversion this past weekend. I like the seal. It went together fine with no struggles or issues.
I used the template supplied with the kit to cut out the back engine plate giving space to clear the new seal frame. If I put the template up to the back plate it looks like a perfect modification. I'd have to double check but I think the finished product came to 7 5/16". I don't have it in front of me.
There is a small gap of maybe an 1/8th inch or so between the rear main cap and the plate where it meets the back of the oil pan. The plate before it was modified come down over the block and sealed with the gasket. My concern is that road dirt, rain, etc... will enter that gap and cause damage to the crank seal or clutch. What should I do with that gap? Has anyone who has installed the seal experienced the potential problem?
Thanks for your input.
Dale