• Hi Guest!
    You can help ensure that British Car Forum (BCF) continues to provide a great place to engage in the British car hobby! If you find BCF a beneficial community, please consider supporting our efforts with a subscription.

    There are some perks with a member upgrade!
    **Upgrade Now**
    (PS: Subscribers don't see this gawd-aweful banner
Tips
Tips

Dash light bulbs

[ QUOTE ]
primed and painted with gloss white paint, removed those plastic light covers right on the inside where the lights come in

[/ QUOTE ]

I have been thinking of doing the same thing, then I remembered there is a product out there that is like chrome leaf. A very thin foil of chrome that is clued on similar to gold leaf (I heard about it as a way to 'rechrome' the turn signal stocks. Anyway, I wonder if that would work inside the gauges to reflect all the light so that all the light finds its way out the part of the gauge we look at. Anyone try this and if so what were the results.
 
Hondo:

Could you post a photo of the inside view??
I must have missed the plastic covers when
I had mine apart.

thanks,

d
 
Hi Adrio,
I have done this. The product is called Bare-Metal and you can get it at better hobby shops or from the Bare Metal Foil Co.
I used their Ultra Bright Chrome and am amazed at how much brighter all of the gauges are after "chroming" all of the reflective surfaces. The foil is easy to apply since the adhesive is already on the back of the foil. Cut small segments, lay in place and burnish with a cotton swab. The trickiest part is cutting the foil. Use a new Exacto knife and try and use most of the edge to cut not just the point and you will avoid tearing the foil.
I did all of my gauges with one package and at $5.50 it was cheap and worth all of the effort.
 
Thanks for this Roman. I will give it a try then. What I try is to do it on two of the gauges then take a look at them side by side with the not redone guages. That might make a nice 'picture' for comparison if such a picture can be taken. I may as well 'rechrome' my trun signal stocks while I am at it. It is off to the hobby shop for me.
 
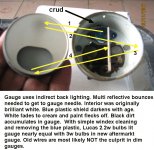
OK, I got curious and played at Mr. Wizzard today.
Original gauge with 2.2w or 3w bulb with brand new
wires----- made no difference in brightness.

So I took it apart for a look-see inside. Light has to
reflect all over the gauge inside to get out to where
the driver will see it. No direct lighting exists and
never was intended. Designed to be soft backlit. Crud
deposits and paint fading to dull cream greatly reduces
the amount of light reflected. 3/4 hour to take apart the
gauge, remove the darkened plastic bulb shield, windex the
insides and the gauge is very much brighter with Lucas 2.2w.

mystery solved, I think

Tin
 

Attachments

  • 256452-gaugebulbs.jpg
    256452-gaugebulbs.jpg
    151.8 KB · Views: 86
[ QUOTE ]
The brightness of a bulb is measured in lumens. You can have a 60 watt bulb or an 18 watt bulb give off the same amount of light. Use the lumens measurement Paul and you will see the light.

[/ QUOTE ]

Hardly,particularly if one of them is a led . Leds use entirely different measuring systems than an incandescent bulb and therefore do not have a common brightness unit.---Fwiw--Keoke
 
Tinster, I haven't had time to take any of my spare guages apart. Is there a shield or cover, possibly tinted green, that is what had the "crud" on it and caused the light to dim?

Thanks,
 
[ QUOTE ]
remove the darkened plastic bulb shield

[/ QUOTE ]
I wonder what the original intention of the plastic bulb sheild was? Could it have been a difuser of sorts. I know that sometimes it seems that in a house bulb, the frosted ones 'seem' brigher then the same power clear glass ones. Could this be the same sort of thing originaly, but the difuser just got more and more opaque?

Does anyone know why those plastic pieces were designed into the gauge in the first place?
 
Paul,

The crud is an accumulation of black dust that
enters thru a small hole on the gauge housing.
Also fine dust is able to enter thru the buld
entry housing since there is a gap where the plastic
bulb cover attaches to the inside of the housing.

I really, really do not want to take apart my
refurbished tach or speedo to increase the light
brightness. I might try to cut the plactic bulb cover
with a tiny exacto blade and extract it from the outside.
 
[ QUOTE ]
I might try to cut the plactic bulb cover
with a tiny exacto blade and extract it from the outside.

[/ QUOTE ]
Did you not once tell us you were an architect. That job sounds more like a gynaecologist's job. /ubbthreads/images/graemlins/blush.gif
 
Another area you can look at might be the interior of the bulb barrel connection on the gauge. I know that over time the exterior gets a light corrosion over it, so the interior could too. Clean the inside with Scotch Brite to provide a better ground.
 
Adrio;

I think the colored plastic bulb shields were to
provide mood lighting. My replacement amp gauge has a
green plastic cover.

Yupper I design many things. Have always enjoyed taking
things apart to see how and why they worked. I also am
involved in building forensics when something fails.
 
One more thing about this. On my TR4 the oil pressure gauge is mechanical. Does it come apart as simply as the electrical guages for this sort of refurbishment?
 
[ QUOTE ]
One more thing about this. On my TR4 the oil pressure gauge is mechanical. Does it come apart as simply as the electrical guages for this sort of refurbishment?

[/ QUOTE ]


They all come apart the same way....so yes
 
I think that this is the LED bulb that will replace the #428 bulbs that I ordered. No muss, no fuss, screw in OEM type replacement if it's the same. The only issue is that they're $3.99 each, but at this point, what the heck? If the $0.95 cost 3.125's don't work as well as I want, these should brighten it up a lot.

Now the question remains whether to get the "focused" or "frosted" , one emitting directly as a flashlight ot the scattered softer glow?

Maybe I should get the green tinted versions and eliminate the difusers that Tinster talked about.

https://autolumination.com/otherleds.htm
 
Paul,

If you are going to all the trouble to install LEDs,
why not also pull the faces off and at least windex
the inside walls and EndDust the faces??

Worth the effort.

d
 
Tinster,

That is definitely in my plans. I have dust on the tach and speedo that really annoys me. Yeah, I'm anal in case you haven't guessed that by now. And I'm getting fogging on my voltage and oil guages for some odd reason, so they probably need sealed.

I've been collecting the guages, one by one on ebay, in the event any of them ever craps out. I have every guage, except for the oil so it will give me a set to play with and learn on before I take out my originals.

Any tips on the sealing process? I do have the round seals to fit between the guage and the dash, so I was inquiring about the sealing of the guage itself. That is if is sealed?
 
Paul,

I use a clear silicone sealant/adhesive for the gauges
and it seems to work pretty well. Don't use too much or you
will be taking the gauges apart again to wipe off the excess.

d
 
Back
Top