• Hi Guest!
    You can help ensure that British Car Forum (BCF) continues to provide a great place to engage in the British car hobby! If you find BCF a beneficial community, please consider supporting our efforts with a subscription.

    There are some perks with a member upgrade!
    **Upgrade Now**
    (PS: Subscribers don't see this gawd-aweful banner
Tips
Tips

Dash Install questions

RestoreThemAll

Jedi Warrior
Country flag
Offline
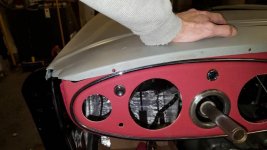
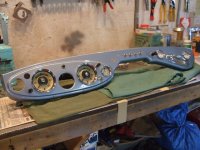
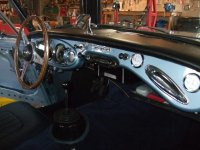
I removed the dash to install leather. Turned out real nice. Lost a month waiting for parts, including the trim felt.

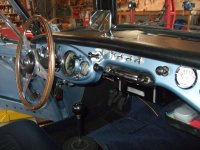
The best part of this story is that my granddaughter helped me install the dash! Keeping the youngest gen interested!

Questions:
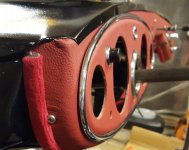
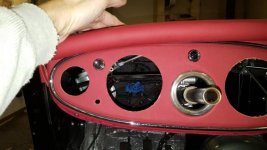
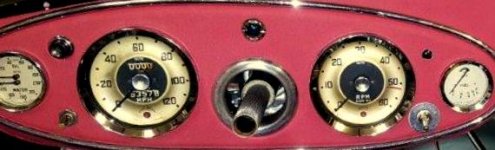
1) Should the chrome instrument ring be touching the sheet metal? See pic.
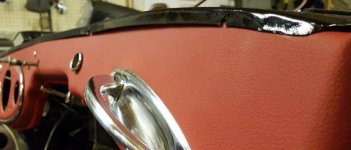
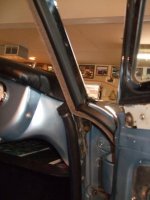
2) Should dash fit tight to the sheet metal. See dash gap pic.
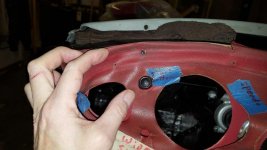
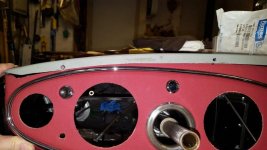
3) Note the holes in the sheet metal. What are they for? There are no holes in the dash that would line up.

Other than that how does it look?

Dale
 

Attachments

  • Dash chrome.jpg
    Dash chrome.jpg
    55.2 KB · Views: 247
  • Dash Gap.jpg
    Dash Gap.jpg
    36.7 KB · Views: 232
Unless I stumble onto another picture, this is the closest I can come to what you're asking. The shroud is already fitted/painted in this shot, and the chrome trim around the fascia has not yet been fitted, but elevation-wise, doesn't look far off from where yours is.

It does look a little tight on the RH side__your 2nd pic__but if the holes in the dash and on the curved A-pillar piece line up, that must be where it goes...
... assuming that's the same dash that came out of the car. The dash shown in my pic below was not the original, but had fewer non-stock holes in it (I had to fit the lighter, as my original choke was under the steering column, not like the later cars; my w/washer took the choke hole, and NO CHOKE NEEDED with Webers).

het_002.jpg


You'll also notice that I didn't cover the dash with vinyl, preferring the same exterior paint and an engine-turned finish for the instrument panel.

Edit: a few more pictures taken once completed (widely understood to be a relative term...)

IMG_3510-me.jpg


IMG_2376-me.jpg


IMG_2375-me.jpg
 
Hi Randy. Yes, the dash is original to the car.
So looking at your dash, the holes are for riveting theshroud on.
I also agree with Bob. Test fit the shroud. I’ll have a busyweekend. Good day to work inside. It snowed here with plenty more on the way.

 
I test fitted the shroud and top dash last night. The shroud does touch the dash chrome. It doesn't look too bad until the top dash is in place. It's all original to the car except the top piece. I don't see any way to change it so I'll have to live with it. See pics. Unless the BCF experts have advice?


The rivets will pass through and press hard on the dash leather. The old cover has holes cut to prevent tearing I guess.

I should probably drill new holes, as the old metal is torn?

I don't recall what the rivets look like. Are they a special rivet/tool?

Dal
 

Attachments

  • Dash align old cover.jpg
    Dash align old cover.jpg
    46.3 KB · Views: 197
  • Dash with shroud test fit.jpg
    Dash with shroud test fit.jpg
    47 KB · Views: 199
  • Dash with top pad test fit.jpg
    Dash with top pad test fit.jpg
    47.6 KB · Views: 195
Dale,
In the photo of the dash with the steering column coming through, it looks like the dash could be lowered a bit to center the column through the hole. If the column is in the correct position ( there are adjustments with the mounts ), use it to position the dash lower if called for. On the dashes I have off cars, the rivet marks are into the vinyl right on the curved edge along the top. You can drill new holes for the shroud and I would use aluminum pop rivets just long enough to get a bite.
Bob

Bob - could you clarify? Why would you need to lower the dash when the steering column position is adjustable?

The rear steering column mount is adjustable in its mounting bolts for height. The box front mounting bolts allow swiveling and the two air sealing plates can be adjusted.
 
Not knowing what has been changed on the car, I suggest possible adjustments to keep the column and dash opening centered. This could include adjusting the column, as Steve describes.
Bob
 
How would one lower the dash? The mounts on each side are solid. I don't think that they'd bend well. The screw holes are not slotted.
Dale
 
Last edited:
I suppose I would do any adjustment necessary to make it all work but there are two things I see in your photos that give me questions. One is that the padding you are using for the dash top pad might be a little thick which when wrapped around the front edge might be contributing to the shrouding of the chrome trim around the gauges. The other thing I noticed is that in my restoring of my BJ7 I do not remember having at any time putting in rivets along the top of the dash. My rivets are there but that is not what is holding the dash in place. The dash i believe is only held in place via the side pieces and one bolt near the center which goes thru the brace. I deliberately uncovered my dash because I like the painted surface. Some pics for reference.
 

Attachments

  • Copy of DSCF2043.JPG
    Copy of DSCF2043.JPG
    47.3 KB · Views: 184
  • Copy of DSCF2066.JPG
    Copy of DSCF2066.JPG
    98 KB · Views: 186
  • Copy of DSCF3220.JPG
    Copy of DSCF3220.JPG
    99.3 KB · Views: 177
  • DSCF2614.jpg
    DSCF2614.jpg
    69.6 KB · Views: 166
Vette, you are correct. The rivets hold the shroud not the dash. The shroud rivets do hit the top of the dash but don't pass through.

The padding is thick. Good point.

Your dash is beautiful!
 
Nice BJ7 Rick. Well that makes me feel better. Maybe some of these cars are designed weird.

I may try a washer or two between the dash and dash mounts. That would drop the dash and buy just enough to make the Chrome not rub on the sheet metal above.
 
Here is just another pic for reference of end pieces:
 

Attachments

  • Copy of DSCF2263.JPG
    Copy of DSCF2263.JPG
    90 KB · Views: 185
  • Copy of DSCF2680.jpg
    Copy of DSCF2680.jpg
    28.6 KB · Views: 164
On my BN4, I can see the entire trim oval when sitting in the seat. There is also space between the top of the dash and the shroud, maybe 1/8" minimum in the center. My shroud wraps around to meet the roadster doors at the ends, and I can get my fingers between between the dash top and shroud/dash pad.
 

Attachments

  • DSCF2613.jpg
    DSCF2613.jpg
    63.7 KB · Views: 133
I had some good luck this weekend. The steering wheel mount under the dash has slotted holes. I loosened the bolts and lifted the scuttle. It moved less than an 1/8 inch. Thanks for that tip Bob!

I also took a little metal off the holes on the sidemounts. Less than 1/16 inch.

Those two changes dropped the dash and aligned thesteering column with the dash hole. See attached.
The puffy padding on the dash top will cover the chrome ring slightly but I can live with that.
 

Attachments

  • Dash with Shroud Adjusted 2 Nov 17.jpg
    Dash with Shroud Adjusted 2 Nov 17.jpg
    51.3 KB · Views: 160
I also put the dash back together. It's always fun to work under the dash.

The actual color of the leather is a deep cherry. Pic isn't the best.
 

Attachments

  • Dash Adjusted with instruments installed cropped.jpg
    Dash Adjusted with instruments installed cropped.jpg
    24.1 KB · Views: 165
Back
Top