
-
 Hey Guest!
British Car Forum has been supporting enthusiasts for over 25 years by providing a great place to share our love for British cars. You can support our efforts by upgrading your membership for less than the dues of most car clubs. There are some perks with a member upgrade!**Upgrade Now**
(PS: Upgraded members don't see this banner, nor will you see the Google ads that appear on the site.)

Tips
- We have a special forum called "Member Articles" where you can submit actual articles for consideration for publication. Learn More
- Don't have an Avatar? If not, your avatar will default to the 1st character in your username. Go into "Account Details" to change your Avatar.
- Some basic forum navigation info: click
 Hey - did you know if you click on the title of a thread it will take you to the first unread post since you last visited that thread?
- Hey Guest - Is your British Car Club in our Clubs database? If not, send me a PM - Basil

- Looking for a local club? Click the "Clubs" tab above and browse hundreds of clubs world-wide.
- Add Android or iPhone APP: click
- Did you know - any picture or video you add in your posts in any marque-specific forum will also get added to the Media Gallery automatically.
- A few more tips about posting and replying: click
- Hey there Guest - be sure to keep your profile page up to date with interesting info about yourself: learn more
- More tips and tricks on Posting and Replying: click
 but were afraid to ask:
  STOP!! Never post your email address in open forums. Bots can "harvest" your email! If you must share your email use a Private Message or use the
  smilie in place of the real @
- Want to mention another member in a post & get their attention? WATCH THIS

- So, you created a "Group" here at BCF and would like to invite other members to join? Watch this!
- Hey Guest - A post a day keeps Basil from visiting you in the small hours and putting a bat up your nightdress!
- Hey Guest - do you know of an upcoming British car event?
 Pretty Please - add it to our Events forum(s) and add to the calendar! >> Here's How <<
- Hey Guest - you be stylin' Change the look and feel of the forum to fit your taste. Check it out
- If you run across an inappropriate post, for example a post that breaks our rules or looks like it might be spam, you can report the post to the moderators: Learn More
- If you would like to try some different "looks" or styles for the site, scroll to the very bottom, on the left and click the Style Selector.
You are using an out of date browser. It may not display this or other websites correctly.
You should upgrade or use an alternative browser.
You should upgrade or use an alternative browser.
TR4/4A Cutting an access panel into transmission tunnel cover for solenoid adjustment
- Thread starter tdskip
- Start date


Offline
I have an alternative based on some advice here, as usual.
OK, everyone has their favorite ways and means. For me, I did not want to carve up my vintage tunnel. Don't forget, fitting that 3/16 "bit" into the adjusting arm on the passenger side also requires room. What I did was drill a small hole in the tunnel on that side so that I could move the carpet aside and slide a bit in there for the adjustment. Then, on the driver's side I took some advice from Randall (anyone done that?) and replaced the bolt on the pinch fitting on the operating shaft (solenoid side) with an Allen head screw so that I could tighten and adjust from underneath. So far, all has been great, and I adjusted lying on my back and with the tunnel left on.
OK, everyone has their favorite ways and means. For me, I did not want to carve up my vintage tunnel. Don't forget, fitting that 3/16 "bit" into the adjusting arm on the passenger side also requires room. What I did was drill a small hole in the tunnel on that side so that I could move the carpet aside and slide a bit in there for the adjustment. Then, on the driver's side I took some advice from Randall (anyone done that?) and replaced the bolt on the pinch fitting on the operating shaft (solenoid side) with an Allen head screw so that I could tighten and adjust from underneath. So far, all has been great, and I adjusted lying on my back and with the tunnel left on.
TR3driver
Great Pumpkin - R.I.P
Offline
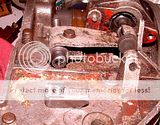
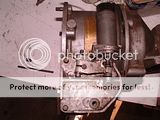
Here's a couple of photos of my setup (shown on a spare OD)
On my TR3, I found that I could maneuver a short length of 3/16" rod into the hole with needle nose pliers, so no need to cut a hole there either. The length was important, just barely short enough to fit between the lever and the cover; plus I had to be careful not to push it all the way in (so there was still enough sticking out to grab for removal).


On my TR3, I found that I could maneuver a short length of 3/16" rod into the hole with needle nose pliers, so no need to cut a hole there either. The length was important, just barely short enough to fit between the lever and the cover; plus I had to be careful not to push it all the way in (so there was still enough sticking out to grab for removal).

Offline
I sliced the cover and riveted a piece of aluminum flat stock to the main cover sealed with automotive silicon. I let the silicon dry on the exposed side of the flange to form a gasket of sorts and fit the rear piece on the flange. Seems to seal well enough. Other side shown in my photo page on the BCF

Offline
Anything you'd do differently Mark? Anyone else with pro/con ideas to that?
Thanks!
No, it seems to work fine, not exactly elegant but the carpet covers it. If you look on my photo page on the BCF you will see the photo of the other side where I used a sheet metal screw to secure the bottom near the cut.
Geo Hahn
Yoda
Offline
On the drivers side I cut a hole for serving the solenoid and another for accessing the fill plug.

On the passenger side I did one for the angle drive and adjustment (don't seem to have a photo.
The fill plug hole is covered with the usual TR rubber plug, the other two with plates formed from sheet aluminum.
On the passenger side I did one for the angle drive and adjustment (don't seem to have a photo.
The fill plug hole is covered with the usual TR rubber plug, the other two with plates formed from sheet aluminum.
alanjohnturner
Jedi Trainee
Offline
This is commonly done in the UK
Also popular is a cover that is in two half-pieces from Racetorations
https://www.tr-register.co.uk/forums/index.php?/topic/40815-gearbox-cover-mods/
[url]https://www.racetorations.co.uk/page20.html
[/URL]
Also popular is a cover that is in two half-pieces from Racetorations
https://www.tr-register.co.uk/forums/index.php?/topic/40815-gearbox-cover-mods/
[url]https://www.racetorations.co.uk/page20.html
[/URL]

