• The Roadster Factory Recovery Fund - Friends, as you may have heard, The Roadster Factory, a respected British Car Parts business in PA, suffered a total loss in a fire on Christmas Day. Read about it, discuss or ask questions >> HERE. The Triumph Register of America is sponsoring a fund raiser to help TRF get back on their feet. If you can help, vist >> their GoFundMe page.
  • Hey there Guest!
    If you enjoy BCF and find our forum a useful resource, if you appreciate not having ads pop up all over the place and you want to ensure we can stay online - Please consider supporting with an "optional" low-cost annual subscription.
    **Upgrade Now**
    (PS: Subscribers don't see this UGLY banner)
Tips
Tips

Cut/Splice Spark Plug Wires??

T

Tinster

Guest
Guest
Offline
The PO installed some form of after market
spark plug wires. They are very long and
unsightly in the engine compartment. See
attached photo.

While my TR6/250 remain dead I am trying to
clean things up and make some order from total chaos.

I purchased the TRF green spark plug wire set that
are of proper length but they did not fit into the distributor or coil holes, etc.

Is it possible to cut off the excess of the red spark
plug wires and make a neat splice in the middle? I already
tried to get the ends off to cut them shorter-no luck.

Thanks as always,

Tin
 

Attachments

  • 245860-cutwires3.jpg
    245860-cutwires3.jpg
    103.1 KB · Views: 125

jerrybny

Jedi Knight
Offline
I sure wouldn't put a splice in the middle. All your doing is asking for trouble. /ubbthreads/images/graemlins/cheers.gif
 

Brosky

Great Pumpkin
Offline
I'm curious as to why the TRF set does not fit the cap and coil? The green TRF set that I had a few years ago fit my Lucas cap and coil and all of the other makers of caps and coils make the holes the same size, at least to the best of my knowledge.

And NO, NEVER cut and splice any spark or coil wires.
 

Alan_Myers

Luke Skywalker
Offline
Hi Tin,

I agree with the others, you can't splice plug wires. However, you often can quite easily shorten them for a better fit.

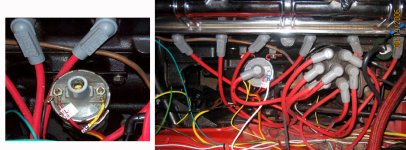
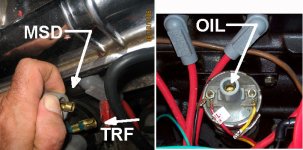
Hate to tell you this, but I suspect those red MSD wires that are on the car in the photo are far superior to the "green" ones you got from TRF, which are likely lighter gauge "standard" plug wires. If originality isn't a concern, the MSD wires might offer smoother running thanks to a stronger spark at the plugs (that might allow a slightly larger plug gap) and less voltage drop or "leakage".

The MSD wires appear to be 8mm or 8.5mm and might be a "universal" set that can be sized quite easily. I much prefer to cut my own wires to length, since the "ready-to-fit kits" are usually a little long and IMHO it's a good idea keep plug wires short, so the juice has as little distance to cover as possible. Also, some of the ready-to-fit kits come with proprietary ends that are heat molded on or otherwise made impossible to change out or resize.

If the MSD wires are like other "universal" wires, they often have crimped-on ends and it's just a matter of slipping off the rubber boot, carefully removing the crimped-on end and shortening the wire to within about 1" of the length you want (short as possible, but with a little slack so that there is no strain on the wire when the dizzy is turned to set the timing). Next remove the insulation from around the core, exposing about 1/2 to 3/4" of it and bending the core back over the wire so that it makes lots of contact with the metal of the crimped-on end, Then re-clamp that end in place. Slip the boot back on and you are done.

Some other wire ends use a sort of screw with a pointed end to pierce the wire and make the electrical contact. These are even easier to work with.

In many cases, one end of the "universal" wire is pre-installed and might not be removeable, while the other is up to the user to install, can later be removed and re-installed. If that's the case, it's usually the spark plug end that's pre-installed and permanent, while the end of the wire at the distributor is removeable.

You can even buy rolls of plug wire and various types of ends to build up your own wire sets from scratch. The only brand I know of that seems to require expensive, special tools is Magnecor (And that might have changed since I last bought a set. But the tools were expensive enough it worked out better in my case to make an exception to my usual procedures and just buy a ready-to-fit kit for my Land Rover).

Currently I'm using Mallory 8mm wires on the Triumph, but have used various other "universal" brands on this car and elsewhere, all of which offered some means of shortening and fitting. In fact, I usually buy a universal V8 set, ending up with enough for two complete sets of wires for the 4-cylinder engine. V8 sets are often more easily found and this can work out a lot cheaper per set.

I do recommend some sort of wire separators be used between the wires, to prevent the wires from touching each other where they run relatively parallel. When that happens, it's possible the voltage will jump from one wire to the other. This doesn't occur in most cases if the wires are crossing each other at a 90 degree angle, approx., even though they are touching. But I still try to avoid wire-to-wire contact(or wire-to-grounding metal anywhere on the engine, for that matter) whenever possible. Modern upgraded 8mm, 8.5mm and 9mmm wires in particular are better insulated than older types. But still capable of leaking voltage from one to the other, which can cause a nasty miss in the engine. This is especially true with modern, really high energy ignition systems (TR6's stock system is much lower voltage). If you want to see a simple type of separator being used, please feel free to follow the link below to some photos of the dizzy and wire installation on my TR4 (In the "Carbs, Engine & More" area).

From your photos, I can't tell what kind of coil or dizzy cap you've got, but those might have been upgraded, too, since the plug wires apparently were. (In fact, the entire dizzy might have been replaced, although I know that's not so easily done on TR 6-cyl. motor... The only replacement I know of is a Mallory dizzy that doesn't have the tach drive, in which case the tach needs to be converted to electronic either by replacing it or by changing out its innards to keep the original appearance.)

Oh, and when you install the wires, suggest you remove one at a time, do any shortening you wish and replace it, to keep from mixing up the firing order (personal experience here... and more than once!). If you bought the car non-running, it would be a good idea to double check that the existing wires are installed in the correct firing order (per the manual), before starting and re-sizing work.

I also think it's a good idea to use a little dielectric grease on all ends when fitting to help keep moisture out, prevent corrosion and make the rubber boot easier to remove when the time comes. This special grease for this is available in small squeeze packets in most auto parts stores, or in larger tubes there or at some hardware stores.

Hey, if you decide to go with the TRF wires and really don't want those MSD wires, send em to me! They look almost new!

/ubbthreads/images/graemlins/cheers.gif
 
OP
T

Tinster

Guest
Guest
Offline
Fabulous Alan! Cannot thank you enough.
Here is a photo of the wires side by side.
I was able to get the TRF wires into the holes
by crimping them a bit with channel locks.

Yes, the new wires are 8.5mm MSD, the coil is
stock Lucas(hole on top filled with oil?)
the distributor is brand-X electronic ignition.

I tried to get the dist. end off one of the MSD wires.
Could not accomplish this. Tomorrow, I will slice on
apart to see how it works.

Yes, the "almost 100% restored" TR6/250 had a running
engine when we purchased it in Early Jan 06.
The radiator blew up the very next day and we got 67 miles
of driving beofore it died. 8 months and $8,000+ parts
and labor later, it is still dead but there is hope.
 

Attachments

  • 245934-trfwires.jpg
    245934-trfwires.jpg
    69.7 KB · Views: 100

Keoke

Great Pumpkin
Country flag
Offline
HI Tinster, your wires seem to be of the molded on type ends and can not be removed.However, you can cut the spark plug ends off and replace them with more conventional type ends to shorten the lines. Splicing wire in the ingnition secondary circuit is guranteed to leave you on the side of the road.---Keoke
 

RomanH

Jedi Knight
Offline
Hi Tinster,
You may be able to move/remove the wire boots at the distributor ends. Carefuly insert a small regular screw driver between the wire and the boot and work it in a bit. Once you have it started spray some silicon lube or WD40 in the joimt and work it in. Once the rubber to rubber bond is broken the boot should slide along the wire relatively easily.
 
OP
T

Tinster

Guest
Guest
Offline
Alan, et al - Good on ya mates!! Thanks !!

It's a given I know almost zip about auto mechanics.
But as a forensic architect I tell my clients if something
looks bad to them, think how bad it looks thru my eyes?

My wiring looks bad to me so to you experts it must look
like REALLY terrible.

So first light this morning, I started to follow everyone's
directions. Six hours later I've gotten three wires cut,
properly mounted on the terminals and in the car. I even
managed to get the TRF wires to fit.

So a big thanks and a two photos of progress.
 

Attachments

  • 246062-halfway1.jpg
    246062-halfway1.jpg
    72.8 KB · Views: 98

Brosky

Great Pumpkin
Offline
We're going to vote you in as the official "Go-To Guy" in Puerto Rico for all things Triumph. By the time you're done with this car, you'll be able to add a "/BCF Certified Master Mechanic" tag to your forensic architect title.
 

bobh

Jedi Warrior
Country flag
Offline
Tinster,
In one brief paragraph you captured the lure of British car ownership.

"Yes, the "almost 100% restored" TR6/250 had a running
engine when we purchased it in Early Jan 06.
The radiator blew up the very next day and we got 67 miles
of driving beofore it died. 8 months and $8,000+ parts
and labor later, it is still dead but there is hope."
 
OP
T

Tinster

Guest
Guest
Offline
BLUUUUFFFF!!!

My pal Mike Masters took a look at my spark plug wire
shortening project. Guru Mike thinks my set up might
catch the car on fire ......if it ever starts again!

back to the drawing board, as they say.
 

Geo Hahn

Yoda
Country flag
Offline
Are you serious? I see nothing wrong with the spark plug wires as you now have them... in fact they look real good.

I always make mine as short as practical (just like the pic in the owners manual) as that is not only much neater but also on a 4-cylinder TR it creates a set-up wherein the wires can only be hooked up one way (the correct firing order) so I don't do something stupid some dark rainy night along the road.
 

jsneddon

Jedi Knight
Country flag
Offline
[ QUOTE ]

I always make mine as short as practical (just like the pic in the owners manual) as that is not only much neater but also on a 4-cylinder TR it creates a set-up wherein the wires can only be hooked up one way (the correct firing order) so I don't do something stupid some dark rainy night along the road.

[/ QUOTE ]

(or something stupid on a perfectly sunny day in my driveway like I did...) /ubbthreads/images/graemlins/smile.gif
 
Similar threads
Thread starter Title Forum Replies Date
S TR2/3/3A Anyone cut out the spare tire compartment on a tr3? Triumph 4
G Inertia Cut-Off Switch - E-Fuel Pump to Ignition [Key] Switch Austin Healey 3
Rut Cut down windshield Spridgets 22
BN6 BJ8 Outrigger Cut Out For Exhaust Austin Healey 3
G General Tech Have new blank key for TR3 but cannot get it "cut" to fit ignition. Triumph 14
KVH TR4/4A Should I Cut the Lower Windshield Gasket Triumph 2
D You Tube made me do it. I bought a Milwaukee dry cut saw. Restoration & Tools 6
69MGC MGC Cut out the Rust! MG 9
D cut-off switch Austin Healey 20
W TR2/3/3A Why a PO cut these holes in rear floor? Also, question re dealing with captive nuts Triumph 6
K TR2/3/3A A cut down side curtain for Fall driving? Triumph 7
CJD TR2/3/3A Cut away TR3 Triumph 6
Boink Moss Healey Cut-out... I'll ask... Austin Healey 2
Boink Cut-away B series engine... MG 6
TLW1958 TR6 1972 TR6 No ignition cut off Triumph 2
BobMunch MGB The MGB Cut-away, Heritage Motor Centre Museum MG 11
J Windshield question pt.2: Why not cut the frame? Spridgets 9
Boink Battery cut-off switch options... or??? Spridgets 10
K TR2/3/3A TR3 Cut Off Side Curtain. Triumph 18
D battery cut off switch Austin Healey 29
T TR4/4A TR4a positive earth to negative cut over? Triumph 9
Tinkerman Battery cut-off switch installation Triumph 22
AUSMHLY fuel cut off Austin Healey 23
vping T-Series Adding a battery cut off switch. MG 16
G To cut or not to cut Austin Healey 3
V Intermittent engine cut out 1989 v12 xjs Jaguar 9
Ouagabambou Cut, torn steering inner tube [+ photograph] Austin Healey 22
T TR6 What year TR6 cut over to Type-J O/D? Triumph 3
roofman Looks like Dale made the cut! Triumph 13
B T-Series cut off switch in MGB? MG 7
T What year cut-over to the 1500? Spridgets 13
jmwuva05 Fuel pump cut off switch Spridgets 6
R Cut off switch wire Austin Healey 2
jlaird First cut on trophies for Lake of the Ozarks Spridgets 32
beaulieu fixing a cut in half Temperature capillary gauge Restoration & Tools 13
G Cut body in half? Triumph 20
J TR6 Inertia cut out [off] switch TR6 Triumph 9
TR6oldtimer Fuzzy door seals to cut or not, buy new or keep Triumph 12
T What do you guys use to cut floor pan sheet metal? Triumph 7
T Wedge Cut wire on TR8 Ballast Resister Triumph 2
tahoe healey fuel pump cut off switch post Austin Healey 21
S Battary cut off switch Austin Healey 1
R6MGS T-Series Late MGB fuel cut off switch MG 5
A dash light cut off switch Austin Healey 9
jlaird Bat, cut off switch Spridgets 7
S TR2/3/3A TR3 Turn Signal Auto Cut-Off Triumph 5
John Loftus BJ7-BJ8 windshield seal cut Austin Healey 6
G Fuel cut-off valve MG 5
A Battery cut off switch Austin Healey 15
trglory TR2/3/3A TR3a spark plugs Triumph 1

Similar threads

Top