• Hey Guest!
    British Car Forum has been supporting enthusiasts for over 25 years by providing a great place to share our love for British cars. You can support our efforts by upgrading your membership for less than the dues of most car clubs. There are some perks with a member upgrade!

    **Upgrade Now**
    (PS: Upgraded members don't see this banner, nor will you see the Google ads that appear on the site.)
Tips
Tips

Crypty's floor progress

T

Tinster

Guest
Guest
Offline
After 15 months dead, Crypty is gonna be
a daily driver not a show car.

I pondered everyone's advice and decided the
total floor pan replacement was a non-starter
here in Puerto Rico. Our drivers here are terrible
and our body shops have almost as many fender bender
wrecks as the shops in Boston where the drivers
are just plain nuts and play bumper cars every afternoon.

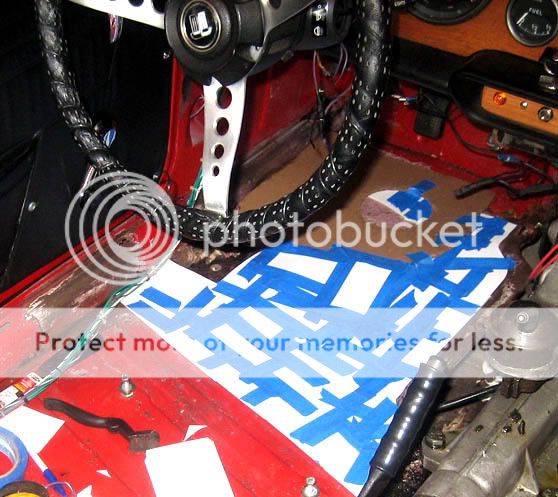
About 1 1/4 square feet need to be cut out and replaced.
It would cost me several $$ thousand to replace the entire
floor pan plus at least two months in the shop, if I could
find a shop willing to do it.

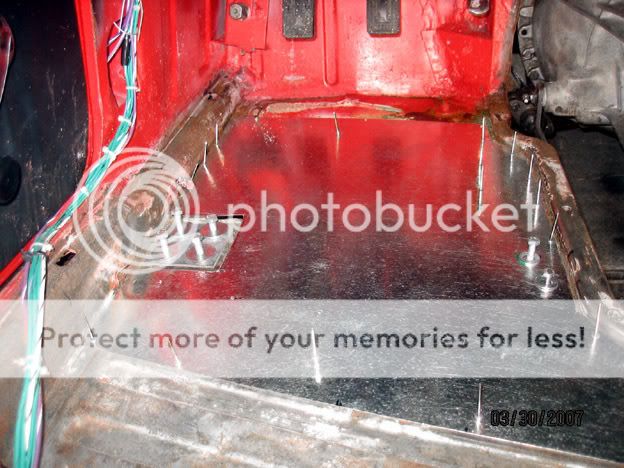
So I stripped the paint, burned the rust twice, power wire
brushed everything and then started chopping out bad floor
pan with my Sears router and RotoZip blades. The rocker
panels are excellent.

Here is work accomplished to date. I am leaving as much
sound steel as possible even if it looks really ugly. I am
keeping structurally sound exist floor pan wherever I can.
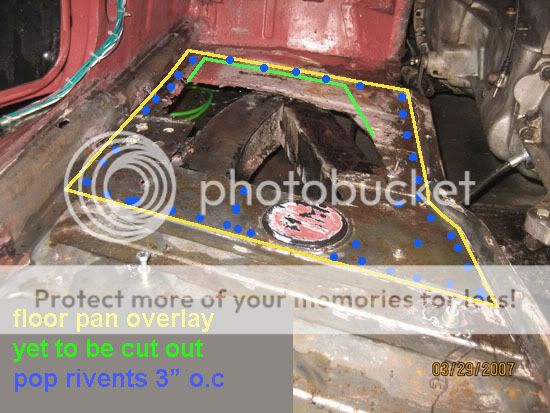
Extreme strength acrylic polymer auto adhesive with steel
pop rivets is my concept. An overlayment with 18 Ga steel.
Then coat everything top and bottom with Eastwood rust
products.

floorconcept.jpg
 
Not elegant, but once in place, painted and covered with that fine wool carpet, who will know. Be sure to place down sufficient layers of rubber stripping on top of the frame to support the bottom of the replacement pan. This will minimize its tendency to oil can and reduce rattles. And, insure you fill all cavities to prevent moisture collection.

When all done, rest easy knowing the rest of the car will go before your repair panel does.
 
Thanks Ray,

I have enough rubber stripping for the entire car frame.
I routinely design and work with metal sheet stock.
I believe the 18 GA will have enough existing support
that oil canning will not be a problem. Plus all
the pop rivets will stabilize it.

The acrylic adhesive will be a 100% paste coating
with no voids.

regards,

d
 
Sounds like a solid plan Dale. The nice thing is that floor pans are not structural on a TR like in an MG.
I approve your method.(not that my opinion matters) While not "proper" in the strict sense, it should be a very acceptable and solid repair.
 
OI!!! I "glued" the pans in this B and pop-riveted every six inches to locate/stabilise as the adhesive cured.

I flew in UH-1's. I ~saw~ how those things were constructed... I feel perfectly at ease in the B at speed. /bcforum/images/%%GRAEMLIN_URL%%/jester.gif
 
Judging from the picture above and the plans stated with it, I guess that we could say that Dale really is "the Tinster".

Dale has always had this mechanic/body man alter ego hiding inside. All it took was some island voo-doo and here he is, replacing clutches and sheet metal.

"And Oz never did give nothing to the Tin-Man.... that he didn't already have".
 
Dale, to have a plan and the knowledge must feel good after all the talk thru's you have had to put up with, and done an excellent job, I might add.

GO GET IT!!!

Wayne
 
I used school kid index cards, masking tape
and cardboard to jigsaw an accurate pattern
shape for the floor panel.

I decided I will cut the floor pan from 14 Ga,
galvanized steel. A little stiffer and it bonds
well with the acrylic adhesive.

d /bcforum/images/%%GRAEMLIN_URL%%/computer.gif

indexcards.jpg
 
<div class="ubbcode-block"><div class="ubbcode-header">Quote:]I decided I will cut the floor pan from 14 Ga,
galvanized steel. [/QUOTE]

Don't use galvanized sheet metal!

Most paints and coatings will not stick to galvanized surfaces. Even Eastwood's Ask an Expert Forum recommends chemically removing the galvanization prior to application of their products. A lot of unnecessary work.

Go carefully here, we don't want to see another TrBill floor cover snafu.
 
Ray,

Right you are!! Paints sometimes will slide off galvy
unless the surface is prepared. Real easy to prepare.

Get a bottle of naval jelly at Ace hardware, paint the
galvy surface, let stand for ten minutes and wash it off
with soap and water. Dry it with a towel immediately and
wipe it clean with any paint solvent/cleaner. Prime it and
paint as normal.

I got the floor pattern cut out this afternoon from the
14 Ga galvanized; dry fit it with drilled thru pop rivet
holes. It makes a world of difference- much stiffer than
the stock floor pan.

I know the Triumph purists might be having cows over my
floor fix concept but I really want to experience driving
this Beast. I already have tons of experience seeing the
car on jack stands, crawling undeneath, fixing this and
that DPO Pedro mess up, etc. I am an in the dirt, outside
the box, construction architect. It might be ugly but it's
structurally sound and better than before.

regards-- I'll be driving in a week!!!
And it cost me under $200 total.

Not $Thousands and months in a shop.

d /bcforum/images/%%GRAEMLIN_URL%%/driving.gif /bcforum/images/%%GRAEMLIN_URL%%/banana.gif /bcforum/images/%%GRAEMLIN_URL%%/banana.gif

dryfitfloorpan.jpg
 
Go for it Dale, let the 1% out there with showroom perfect cars have thier say. The other 99% of us have a few creative things going on in our cars too.
 
Looks pretty darned good to me. You know my motto, safety and drivability first, purity last for my car.
 
No Cows here, go for it Dale. Good winter project, shouldn't drive it on the snow and ice anyway! Don't worry about the originality bit, if it was a TR 3 or 4 yes, but a 6, what the heck. Seriously, get it as right as it needs to be so its reliable and go wear out the tires. These are great little cars! Drive it! I drive mine a few thousand miles every summer, over an 11,000' mountain pass, Yellowstone park, Vancouver Island, evening drives to dinner and drinks at country pubs and just cruising on any warm afternoon and evening.
 
TRMark said:
No Cows here, go for it Dale. Good winter project, shouldn't drive it on the snow and ice anyway! Don't worry about the originality bit, if it was a TR 3 or 4 yes, but a 6, what the heck. Seriously, get it as right as it needs to be so its reliable and go wear out the tires. These are great little cars! Drive it! I drive mine a few thousand miles every summer, over an 11,000' mountain pass, Yellowstone park, Vancouver Island, evening drives to dinner and drinks at country pubs and just cruising on any warm afternoon and evening.

I like your spirit, Mark; I like your spirit.

2wrench
 
Tinster: Reading your thread brings to mind some
repair creativity I heard (and tried a little) which
involves POR 15 silver paint. This stuff actually has
metal in the paint. Works pretty good to use as a
catalyst for fiberglass. You lay on a thin sheet of
fiberglass and paint the stuff. End result can be
pretty smooth and rather strong. Interesting stuff to
work with.
 
Roman,

It was a toss up for me as to which adhesive to use.
There are so many variables and so many good products.

Compressive strength is not real important in floor pans
but peel strength, flex and shear strength are critical.
And so is "pot life" --the amount of time you have before
the adhesive in no longer workable.

I am going with an acrylic with a 20 minute pot life.
I might not get all the pop rivets complted in 20 minutes
but I'll get the four corners and four middles. The pop
rivets are mainly for peace of mind and to compress the two
pieces of sheet metal into the adhesive.

Here is a list of 3M brand adhesives for reference: /bcforum/images/%%GRAEMLIN_URL%%/computer.gif

Epoxy Adhesives

Offer high strength and resistance to chemical and environmental damage.
DP-100— Low viscosity for easy pouring. Meets UL 94HB.
DP-100FR— The flame-retardant version of DP-100. Meets UL 94V0 burn test requirements.
DP-100 Plus— Exhibits much higher shear strength and resistance to peeling than DP-100, and is slightly more flexible. Meets UL 94HB.
DP-100NS— Nonsagging version of DP-100 for vertical surfaces.
DP-105— Very flexible. Ideal for bonding dissimilar surfaces that expand and contract differently.
DP-110— Flexible with good shock and impact resistance.
DP-125— Very high resistance to peeling.
DP-190— Better impact and shock resistance than other epoxies. Bonds rubber and masonry products.
DP-270— Electrical-grade for encasing items in adhesive (potting) and for bonding electrical components. Noncorrosive to copper. It offers heat resistance and retains electrical insulation properties under high humidity. Meets UL 94HB.
DP-420— Excellent durability and shear strength plus resists peeling.
DP-460— Similar to DP-420, but with longer handling strength.
DP-460NS— Nonsagging formula for use on vertical surfaces.

Acrylic Adhesives

Have excellent shear and peel strength, good impact resistance, and resist environmental damage.
DP-805— Excellent adhesion to unprepared or oily surfaces. Bonds metal and plastic. Offers excellent weather resistance.
DP-810— Very high shear strength and resistance to peeling. Excellent for oily steel, aluminum, plastic, glass, and painted surfaces.
DP-810NS— Nonsagging formula for use on vertical surfaces.
DP-820— Similar to DP-805 with longer hardening time.

Urethane Adhesives

More flexible than epoxies and acrylics. Priming is highly recommended when bonding metal surfaces.
DP-605NS— Nonsagging adhesive offers tough flexible bonds with excellent adhesion to wood, plastic, and primed metal.
DP-640— Nonsagging with resistance to peeling. Provides impact-resistant bonds to wood, plastic, and primed metal.
 
Dale, as others have said. Once there is carpet covering it no one will know. As long as its safe and sound, get 'r done and get behind the wheel. I think you'll find the majority of Triumph owners are more concerned with driving them than looking at them. Even those of us with 'pretty' cars. /bcforum/images/%%GRAEMLIN_URL%%/wink.gif
 
Back
Top