• Hey Guest!
    British Car Forum has been supporting enthusiasts for over 25 years by providing a great place to share our love for British cars. You can support our efforts by upgrading your membership for less than the dues of most car clubs. There are some perks with a member upgrade!

    **Upgrade Now**
    (PS: Upgraded members don't see this banner, nor will you see the Google ads that appear on the site.)
Tips
Tips

Crypt Car diagnostics-step 3

T

Tinster

Guest
Guest
Offline
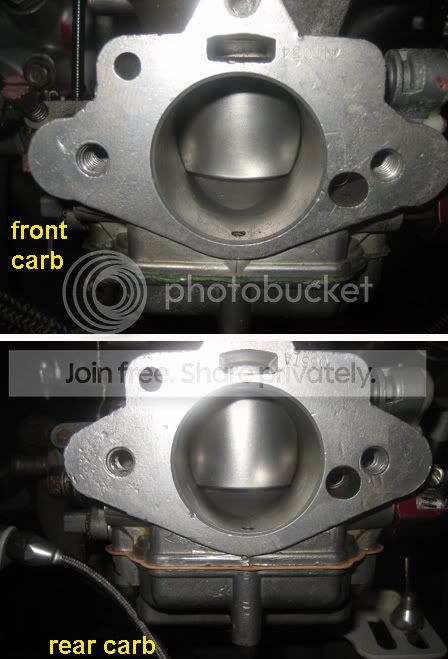
I've got the carb linkage mostly sorted out.
Pulled and cleaned all 6 spark plugs
Checked the dizzy rotor and dizzy ground wire.
Checked and cleaned the points.
Installed new fuel filter
Routed gasoline thru my backup elec pump.
Put everything back together................


The engine spins and spins but no starting.

I pulled a plug and got no spark when I cranked
the engine. The pulled plug was wet with gasoline.
Choke cables not yet hooked up.

Could this indicate another burned up coil?
The points have over 1200 miles on them.
The condenser is new with 75 miles on it.

any suggestions?

thanks,

dale
 
Dale

Try another rotor yours could be cracked I have had this happen to me about 4 times. Also check how your points are put on. On my TR3 you can put points on with the plastic washer in the wrong place and ground out the points.

Don
 
Dale,
You are getting all sorts of advice from various people who all have different thoughts about what may be up with Cryptie. You really need to eliminate one thing at a time, and be sure that the fuel system is OK before moving on to the electrical side of things.
I think you may now have two problems!!!
My previous request for a picture looking into the carbs was because one of my various theories was that one of the throttle valves may be out of alignment causing the linkage to twist.
Another of my theories is that your main HT lead or the LT lead may have corrosion between the wire and the connector.
Both of these theories may be completely wrong. I think the theories already mentioned of cracked rotor or burnt out coil are more likely.
As someone has already suggested you do have the LT and condenser lead on the under side of the plastic washer holding on the points?
The real problem with faults like this is that it is very easy to create new faults while looking for the cause of the first one.
Good luck.
Nick
 
Tinster said:
...

Could this indicate another burned up coil?

any suggestions?

thanks,

dale

It might. I would suggest you take a couple of ohm meter readings. Disconnect the small wire on the coil going to the points, and the fat center coil wire going to the distributor cap. Take a reading between the two small terminals, and another reading between the fat center terminal and the small terminal that still has the the ignition wire attached (opposite of the one you took off). Let us know what the readings are.
 
I'll ditto the suggestions to apply some old-fashioned trouble-shooting.

Not that it's common, but I have seen a rotor that looked new and perfect in every way; that simply conducted the spark to ground through the center post instead of letting it go to the side tower. Even knowing the rotor had to be the problem, I could not see anything wrong with it. My point is that, just because it's new and looks good, doesn't mean it is good.

In that case, we could show spark from the coil center terminal (using a pair of screwdrivers to form a spark gap against the rocker cover), but got nothing at the plugs. Might be worth a try.

If no spark at the coil terminal, my next check would be that there is no voltage across the coil side terminals with the points open; and 12v with the points closed.
 
martx-5 said:
[
It might. I would suggest you take a couple of ohm meter readings. Disconnect the small wire on the coil going to the points, and the fat center coil wire going to the distributor cap. Take a reading between the two small terminals, and another reading between the fat center terminal and the small terminal that still has the the ignition wire attached (opposite of the one you took off). Let us know what the readings are.

<span style="color: #990000">3.2 ohms between small terminals
9.3 ohms between center of coil and ignition wire.

12.6 volts in battery
12.6 volts at ignition wire on coil.
Engine cranks rapidly but no indication of spark

I'll try another new rotor tomorrow.

Most of today the back side of that new hurricane
was beating us up. Look out gulf coast.

Nick- photo you requested.

thanks all,

dale</span>

twincarbs.jpg
 
Tinster said:
<span style="color: #990000">
9.3 ohms between center of coil and ignition wire.

dale</span>

Are you sure about that reading?? Check again. It probably was 9.3<span style="font-weight: bold">k</span> (as in kilo) Ohms. If it is, the coil should be OK.
 
I would like to offer one comment. While it's OK to look at the carb for float valve operation and settings, you should not (in general) start messing with carb tuning steps. Those need to be saved until after you have sorted all the electrical system.

I put together a PDF on troubleshooting points. I wrote this for the A-series engines but it applies to points ignitions in general. You may want to download a copy, read through it, then see if you can figure out where you are loosing energy for the spark.
https://home.mindspring.com/~purlawson/files/LucasPointsIgnitions.pdf

I would also like to second (or third) the suggestions that you look at the rotor itself as part of your troubleshooting. There have been reports on numerous other forums of terrible quality control on the rotors, some have been DOA out of the box while others fail in a few hundred miles. In extreme cases you can use your meter to find these... but not always. If you touch the end of the rotor arm with a meter probe and touch the other end of the meter to ground, the resistance should be infinite (open). Sometimes however there are cracks in the rotor that won't show as conductive until there is high-voltage. If you have a spare rotor be sure to try it.
 
Okay cuz, before you start throwing parts at it... It COULD be the coil, it could be any number of things.

Some basic ignition diagnosis is needed. 12 volt kettering style ignition worked quite well on many hundreds of thousand of cars(maybe even millions) for several decades.

Time to read up and learn about ignition systems and diagnosis.

Can you get your hands on any of the old Motor repair manuals? They used to offer a very good tuneup diagnosis subchapter in them. Perhaps a swap meet, or another member can find one for you and send it to you.

You are on the right track in using your voltmeter to trace the ignition, so you are learning.

Basically the system voltage(in this case around 12 volts) is supplied from the ignition switch to the primary side of the coil. From there it travels through the primary windings out the other small terminal of the coil to the outside terminal on the side of the distributor. There it travels through the plastic bushing, along the primary pigtail to the connector on the point set. When the points open the primary field(that has been building with the voltage supplied to it) is energized by the secondary winding(okay terminology, electrically may be a bit wanting but the idea is the same) and the "spark" comes out of the center terminal of the coil, where it travels through the coil wire, into the distributor cap, down the carbon brush to the rotor, along the rotor top, jumps the small air gap, then to the cylinder post inside the cap, and through the wire to the spark plug.

So primary ignition system troubleshooting is fairly easy.
1; 12 volts to primary side of coil, 12 volts to other side of coil(when the points are open, so either remove the wire from the coil when checking, or turn the engine over to where the points are open. 2; trace the 12 volts to the connector on the points. If you do not get 12 volts there find where it is jumping to ground and correct the wire feed. You should be able to take your voltmeter, hook it up to the distributor side of the coil and while cranking it, see 12 volts and zero volts, then 12 volts again. Once you get that worked out. Then 2ndary ignition. When cranking take the coil wire from the distributor cap and hold the tip 1/2 inch away from the cyl head, WHILE YOU ARE HOLDING IT WITH GOOD INSSULATING PLIERS. You should get strong blue white spark...

hth
 
Dale, I'm with Ron.
Next step for what you've done so far; disconnect the wire that goes from the coil to the points, at the coil. With a test light connect the clip on the end of the wire of the test light to the positive terminal of the coil, then stick the probe on the end of the wire you disconnected. Now, while cranking the test light should flash, indicating that the points are opening and closing correctly, and all is well in the dizzy.
If no flash. start inspecting the points/ condenser to see what's going on.
 
<div class="ubbcode-block"><div class="ubbcode-header">Quote:]Next step for what you've done so far; disconnect the wire that goes from the coil to the points, at the coil. With a test light connect the clip on the end of the wire of the test light to the positive terminal of the coil, then stick the probe on the end of the wire you disconnected.[/QUOTE]

Banjo,

Wouldn't that be the "negative" side of the coil? By doing that the test light then acts as a jumper and flashes with the pulsing of the points?
 
Banjo a good quick check, but I have to agree with Brosky, you jump it to the positive side terminal and it would be hot all the time.....
 
Hi Dale,

I hate to say this but; "Check out the Coil"!!!!

Its an In-Expensive fix.

Check to see if your current Coil is putting out the voltage.

To me, (Not a Mechanic by any means), seems to be the exact same problem I had with my `57 XK 140.

"Try It; You may just like it"!!

Russ

PS: I also agree with changing the rotor. Another simple, easy, In-Expensive troubleshoot.
 
Brosky said:
<div class="ubbcode-block"><div class="ubbcode-header">Quote:]Next step for what you've done so far; disconnect the wire that goes from the coil to the points, at the coil. With a test light connect the clip on the end of the wire of the test light to the positive terminal of the coil, then stick the probe on the end of the wire you disconnected.

Banjo,

Wouldn't that be the "negative" side of the coil? By doing that the teat light then acts as a jumper and flashes with the pulsing of the points? [/QUOTE]


<span style="color: #660000">OK, now I am totally confused. I have 2 wires that connect the
coil to the distributor. A fat one in the middle and a skinny one that runs
from the coil to a spade on the distributor. I have a 3rd heavy wire on the coil
that runs to my ignition (I think)

Once again, how do I connect my test light? I am unclear.
thanks,

<span style="color: #000099">Edit: I pulled the fat, center wire out of the coil.
I stuck a screwdiver in the hole and touched another screwdriver
to the first and pushed the assembly close to the valve cover.

The Mrs cranked the engine several times with no sparks anywhere.
I'll install a spare coil and see what develops. </span>

dale</span>
 
Definitely sounds like fuel or spark. When a car cuts out while driving, or won't start after a stop, it's usually one of those two--maybe it has to be.


Last week I used the easy dummy test for my coil. I pulled the plug off spark plug one, stuck a screw driver in the plug about 1/4 inch from the connector, and asked my wife to turn the ignition key so I could detect a spark. When there was no spark, I suspected I needed a new coil because all my wire and other connections were solid. That was the problem.

Of course, I had also checked the fuel line to the carbs which spurted gas the moment I took the hose off.

Sounds like: coil, bad lead wire, rotor or totally burnt or shorted wires inside the distributor (check the wires at the points to be sure they don't touch the points post, and that your insulators are correctly installed). Also check that you have positive current to the coil from the ignition key, and a good connection there. Maybe all said above.
 
Dale,
You can track this problem down. I carry a spare plug wire lead and have found 2 bad rotors this way (on the road). Simply put a spare spark plug in the lead end, and plug the other end into the coil (the fat wire in the center). The coil wire you pulled out usually goes to the distributer, and the rotor inside the cap makes the connection to each cylinders' plug wire in the proper sequence while rotating.

But, if you have a single plug attached to the coil, it will spark each time any cylinder is supposed to, because of the points opening/closing and the effect of the coil. The plug can be laying on the valve cover, or you can ground it somehow (like with a test lead). -Do not hold onto the plug or you'll know what a few thousand volts feels like. If you see the plug sparking when the engine turns over, your coil is OK and so is the wiring to the points/coil. Track the problem before you start replacing stuff.

Jer
 
Or you could read the PDF I posted the link to earlier which takes you step by step through most of what's been suggested.
 
Okay, Cuz, quit being confused. Primary ignition terminals are the two small terminals on the outside of the coil. The secondary is the one in the center where the coil wire that goes to the distributor cap goes.

Now positive or negative. Doesn't really matter with the points type ignition for the small number of miles you drive. We will call the primary side from the ignition switch the positive side. You should have battery voltage there anytime the switch is on, and especially with the engine cranking.

The other primary terminal we will call the negative terminal, that is the one that supplies voltage to the points(and condensor, a capacitor really, which acts like a sponge to absorb "excess" electricity to keep the points from burning) That is the one if you install the test light or volt meter to should see varying voltage, or the test light flashing when cranking. Check that... then we can get into proper coil polarity(which can be checked using a pencil, or a voltmeter) after you get 'er up and running again.

I mentioned Motor's earlier, Just looked through my storage shelf and found a good textbook that you might consider acquiring. Goodheart-Willcox automotive Encyclopedia, mine is an old issue 1983 but it is a good primer and text book.
 
Back
Top