• Hey Guest!
    British Car Forum has been supporting enthusiasts for over 25 years by providing a great place to share our love for British cars. You can support our efforts by upgrading your membership for less than the dues of most car clubs. There are some perks with a member upgrade!

    **Upgrade Now**
    (PS: Upgraded members don't see this banner, nor will you see the Google ads that appear on the site.)
Tips
Tips

TR4/4A Core Plug - Cam Rear change

TriumphTR4_DK

Freshman Member
Offline
Hi,
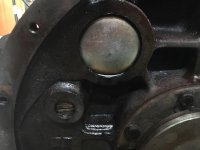
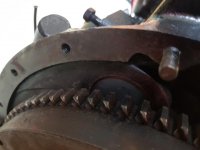
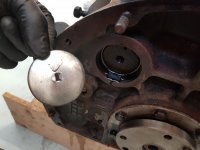
My Core Plug placed on block behind the flywheel is leaking oil. Having search the internet it seems such plugs are normally fitted from the front, whereas it seems mine , as per photo, has been fitted from inside engine - or am I wrong.
Others I've seen have a shape that is vaulted inward, just like a freeze plug, mine has the opposite shape
Suppose it can be removed with a screwdriver and hammer
Any suggestions and experience?
 

Attachments

  • CorePlug.jpg
    CorePlug.jpg
    42.1 KB · Views: 212
I remember the originals were flat convex like yours and after inserting it, you tap the convex part squarely to reverse the convex and seal around the edges. I also use epoxy around the edges when I changed mine to insure seal wouldn't leak. You can use a standard freeze plug too with sealer. And yes to remove yours, you can pop it out as stated.

Before destroying yours, try popping the center in with a blunt hardwood dowel or such, then clean and JB Weld or other epoxy to seal the edges. It looks like they forgot that step when your was installed.
 
P6230003.jpgI agree with what Peter said. Here is a shot of mine, though I also painted over it, you can see the JB weld.
 
I don't have experience with this, but hitting that convex surface doesn't look like a promising exercise to me. I'd be concerned about damaging the block or plug sealing surface. Curious what you do.
 
I wasn’t going to look at this thread since I’m a TR2 guy...but I agree with the other responses. Someone installed a wrong type plug in your block. The good news is they are very cheap!

You have an American style freeze plug. The British version is only slightly curved. You use a sealant and then install the plug convex outward, so it seats on an internal ridge in the block. Finally you tap the center to push the concave inward, which allows it to bite into the block.

To remove that one just hammer a sharp screwdriver through it and pry it out.
 
Last edited:
Yes, they are installed from the outside.

My standard trick for removing those plugs is to drill a small hole in them, put in a self-tapping screw, and pry it out with a vise-grip pliers or anything else that can attach. That plug has not been peened inward, as it should have been, which may be why it is now leaking. For that same reason, it should be easy to remove.

There is nothing fragile behind the plug, so there is little chance of damaging anything when the drill bit breaks through the plug.

When you install it, be sure to use some sealer and peen it inward. The standard approach is to use two ball-peen hammers. Put the flat side of one hammer on the plug, and collapse it by tapping the round end with another hammer. Many people just dimple the center inward, but that's often not enough. You can get it to the point where it is mostly flat, and it will be in there quite firmly.
 
I’m with John- that looks like a freeze plug instead of the normal installed plug. I don’t think you can seal in place.
 
Hi, thanks for all your suggestions.
Turned out to be a quite easy fix. Drilled half way through the plug used a screw driver and hammer for making a hole and with a screw driver able to remove the plug from the block.
New plug sealed and used a hammer in the middle and thereafter hamme all the way round
It sits firmly now
 

Attachments

  • 20180225_141839.jpg
    20180225_141839.jpg
    34.7 KB · Views: 170
  • 20180225_135348.jpg
    20180225_135348.jpg
    46.1 KB · Views: 182
Back
Top