• Hey Guest!
    British Car Forum has been supporting enthusiasts for over 25 years by providing a great place to share our love for British cars. You can support our efforts by upgrading your membership for less than the dues of most car clubs. There are some perks with a member upgrade!

    **Upgrade Now**
    (PS: Upgraded members don't see this banner, nor will you see the Google ads that appear on the site.)
Tips
Tips

cooling

fogdot

Jedi Hopeful
Offline
My 60 TR3a will heat up in stop and go traffic. I have a 160 thermostat, and it will cook up to about 200 under the worst conditions. The radiator shroud is missing.
If I were to replace it, how difficult is it to remove the nose skin? Will it be obvious what needs to come off, or will I miss something important? I am in Florida, and the weather hasn't started to get hot yet.
 
No need to take off the entire front apron unless the radiator itself has issues.

The radiator duct work is a folded fiberboard screwed to the sheet metal behind the front grille. It fits easily through the front grille opening once the grille is removed. Take out the front bumper over rider support bars and screws for the grille, remove same, and re-install all. You should also know that some people never seem to have any overheating issues while others like myself do. If my car sits in traffic for more than twenty minutes the temperature starts to rise. I installed an electric fan with a auto temperature sending switch which turns it on and off automatically. I also installed a manual over-ride toggle switch mounted on the dash to turn on the electric fan as well just in case the auto switch fails.
 
I had chronic overheating problems when I had my XK-140, & did a lot of research into cooling.

I found that the most effective (& really essential) item to go with a radiator & fan is a *fan shroud*, which increases the efficiency of the radiator/fan system enormously.

Not surprisingly, all modern cars now have fan shrouds. If you'll look behind the radiator of a modern car, you'll see that there is a structure running from all sides of the radiator funneling to & around the fan but no further, with just enough opening for the fan to enter it. It is in some cars actually a part of the electric fan assembly.

I mocked one up from flattened cardboard boxes, then traced the pieces to sheet aluminum (actually about 3 cookie sheets, when cookie sheets were just aluminum), pop-riveted them together nicely & easily with a $20 pop-rivet gun, & installed it. The cooling problems vanished. That car then ran always ran cool.

I recommend the radiator shroud too, but a fan shroud will make more of a difference & may solve the problem alone. Paint it black, & it will look factory. It is a very simple truncated pyramid with a round hole lopping off the point, all flat sides & bends you can make over a board, easy to construct.
 
This is an interesting point. Makes me want to try it too.

I've always been impressed by how efficient forced-air cooling can be, as long as you force the air though the right places. Much electronic equipment is cooled this way, quite effectively, and even high power vacuum tubes in places like broadcast transmitters, which dissipate tens of thousands of watts. Do it right, and it works.
 
Placing the shroud on the engine & fan side right?!?
The front mount will help BUT the fan will always draw from the path of least resistance or the most direct
 
Tomster -
Fan shrouds usually go in front of the radiator to force incoming air through the radiator for cooling. Otherwise air entering through the grille would escape around the radiator (i.e. follow the path of least resistance) instead of going through the radiator cooling fins and tubes.
 
dual shrouds will work better, as do most of the newer vehicle shrouds.
Tried front only w/ a stock fan.... loved to pull air (when standing) from anywere but thru the rad. Yes, new rad was used
 
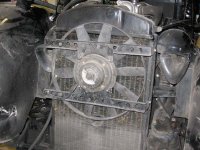
It goes behind the radiator (attached to the radiator) extending to the fan, with the fan just entering the shroud.

This is a typical modern fan shroud:
1970-72_26_inch_Fan_Shroud.jpg


Yours will be deeper, because the fan is farther from the radiator, but the construction is similar & a little easier because the function is the same: isolation of the path of the air from the back of the radiator to the fan. The area at the radiator end must include all, & not obstruct any, area of the core at the back of the radiator.

If you look at it, & OEM fan installations in modern cars, you can see why many retrofit electric fan installations in cars that had mechanical fans originally are not much better: they only use part of the radiator. The ones that just wire straight to the back of the radiator only pull air through that section when stopped in traffic.

<div class="ubbcode-block"><div class="ubbcode-header">Quote:]I've always been impressed by how efficient forced-air cooling can be, as long as you force the air though the right places. [/QUOTE]

I was amazed too. We have a room full of servers at work with their own A/C, in which twice the dedicated A/C died. They were blowing the A/C'd air from the hall in w/a box fan propping open the door, but the temp was still heading over 90. Shrouded the fan by taping up some garbage bags to seal the open area in the propped door above the fan, then experimented with how far to crack the other door for maximum exhaust velocity, & the temp in the room went down to the hallway level in about 15 minutes. Specialized knowledge learned from figuring out how to make an XK-140 stop running hot transferred to the "real" world!
 
The TR2 and TR3s had the air director (shroud) built-in as part of the sheetmetal "small-mouth" design. When they introduced the TR3A in late 1957 with the wider grille, there was no air deflector. No-one complained of over-heating through January to May of 1958 when the first 20,000 TR3As arrived in North America. My TR3A was "born" on Feb. 14th, 1958 and it didn't have an air deflector. Then as the hotter months of 1958 came along, S-T dealers got all kinds of complaints about over-heating and I can just visualize about 6 design engineers at S-T burning the midnight oil trying to come up with a solution that was cheap to produce, light-weight to ship and quick to retrofit. If a customer complained, he got one installed free of charge by the dealer. After my 3000 mile warrantee was up, I did all my work myself and never went back to a dealer, so I never knew about it back in 1958. I must have blown about 3 if not 4 head gaskets in the first 80,000 miles.

I installed one in 1990 as I was finishing my restoration and haven't blown a head gasket since in 94,000 miles.

I wonder if TRA would dock me a point if I told them that I added an air deflector which was not on the car originally.
 
I installed a 12" Kenlowe fan that I bought in England. It is mounted in front of the radiator and pushes air through the radiator. I made the brackets myself as I didn't like stuffing long screws through the rad between the fins.
 

Attachments

  • 4750-KenloweFan.JPG
    4750-KenloweFan.JPG
    68.9 KB · Views: 134
Time for my semi-annual cooling system mantra. Before you go to any great extremes of add-ons (although having the "factory" deflector is definitely a good idea), make sure that not only the radiator but the cooling system passanges in the ENGINE BLOCK are clear. Find and remove the drain tap and poke around with a stiff wire or small screwdriver. Odds are you'll loosen up all sorts of crud, but keep going until water positively GUSHES out of that hole. Most of the time, it will make a BIG difference!
 
I had a few extra thoughts on this subject this morning. In addition to what Andy said about cleaning and flushing the crud out real well. You should also have a period correct thermostat which blocks the bypass hose when the thermostat is open. Some use a plug with a hole drilled in it to restrict the bypass hose to limit the returning water to the block. Another thing is to make sure your radiator is pressurizing correct.
 
I blocked my bypass hose flow by threading in a brass pipe plug with a 3/16" drill hole in it to permit any trapped air to rise and get out the system when I fill it. I also have an original style thermostat.
 

Attachments

  • 4756-ThermostatBellows.JPG
    4756-ThermostatBellows.JPG
    39.7 KB · Views: 80
  • 4757-ThermostatBoxes.JPG
    4757-ThermostatBoxes.JPG
    30.3 KB · Views: 70
  • 4758-TheromostatModern.JPG
    4758-TheromostatModern.JPG
    46.7 KB · Views: 77
I live in Melbourne Florida and I have spent many afternoons driving home from work sitting at a red light with nothing to do but read the sidewall of the truck tire next to me and watch the temp gauge climb. When I converted to rack and pinion steering I had to change to an electric fan. The fan would probally work fine anywhere but Florida, Texas and Arazona in the summer and worked fine here except on really hot days (93+). The second summer I added a second fan. Now I have 1-10" and 1-12" fan one pusher one puller both are wired to a thermostat that activates at about 190. This arrangment cools it on even the hotest days. If you put a 12" pusher in addition to your stock fan you should not have any problems plus the electrics already have shrouds.
I know someone will say that pusher fans block airflow which causes them to be used more.That's true but the extra protection is worth it.
 
I have read this one with interest. I have never considered that my TR3 had an overheating problem, although it reaches the top of the guage if I sit in traffic for more than about 15 minutes. I just thought that was normal.
I don't have a radiator shroud fitted. When I replaced the liners in the engine the area around them was full of little bits of rust, like sand. I had previously been good at flushing the coolant and keeping it topped up with anti-freeze. The engine certainly ran cooler once I had cleaned all of that out.
I had always thought that a shroud would help cooling when the car was moving, but hadn't expected it to help when the car is stationary. I think that maybe I should invest in one now. How do they attach to the car?
PS I should add that I only have to cope with Scottish weather!
 
NickMorgan said:
I think that maybe I should invest in one now. How do they attach to the car?
PS I should add that I only have to cope with Scottish weather!


Nick,

As Don mentioned the radiator duct was a U.S. add on after the cars started overheating due to the climate being warmer in spots on this side of the Atlantic. The fiberboard (fancy word for cardboard) radiator duct is a fold-out un-painted air deflector that is mounted to the inner fender wings, the sheet metal that supports the hand crank support guide hole, in toward radiator. The duct is held in place by small round headed single slot sheet metal screws with flat washers. These are those screws where you had to go search high and low or grind down a perfectly good screw driver to get it to fit em. The front bumper over rider chrome tubes also hold it place. The duct directs air flow into the radiator face so that the air flow created by the forward motion of the car cannot get around the radiator to the sides and below. If you decide to get one I will post a picture. You will have to paint it or it will deteriorate after the first rain. Usually it's painted body color but I painted mine black. I firmly believe your assumption is correct though because I have one installed and after twenty minutes stopped in traffic my car will start to overheat. The duct only improves air flow when you are moving. As you know the TR3 fan runs directly off the crank and at idle barely creates a breeze. So I do not think the interior shrouding previously mentioned will have much effect either. Electric fans are a significant improvement or an improved larger fan with an aggressive pitch might do. When you say the gauge rises to the top do you mean the radiator also boils over? No pictures through the windshield this month.
 
NickMorgan said:
I...When I replaced the liners in the engine the area around them was full of little bits of rust, like sand...

I found that too back around the liner on number 4. With a long thin tube connected to a Shop Vac I was able to 'liposuction' that part of the jacket (just had the head off did not remove liners).

My recollection is that the shroud secures with a few sheet metal screws. Real easy once you've got the grille off, which requires taking the bumper off.

The supplied fibreboard is usually a shade of brown, the shroud should be painted body color if you wish to be correct. Painting may also make the fibreboard more durable/wet resistant.
 
Mine came in three pieces. Left side, right side and the bit that fits above the radiator. They hold together as one piece by means of two brass headed rivets on each side up near the top to hold the top bit. These rivets are what you would normally see holding a wad of loose-leaf pages into a binder or a file.

I don't use any screws. Mine are held nicely by means of the two chromed bumperette brackets. Once you remove the bumper and grille, remove the two support brackets for the bumperettes. Then fit the shroud into the space around the radiator and re-install the bumperette supports so that the stud goes through the hole in the shroud, then through the hole with the nut under each fender. I also use large flat washers.
 
Thanks for the info guys. When (if) the weather warms up here this summer I will see how the temperature does in the car. Currently it is running nice and cool, although the weather is only a few degrees above freezing. Harry, the car has never boiled, but the needle on the gauge has been beyond the maximum mark a few times when stuck in traffic. I usually switch the heater fan on to try and help cool the engine, but the driver and passenger then get rather hot! I would appreciate a picture if I do decide to fit a shroud - thanks for the offer.
No inspiring views through the windshield recently I am afraid and now the roads are all salty again!
 
Back
Top