• Hi Guest!
    You can help ensure that British Car Forum (BCF) continues to provide a great place to engage in the British car hobby! If you find BCF a beneficial community, please consider supporting our efforts with a subscription.

    There are some perks with a member upgrade!
    **Upgrade Now**
    (PS: Subscribers don't see this gawd-aweful banner
Tips
Tips

Converting Rear Reflector to working lamp

Hi Ed,
Thanks very much, really appreciate it.
The "pod" is 2.250" outside to outside. If nothing hangs out more than the 2.125" dimension It should work. The radiused edges just do come to the 2.125" flat dimension. Again, thanks,
D
 
AUSMHLY,
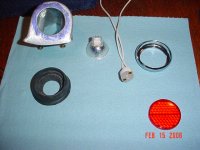
If you use halogen bulbs, either side can be tied to ground, polarity doesn't matter. I cut two pieces of wire about 18 inches long. Stripped the insulation and tinned the ends with solder. This stiffens them up so you can cram the ends into the back of the sockets. The sockets also have a couple of strain relief holes, so just feed the wire in from the front direction into the strain releif holes, bend the wire ends far enough to go all the way into the connector, then pull the excess wire tight from the front. Mix up a thimble full of epoxy and put a dab on top of the wires where they go into the back of the connector. After it dries, bend the wires toward the back of the socket around the strain releif holes. Strip the other ends of the wires. On the ground wire( just pick one, it doesn't matter electrically), attach one of those round electrical connectors. On the other wire, strip it back and solder on one of those lucas wire end connectors. Now all you do is loosen the nut on the back of your tail light where the ground wire should be from your tail/stop/turn light assembly. Slip the round electrical connector over the stud of the tail light. Make certain you have a star washer against the body, then the ground wire from the light assembly, then your new ground wire, then put the nut back on...Now find where the white with (brown one side, purple the other) connects to your tail/stop/turn assembly. These connectors are around 8 inches of wire away from the light assemblies on either side of the boot. Unplug and remove the single lucas connector and replace it with a double connector. Now you can add in your new wire for a total of three wires plugged into this new connector. One position will be empty. Once you seat all three wires into the connector, run a couple of wraps of electrical tape around the ends of the connector. This will help hold all three wires in the connector and exclude foreign objects from ever touching or shorting the wires to ground.
 
Dave,
Give me a minute. I need to go check the chrome ring to see if there is any potential clearance problem to your body below your pods. Back in a minute.
 
The chrome ring of the refector is 2.065 ".
Looks like it will fit but it will be close. Then again, mine is close under the chrome ring to the body. Looks like it will work for you. /ubbthreads/images/graemlins/hammer.gif
 
[ QUOTE ]
Hi Ed,
You can also find sockets here:
https://www.superbrightleds.com/cgi-bin/store/commerce.cgi?product=MR16
Scroll down to "MR11 Socket - G40.
I suspect you can find them at a local home/commercial lighting store.

There may not be room in the housing for a socket.
D

[/ QUOTE ]

My local store: San Leandro Electric Suppy 510.638.7760

They have sockets with the wires in them.
Item number: BUHLQRX63512
Description: BUHL QRX-6.35- 12"LEADS MR-16 SOCKETS

They fit perfectly
see attached photo
cheers, Roger
 
/ubbthreads/images/graemlins/savewave.gif
Well Dave those lamps identified by ASMHLY in the UK in his post of 12/18/05 look the same as those Michael has on his car except they have amber BeeHive Lenses maybe they make them in red too.--Keoke
 
Those sockets look good. I had looked around in a few local stores including radio shack before I ordered the ones without the wires. Dave, Take a look at Roger's attachment of the reflector. After re-reading your posts, I see that your reflector ring is exactly the same size as mine and Roger's. You'll notice that these will be able to go into your pods after you cut a hole that is perfectly centered of
1.310 ". I understand that Keoke is good at cutting on things, perhaps he'll volunteer to help you.
/ubbthreads/images/graemlins/cool.gif
 
Don't have a thing that cuts holes under 2" ED.---Keoke /ubbthreads/images/graemlins/grin.gif
 
Roger,
After another look at your attachment and your post I noticed that you bought some MR-16 sockets instead of MR-11. The MR-11 has 4 mm pin spacing, the MR-16 has 5.5mm pin spacing. In your picture I notice that one of the holes in the cardboard appears to be elongated. Did the pin bend on the lamp and elongate the hole in the socket ?
 
Thanks Ed, Roger, Keoke,
I ordered some parts. With things in hand I can see better how everything will go together & proceed from there. I have a vertical mill that should handle the hole cutting. Only thing I'm not sure of is the beehive lens. would rather have a flatter lens, any ideas?
Your help is much appreciated,
D
 
Dave,
Take another look at Roger's attachment. It is a side view but the reflector is perfectly flat. Micheal's is the beehive shaped one. If you just order qty-2 of the 65 style reflectors from moss, you will have everything you need, other than the MR11 bulbs, sockets and wire.
.. I had a hard time finding them using the online version of the Moss catalog. I had to break out the paper catalog and find them, then use the p/n to find them online:
https://www.mossmotors.com/Shop/ViewProducts.aspx?PlateIndexID=28940&SortOrder=2
Get qty-2 of p/n 544-700 ( item#5 ).
.... Now back to working on my lower windshield frame seal ...
 
Hi Ed,
Thank you so much. The order is sent. Think I can figure it out from here. At first I was confusing tail light parts with reflectors. The Moss catalog isn't very clear about the rubber part on the reflectors.
D
 
My 1st attemp with a digital picture...
 

Attachments

  • 165489-DSC00391_edited.JPG
    165489-DSC00391_edited.JPG
    117.1 KB · Views: 141
Update: Converting BN2 reflector pods to working lights.
As I said earlier, the BN2 has separately mounted "pods" for rear reflectors. I was able to convert them to working lights.

I purchased Moss # 544-700 reflector assemblies. The solid BN2 pods were cut out with a 1 3/8" hole saw. the rubber backing was cut out & shaped to hold MR11 10 watt type bulbs. The rubber fits the cut outs, holds the bulbs securely, & the chrome rings hold the lenses on tightly. Looks exactly like the original BN2 reflectors.

The new lights are wired for stop & turn functions. The one amp extra current draw of the MR11's had no noticeable affect on the flasher rate. A pic of the new components is attached.
D
 

Attachments

  • 177100-BN2conversion1.JPG
    177100-BN2conversion1.JPG
    153 KB · Views: 116
Looks good.
How did you run the wires ? Did you drill through the center of one of the mounting bolts ? Or did you have to drill a new hole for the wire(s) ? Just curious.
 
[ QUOTE ]
Looks good. How did you run the wires ?

[/ QUOTE ]
Got an extra pod from Moss to experiment on first. The thing was sand cast with the rough side out. Would take hours of grinding & polishing to make it usable. I grounded one wire on one of the pod mounting bolts. Drilled a small hole, with grommet, ran single wire through it. Having three holes instead of the two original is no big deal to me. The rear pod face is pretty thick but the rubber fits nice & tight in a 1 3/8" hole. Took some work with a rotary file to remove some of the inside casting lumps. Thanks for the help on parts selection.

I also have a center high mounted stop lamp, so things are well lit now. See pic.
D
 

Attachments

  • 177432-DSC00798.JPG
    177432-DSC00798.JPG
    142.6 KB · Views: 112
Back
Top