• The Roadster Factory Recovery Fund - Friends, as you may have heard, The Roadster Factory, a respected British Car Parts business in PA, suffered a total loss in a fire on Christmas Day. Read about it, discuss or ask questions >> HERE. The Triumph Register of America is sponsoring a fund raiser to help TRF get back on their feet. If you can help, vist >> their GoFundMe page.
  • Hey there Guest!
    If you enjoy BCF and find our forum a useful resource, if you appreciate not having ads pop up all over the place and you want to ensure we can stay online - Please consider supporting with an "optional" low-cost annual subscription.
    **Upgrade Now**
    (PS: Subscribers don't see this UGLY banner)
Tips
Tips

TR2/3/3A busted through to bare metal

sp53

Yoda
Country flag
Offline
I busted through to bare metal about 3/8 in diameter and wonder if I can just paint over it with enamel, or maybe do something like a rattle can primerXXXXX or should I mix some up; I just do not know if person can primmer over paint or if something that small without primmer would not matter. I probably should have left that little dent alone, but once I got a good gloss with the paint I can see too much. Anyways looking for suggestions.
steve
 

Attachments

  • CIMG3291.JPG
    CIMG3291.JPG
    163.7 KB · Views: 136

CJD

Yoda
Country flag
Offline
Yes, do prime it. Top coat on bare metal tends to spider-web and/or fish-eye...at best a 50/50 chance it’ll take.

Reduce your primer so it is much thinner than normal. You do not want a build, only a cover. Then spray a light dry coat, immediately followed by a single medium wet coat. Allow about an hour to dry and you can spray more color right over without even sanding it.

A smaller touch-up gun would be best, but your main rig will work too with a delicate touch on the trigger.
 

Brinkerhoff

Jedi Knight
Offline
You need to spray a few light coats of epoxy primer ( sprayed with extra reducer , as a sealer) over this area and LET IT DRY for a few days before you top coat it. Respray the entire panel. Don't use a rattle can primer , you need epoxy to seal the different repair areas you've exposed or the top coat color may ( depending on the solvents used and the temp and technique used) "bullseye" or lift some of the edges you've exposed as their solvents migrate into the undercoats. Using a "sealer" prevents that. Before spraying color again , lightly sand the sealed repair with 600 wet paper just to remove any nibs and dust.
 

TomMull

Darth Vader
Silver
Country flag
Offline
You need to spray a few light coats of epoxy primer ( sprayed with extra reducer , as a sealer) over this area and LET IT DRY for a few days before you top coat it. Respray the entire panel. Don't use a rattle can primer , you need epoxy to seal the different repair areas you've exposed or the top coat color may ( depending on the solvents used and the temp and technique used) "bullseye" or lift some of the edges you've exposed as their solvents migrate into the undercoats. Using a "sealer" prevents that. Before spraying color again , lightly sand the sealed repair with 600 wet paper just to remove any nibs and dust.
Just curious about letting the primer set up thoroughly before the color coat. I've never done that, unless I ran out of time, but I'm no pro.
Tom
 
OP
S

sp53

Yoda
Country flag
Offline
I was hoping to avoid spraying primmer with the spray gun because of all the over spray. The gray area in the picture is urethane primmer and the yellow area is the first body putty I put on, and the black is guide coat that I will sand off, ( I do not like guide coat because of that, but if I would have used it the first time I would have probably got the dent) and the little spot in the middle is where I barely broke through, about the size of dime with some shadowing of the original epoxy primer. They sell rattle can epoxy, but it is probably not ideal for this application. Maybe I could brush something on and sand it down?
How do I spray a wet and dry coat?

I will look into a touch up gun today because that sounds more manageable. I do have some epoxy primmer left over and from what I gather here is that I can put that over paint and body putty? My gut tells me to use the gray primmer only because I first used the epoxy initially on the bare metal and did not know I could mix the products up. The sales pitch at the body shop store is the gray primmer and body putty both have the same resins, and I can top coat over either of them at the same time.

However, what I noticed is the top coat over the putty alone with no primmer lays smoother than it does on primmer on metal, weird!--- I kinda like the 50% odds.

steve
 

Brinkerhoff

Jedi Knight
Offline
You have different factors affecting "dry times" correct ? Humidity , air flow , and temperature. Everything applied as an undercoat i.e. fillers, primers , glazing putties all need to dry thoroughly before color coat is applied , whatever it says on the can is just a guide to aid in faster "production" . A rattle can type primer MAY work in ideal drying conditions because the vehicle used ( solvent) is very fast dry though there really isn't enough pigment to seal the area. I prefer epoxy as it will tie all the different areas together and seal them. Letting it sit overnight ensures the hotter solvents used in the epoxy have escaped. You should then be able to respray the entire panel and the repair area won't "bullseye" .
 

CJD

Yoda
Country flag
Offline
With a touch-up gun the overspray will be minimal. You can cover the areas about 6" around the repair to prevent getting overspray on the main panel. I often cut a hole in a piece of paper and spray through the hole for touch-ups like yours. If you do get overspray, it'll sand off very easily...even with a light scotchbrite rub down. Don't spray out to the 6" covering...just hit the spot you need.

Brinkerhoff is correct with dry times. Any non-epoxy primer should dry a day before working over it. The epoxies allow you to work much sooner.

I have sprayed top coat over my red body putty many times, when I am in a hurry. It tends to absorb the color coat more, and can leave a distinct outline if you do not put down a thick enough coat over it. Then, the difference in color can show through if you don't lay enough color over it. You must be careful with runs. I usually primer over the putty if at all possible. If the entire panel is good, but I have one or 2 tiny spots, I might get lazy and spray over putty...and only if the spots aren't in an obvious area it will get studied by people looking at it.

Talking touch-up guns...
You can find them for $29, and they will touch -up just fine. They use older style cups, so cleaning is more of a pain, and use caution, as the older style cups can drip if you tilt them too much. After using the Dekups you have to remember to keep them straighter!
 

Brinkerhoff

Jedi Knight
Offline
John is using products with a more advanced approach and living in Texas his dry times are much faster than mine , I have no doubt he has good results. However, I would advise not to use any air dry only product ( putty , primer) in your undercoats , you run the risk of trapping solvents under your paint which can cause problems down the road. I've never had anything but bad results when I pushed a job , patience is a virtue. I'll use a heat lamp and time , so that the undercoat is stabilized ! As your refinishing work improves and your process becomes better , so does your "eye" and you'll see all the steps along the way play a part in the final finish : how it looks as well as lasts.
 

Brinkerhoff

Jedi Knight
Offline
I've used the Prevail years ago with lacquer paint . The epoxy once catalyzed will need to be over reduced with a medium temp reducer in order to be viscous enough for the lower pressure to spray it out of the nozzle. I'd start with 2 parts epoxy to 1 part hardener to 2 parts reducer and add reducer until you can spray wet primer out the nozzle 4 inches from the surface ( spray into a piece of masking paper taped to the wall). Most novices do not use enough reducer for the air pressure they have and consequently the material drys too quickly once it exits the nozzle. The reason a rattle can can be sprayed wet is that its mostly solvent.
 
OP
S

sp53

Yoda
Country flag
Offline
I have a long drama with this latest step. I ran out of paint and could not get a good match, so I decided to repaint the whole outer car and bought a gallon of a really, really close match. Each panel and the tub had its own little flaw so I figured I would fix those as I moved forward. The one in the back by the tailpipe has been a difficult one to fix because of all the curves meeting at one bend, but like suggested as I get better my eye and skill level increases, at least I hope. Anyways it is off to get a touch up gun.
Thanks you guys, steve
 
OP
S

sp53

Yoda
Country flag
Offline
I really like that little touch up gun I got; it is so smooth and easy to operate with hardly any over spray. I went with the 35.00 dollar gravity feed model from HF because it was the miniature of a larger gravity feed gun. Some of the others I looked at had different style triggers and some were syphon feed and some were less money. Putting the epoxy paint over those 3 small areas reminded me of how epoxy needs special care because of the thickness of the product plus mixing a small amount of paint is more difficult to mix because of the calibration scales I have. I went 1 part primmer, 1 part harder, and 1 part reducer which was very thin.

Anyways, what is next? Should I sand the epoxy primmer after 12 hours with some 400 or 500 hundred to get as level of surface as possible while at the same time making sure I do not bust through again? I cannot believe I did not see those 2 dents at the top before; I bought this thing out of an old country air plane hangar and it looks someone put something heavy right close to where the hinge holes are. It was when I got a good gloss and the light hit just right that they popped out and that is all I could see. Everyone that looked at the car after it was repaint saw those dents first also; isn’t life grand.
 

Attachments

  • CIMG3295.JPG
    CIMG3295.JPG
    168.9 KB · Views: 68
  • CIMG3296.JPG
    CIMG3296.JPG
    178.6 KB · Views: 66

CJD

Yoda
Country flag
Offline
Normally, for just a sand through, I would prime like you did and then respray right over the primer. The instructions on the primer usually tell you that if you overspray within 24 hours, then you do not even have to rough it. (Brinkerhoff is already fuming as he reads this!!) Or...as Brinker would recommend...let it cure completely and then rough with scotchbright before re-spraying.

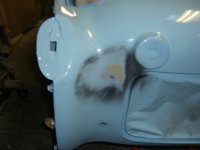
But, it sounds like you still have an issue with the little dent. So we have to take care of the dent. You have a few options. I'll list them, and you'll have to decide which fits your dent the best:

1) You can lay a layer of glaze all around the area, then sand it back down until you hit the dent again. Repeat if necessary until the surrounding area is fared smoothly into the dent...so the dent goes away.

2) Bite the bullet and re-work the dent with a hammer and dolly. If it is small, it may only take a few gentle taps. On little dings like this I often lay a couple layers of paper towel over the dent as I tap. If you are lucky, the primer will stay good, so you can just sand and spray. Worst case, the primer gets beat down to bare metal...and then you have to use your touch-up gun to spray more primer. Of course you would only be spraying the small area using your touch-up gun. Then go back into your routine of primer, sand, check...until you are happy with the result and can re-spray the color.

3) Just sand the area until the dent goes away or the metal comes back through. If the dent goes away, just re-spray color like it never happened. If the metal comes through before the dent flattens, then you can go into the usual routine. Spray primer (touch-up gun in small area), sand, check, and repeat if necessary. This step is essentially like step #1, except you are building primer instead of glaze.


That's about it. You'll learn to love that little touch-up gun! It allows you to fix small area without having to spray the entire panel, opening a few more options as you go.
 
OP
S

sp53

Yoda
Country flag
Offline
I actually filled the little dents with glazing and primmered over them. Before I primmered, I sanded the area down that had the glazing as far down as I dared to hopefully let any new primmer sit as level as possible. My concern now would be that any extra buildup of primmer that is not leveled could lead to what I am guessing is a bullseye. The jargon is many times new to me; could a bullseye be a point after the top coat is on where you see a spot on the top coat? Or a place where things are lifting off?
Steve
 

CJD

Yoda
Country flag
Offline
The thinned touch-up primer left a very thin...like only .001-.003" of build. The idea is to "feather" the touch-up spot, so this .002" of paint reduces outward to nearly zero at the edges. You can lightly sand the area with 600grit to ensure it fairs in well, and then spray right over it. In other words, the touch-up spray is too thin to make a noticeable difference. The only choice is whether to spray right over it, or to rough it first. Follow the "topcoating" instructions for your primer. Most say they can be top coated after 1 hour, but not to exceed 24 hours. If you go past the 24 hour limit, then you MUST roughen the primer with scotchbright or fine paper.

Which you do depends mostly on your time available. Modern shops spray the primer and topcoat the same day. If you are in less of a hurry, you can let it cure fully, like Brinkerhoff recommends, and then roughen and top coat.

Another reason for roughing, even if you plan to top coat the same day, would be if your feathering left a very rough, dry area around the spot you sprayed. If you feel a rough area around the feathered area, then gently smooth it with 600-800 grit before top coating.


Bullseyes come from not feathering the glaze or paint smoothly. I don't think your touch-up will cause a bullseye. If you had used glaze, and then not fully sanded the edges of the glaze into a feather, then that would produce a bullseye. Painting over feathered primer has little chance of bullseye unless you really layed it down very thick with too many coats.

A lot of info above...let me know if you need more details on any of it. I think you at the point it should make sense to you though.
 
OP
S

sp53

Yoda
Country flag
Offline
I am pretty much on board John for the paint over. There is one question about where you said “unless you really layed it down very thick with too many coats.” You gotta be talking about the primmer and not the paint when you say, “IT” in that sentence. One reason for asking is I have be visualizing some of my paint work as spraying texture on a freshly sheet rocked wall, so what I am saying is I think I could sanded with 220 and get the same results, so again most of the prep work on the hood for the respray was probably not needed, I just freecked out.

I re-sprayed the hood the other day and was only about 70% satisfied. I seem to have gotten my best paint lay down on the vertical sides of the hood toward the back. This time I painted with the hood laying down flat because after I watched the video David suggest, I started looking closer at how and where I stand-- plus how much area can I cover with my strokes and have a mechanical arm and be comfortable. You had mentioned earlier the first time I painted the hood to cut the size in half and even perhaps lay the hood down to avoid runs. This time no runs or tiger strips—plus there are some areas with no orange peel like on the vertical sides, but too much orange peel on the center section where I held the gun perpendicular to the hood with my wrist, so go figure.

The paint sheet states 1-to1-to 8 on the sheet, and my gut tells me to use more reducer to stop the sheet rock texture look, but my experience is when I have too much reducer there is a better chance of a run and that I should do exactly what the sheet says. Moreover, I have seen some very mild bullseyes on panels that I did not primer over the glazing and did a respray, but that looks like it would buff out because I am sure maybe kida sorta that I have enough paint on……..
 

Attachments

  • CIMG3294.JPG
    CIMG3294.JPG
    173.7 KB · Views: 70
  • CIMG3298.JPG
    CIMG3298.JPG
    162.2 KB · Views: 64

CJD

Yoda
Country flag
Offline
Yes, the "it" was primer. For a spot that rubbed through to metal, but is otherwise ready for a topcoat, the the touch-up primer you put over it should be relatively thin. Like, spray a dot over the metal...wait a minute or two...now a slightly larger dot centered on the metal...wait...and a final larger dot. That gives a relatively thin coat of primer which will hold the top coat to the metal, and it feathers the thickness into the rest of the panel. You could paint right over this kind of touch-up without any further prep and it will not show through.

My point about thick touch-ups is if you do multiple coats and really lay down the paint, then you should prep by sanding before top-coating. The extra thickness you build WILL show through the top coat. A reason for laying a thick touch-up would be if you think the dent was not leveled yet, and you want to sand more to level it.


Most of your stripes sound like you are moving the gun just a little too fast, resulting in a little thinner coverage. In the center of the hood it is often painful holding the gun at the limit of your reach and keeping the hose off the panel. The tendency is to move faster to end the pain sooner! That is why your vertical panels look better. On vertical panels you can set yourself to hold the gun in a comfortable position, so it is easier to move slower and get a good amount of paint down.


If you remember...I had to spray my hood like a dozen times, including the primer coats, given all my bad luck! My usual routine for spraying a hood is:

1) Use a bit lower saw horse to set the hood on. If it is high, it is harder to reach to the center.
2) Lay your hose out, so it will not get wrapped up as you work.
3) I do a circle around the hood, spraying the edges and any part of the underside your need to get.
4) Now I start at hood center and start striping back towards myself. I use a relatively higher paint level, as runs are less likely on a level surface.
5) Now I uncoiled the hose as I walk to the opposite side, and starting from center, and stripe back towards me.

And that's one coat.
 
OP
S

sp53

Yoda
Country flag
Offline
There were 3 spots I re-primed and the one in the photo is one of them that I only primmer over glazing because I was afraid of the bullseye. The gap you see is some of the blue coming through because I sprayed the area a little big because I figured I might need room for feathering also. The guy who painter my green tr3 was big on epoxy paint like Brink, but I really do not like how the epoxy clogs up the sand paper, but I can see why it is considered superior. I took a page out of Jerry’s book and only painted the hood. In the past, I had too many pieces to think about and would hurry the spray. That is one good reason I am glad I got extra paint and it is going fast- plus it did help a lot to just have the one piece.
 

CJD

Yoda
Country flag
Offline
Now that you have the little touch-up gun you will find it useful for many little repairs. Always best to use whichever primer you feel most comfortable with. Just follow the data sheet for times before sanding or top-coating. Can’t wait to see it all one color!
 
Similar threads
Thread starter Title Forum Replies Date
aeronca65t Busted! Spotted 3
stretchit2 Busted Windshield Austin Healey 5
I Bugeye bonnet hinge bolt head busted off - ideas? Spridgets 8
Gerard Does anybody have a busted crank? Spridgets 3
J Busted Fuel Tank Sender Unit Screws Austin Healey 7
roscoe All the busted knuckles were worth it. Austin Healey 6
T busted rear carb Triumph 7
Morris Busted alt... Spridgets 12
Morris Busted Exhaust Manifold Spridgets 3
J Speedo Busted!!! Austin Healey 4
5 BJ7 Boot Rust-Through Austin Healey 13
ROARRR For Sale 1930-40's AUSTIN 10 SALOON! straight, good glass, no through rust, very complete Austin Healey Classifieds 0
AUSMHLY 1967 Mark III, Phase I through III and counting Austin Healey 38
Hamish Racing TR2/3/3A Pictures through a corner. Triumph 7
S TR2/3/3A “burn through primmer” Triumph 8
S For Sale Triumph GT6 Workshop Manual on CD/ROM – 1966 through 1973 Models Triumph Classifieds 0
A MGB-GT Video- Three minute run through Smugglers Notch in Vermont. MG 4
A Spitfire Video- Three minute run through Smugglers Notch in Vermont. Triumph 4
D TR2/3/3A Clutch through out fork misaligned Triumph 17
BoyRacer Need Tips on getting wiring harness through firewall Austin Healey 4
S TR2/3/3A steering column through the body tub Triumph 5
C TR4/4A TR4 coolant leak through aluminum plug in top side of head Triumph 6
T TR2/3/3A Question on wiring Denso alternator through ammeter Triumph 4
J Backfire through carbs Austin Healey 3
kennypinkerton Seeing it through... no matter the result. Other Cars 0
B Rear Seats - Do I have to drill screw holes through the brand new leather upholstery? Austin Healey 13
AN5Sprite How My Sprite Got Me Through A Blizzard... Spridgets 6
T TR4/4A Tips on controlling heat coming up through shifter opening? Triumph 14
M Backfiring through carbs still Austin Healey 17
C TR4/4A Burning through points Triumph 4
maxwedge5281 braking circuit through the stop light switch Austin Healey 7
Darrell_Walker General TR View through the windscreen Triumph 15
Don_Racine 15% OFF Spridget Parts through Memorial Day Spridgets 1
BlueMax Griffin Comes Through Spridgets 0
T everyone make it through the storm OK? Triumph 18
arizonamike Triumph 6 cylinder engine '67 through '76 Triumph 29
T Normal/good OHM resistance through spark plug wire Triumph 17
T TR4/4A TR4A Through 6 Diaphragm Clutch Triumph 12
dougie 1000 Miles Through Argentina in a 100-4 Austin Healey 7
71tr How to pump oil through a lube gun? Triumph 4
Trevor Jessie Please help me think through this alignment issue Spridgets 22
TR4nut Is there a weld-through adhesive? Restoration & Tools 22
jaegzie No Power [Slow] through starter 59 Bugeye 1275cc Austin Healey 4
JPSmit Can someone please talk me through Spridgets 10
Bruce_B No gas coming through carbs --how come?? Spridgets 8
zimmy LoTO......if ur coming through NW arkansas Spridgets 5
jlaird Walking through this auto repair shop Spridgets 18
sim Through out bearing question Spridgets 4
chicken Routing of oil pressure pipe through bulkhead Austin Healey 2
Brosky Mike Masters comes through! Triumph 2

Similar threads

Top