• Hi Guest!
    If you appreciate British Car Forum and our 25 years of supporting British car enthusiasts with technical and anicdotal information, collected from our thousands of great members, please support us with a low-cost subscription. You can become a supporting member for less than the dues of most car clubs.

    There are some perks with a member upgrade!
    **Upgrade Now**
    (PS: Subscribers don't see this gawd-aweful banner
Tips
Tips

Bugeye tonnau installation tips

ichthos

Darth Vader
Country flag
Offline
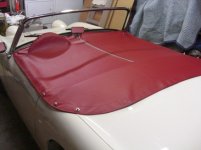
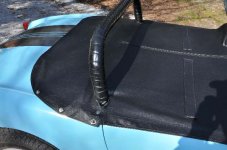
I got an estimate to put the tonnau on my Bugeye of somewhere between $200-$240. Money is gettting very tight for me right now, and I was considering doing it myself. How difficult is it to install one of these? What tools would I need? Does anyone have directions on how to do it? Any help or comments would greatly be appreciated.
Kevin
 
Don't you live in or near Seattle? Take it to a boat yard and get a second opinion. Those guys love a chance to work on something "different".
 
You can do it yourself. [best with an assistant] It is not rocket science. Someone will no doubt be along with either a link or a description of the procedure. The most important part is to allow plenty of time so that you are relaxed and not in a hurry. [ Be sure to warm the fabric so that it too is relaxed.]
 
Try this site:
https://mgaguru.com/mgtech/top/top102.htm
Barney seems to have information on just about everything, yes it is for an MGA, but not too different than a BE.
I used a leather punch set from HF, made sure the cover was warm and flexible (leave it in the sun). I used blue painter's tape and marked the center and location of the snaps. You will need the two 1x1/8" flat bar for the the rear hooks. I attached it at the back, then centered it, and put in the front snaps. Then installed the side snaps. BTW, there are two type of tonneau covers for a BE. One which hooks to the top brackets in the back and the shorter one which snaps to posts along the rear edge of the cockpit. The long version is more common. I wanted to jazz up the colors of my BE, so I ordered the red color from AH Spares(they provided samples which matched my Moss seats).
Cheers,
Good luck
Scott in CA
 

Attachments

  • 26527.jpg
    26527.jpg
    62.8 KB · Views: 152
Pretty easy. Take your time. Warm sunny day. Let it all warm up
first.
STRETCH....everything. Two guys helps. Bluemax helped me.
Those punch tools help but you'll still need small scissors
and a sharp knife. Those little Swiss Army pocket knives are handy.
The "shorty" tonneau needs additional studs along the back of the cockpit.
I had those removed and the holes filled. I like the long version. I had both styles.
I had a shop do the roll bar cutout and edge that modification
before the installation. They charged 20 bucks.
BlueMax and I installed the thing in a couple of hours or so.
Taking our time.
 

Attachments

  • 26528.jpg
    26528.jpg
    50.8 KB · Views: 127
  • 26529.jpg
    26529.jpg
    28.5 KB · Views: 133
I have the long version too. I also removed the studs around the cockpit and welded them shut. I didn't know there were two versions when I bought mine, but I like the longer version because of the way the tonneau uses the existing hooks in the back. Are there any tricks to putting in the snaps or turn buckle holes? How big do you make the holes for both the various fasteners?
Kevin
 
ichthos said:
I have the long version too. I also removed the studs around the cockpit and welded them shut. I didn't know there were two versions when I bought mine, but I like the longer version because of the way the tonneau uses the existing hooks in the back. Are there any tricks to putting in the snaps or turn buckle holes? How big do you make the holes for both the various fasteners?
Kevin

Just follow the instructions. The itty bitty scissors are nice.
Make the holes no bigger than required.
Making the cuts so the tabs bend nice requires attention to detail.
The punch thing does work. The itty bitty SHARP scissors are great for trimming and the small sharp blade can "fix" any punch holes.
Take your time and stop when fatigued.
The right tools make things easier to do to say the least.
Call the tools an investment. Personally I love having SSTs around. (Special Service Tools)
 
Back
Top