Hey Guest!

 Hey - did you know if you click on the title of a thread it will take you to the first unread post since you last visited that thread?
 but were afraid to ask:
  STOP!! Never post your email address in open forums. Bots can "harvest" your email! If you must share your email use a Private Message or use the
  smilie in place of the real @
 Pretty Please - add it to our Events forum(s) and add to the calendar! >>
Tinkerman
Darth Vader
Offline
Afternoon all:
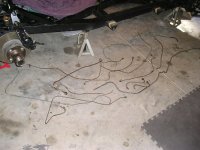
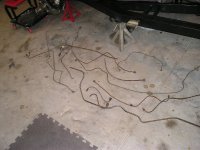
I have just seven items left to do before I can put my body back on. One of them is installing the brake and fuel lines. I will be using cupro-nickel lines and of course they come all coiled up. I have the two major fuel lines and have just ordered a set of the brake lines. I also ave a nifty bending tool and I'm ready to go. I very carefully saved most of the lines that came off the car. See pics. HOWEVER, I carefully neglected to label almost all of them. Another one of my dumber moves. I DID label the fuel tank vent and I recognize the master cylinder S shaped lines but I need some ideas, thoughts and help on the rest of them. Oh and I have 13 lines so I suspect I may be short some that got thrown out along the way. Sigh........
With mucho gusto thanks, Tinkerman