• Hi Guest!
    You can help ensure that British Car Forum (BCF) continues to provide a great place to engage in the British car hobby! If you find BCF a beneficial community, please consider supporting our efforts with a subscription.

    There are some perks with a member upgrade!
    **Upgrade Now**
    (PS: Subscribers don't see this gawd-aweful banner
Tips
Tips

MGB Bought 1st MGB

Norton47

Jedi Warrior
Offline
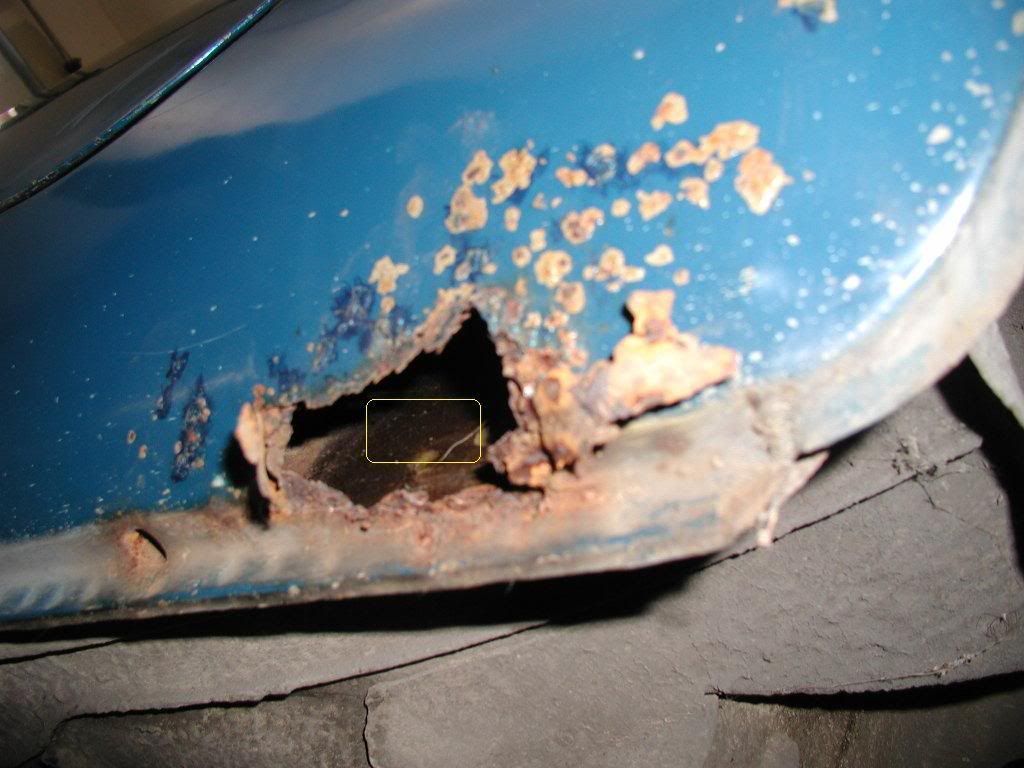
Well I bought the 1972 Blue MGB. The doors do have a gap about 1/16" at the very top and it opens up to about an 1/8" gap when jacked.
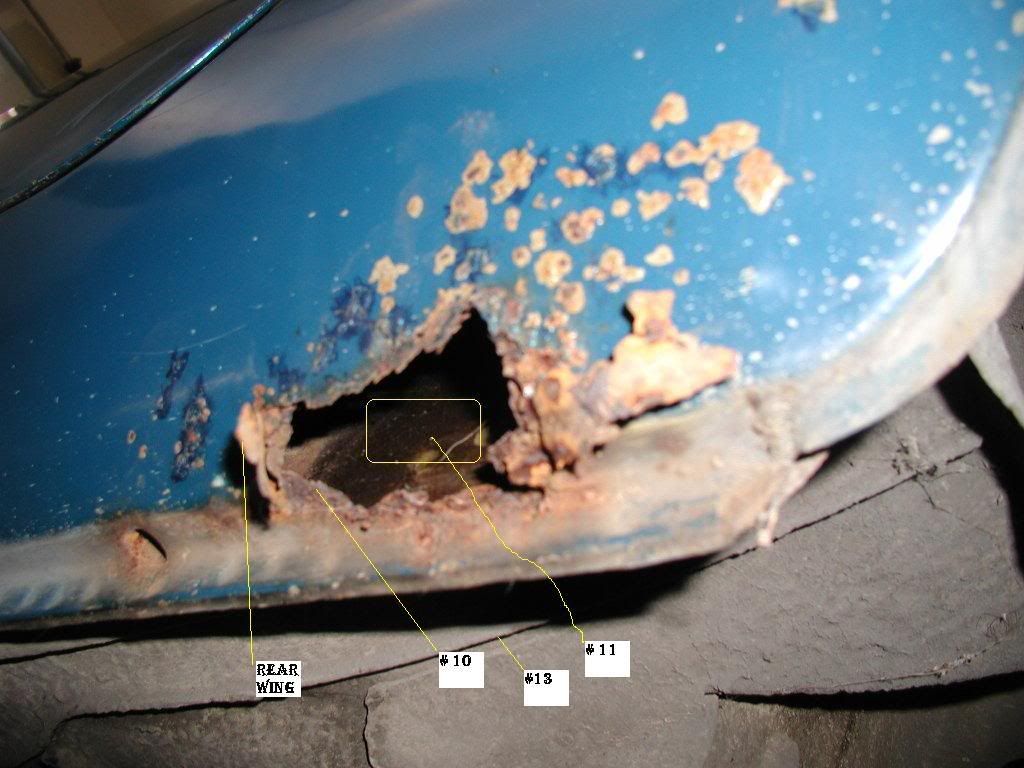
I opened up the rust and it seems very localized. The rear wing skin and the outer sill but only in that area. The inner has a waxy film on it and no rust. I took out the interior panel and looked down that hole an it looks clean.
The trunk has surface rust and a couple small holes. The drivers floor pan has 2 small holes in it, the right has only surface rust.
The right dogleg may have some of the same disease as the left but not as advanced. I just can't find any other rust through areas. I looked at a 1971 the other night and it was rusty so I kind got it figured out where to look.
Here is a link to some photos.
https://i225.photobucket.com/albums/dd50/Norton47/MGB/MGBTrunk.jpg
https://i225.photobucket.com/albums/dd50/Norton47/MGB/MGBRust1Dogleg.jpg
https://s225.photobucket.com/albums/dd50/Norton47/MGB/

He could not get this car to run but it did run when he parked it. He put in plugs, changed the oil, new points, rotor and cap and fuel filter but it was dry. Do these have mechanical fuel pumps? Looks like it needs fuel.
What is the shift pattern, is it a normal H with reverse all the way to the right and back?
I bought this for $500.00, it also has a snug top hardtop.

I am going to buy the underwater 1974 also and use it's bonnet and wing to fix this one I think.
Off on another adventure.
 
Congratulations probably the first of many MGs.They have electric feul pumps(should hear it tick as soon as you turn ignition),reverse left and back. Bob
 
Thanks Mate.
I thought that was how it seemed to shift. I have to check the lectrics out I see a fuse missing on the bottom fuse holder. Has a big brown wire on one side.
 
Wiring diagrams are available at https://www.advanceautowire.com click on stock schematics.
Make sure you have power going to the fuel pump.
Make sure the ground connection for the fuel pump is clean and secure.
If you have good electrical connections and it is still not working, try banging on it with a heavy screwdriver handle. My car was parked for three years and the fuel pump wouldn't work until I gave it a couple of wacks with a wrench. After a period of nonuse, the points in the pump will film over.
 
Wish I could open the photos but the computer center I´ve found here in Honduras is blocking them!

Congrats.
 
Try computer #2, Tony - I just looked at 'em!
 
Honduras?? Going after a secret stash of LBC parts there? :smile:
 
I placed a new battery in and the fuel pump worked just fine. When cranking it just popped every once in awhile. I checked the timing and ended up finding the the PO had installed the sparking plugs leads incorrectly. Once installed properly, it fired right up, no smoking and good oil pressure when cold anyway. I could not let it run long enough to warm up as it is backed into the garage. Needless to say I am pleased.
I am currently on a business trip, so I will be ordering some parts for when I return. The brakes hold pressure and work but the clutch system does not hold pressure and won't actuate the clutch. So that's first on my list. Then we will see how it runs and drives. The tires look sound and not oddly worn, so hopefully the suspension is not to wore out.
 
How much bodywork have you done? Rockers & doglegs need replacing - & you never know what you're gonna find once you cut into it!
 
Nice find. Good price.

Agree with Tony, I think you're looking at doglegs and outer sills. Castle rails look Ok to me, but you'll only know when you get in there.

Thanks for the reminder - it's getting to be that time... Waxoyl in bucket of hot water. :smile:
 
Tony
I have done some and looking forward to learning some MIG welding on this car.
In looking at the rust on the left dogleg, the inner panel you see when looking in toward the center of the car, is which part of the 3 part rocker assembly the inner brace or the inboard most panel of the rocker.
I really can't find signs of rust going forward, a close look at the underside of the sill down their length does not revel any holes or rust bubbles, what else should I look for where.
I understand from comments here that the dogleg rust is usually indicative of rot in more areas of the sill, but I can't seem to find it. Are there indications I am missing or just your experience?
 
1st diagram shows outer panels: The dogleg is #35 in the diagram below; the rocker is #26...those are the panels that have the holes in them & will need replacing...the rocker rests right against the dogleg & the rust formed between them:
MGB-060.gif


2nd diagram shows inner panels: #10, #11, #12, #13 in this diagram together form the 'frame' part of the unibody & are where all the car's strength is. Your rocker that has the hole in it is #10; I'm gonna bet that #11, the inner panel is also gone...your #12 bottom member (some folks call it the 'castle rail') looks good in the photo...look inside the car up where the sill meets the firewall to see if there's any rust in that sill (#13):
MGB-061.gif
 
Oh, so now I see where you've been hiding Norton...

You've been a very naughty boy, haven't you? Driving one of those cute little MGB's now, are ya?

Have you told your Triumph about this yet?

If I were you, I wouldn't be planning any "long cruises" without tools in the TR6 for quite a while ........... if you know what I mean......they can be quite "sensitive" at times like these.
 
Tony
I edited this photo
InnerMGBRust1Dogleg.jpg

by adding a yellow rectangle to show what I believe to be the inner sill id #11 on the IPB.
My examination of this area through this hole does not show any rust on part #11 that is visible , but that the surface of #11 is coated with a brown waxy coating. At the bottom of course where the multiple layers are on top of one another I cannot tell the condition. Looking down the sill forward looks very clean. I removed the interior panel on this side and looked in those holes and it again looks rust free, but again you can't see all the way to the bottom.

I would venture to say that my first step will be to perform the check at the forward end. Next would be to cut the fender layer away for the rear fender dogleg and examine the end of the outer rocker. Next would be to section out the rusty part of the outer rocker and see what is inside and continue inwards as required.
Here are a couple of links I have found:
https://www.middlebank.co.uk/index.html and https://www.mgcars.org.uk/cgi-bin/gen5?runprog=mgoc&p=emg/sillrepa.htm
that seem to cover these operations.

My hope is with the castle rail looking good and from what I can see of the inner and outer rockers, that I will only need to do section repairs not total replacements. Finger's crossed but always expect the worst.
 
Paul
I feel so busted! LOL! I bought this for my wife. She likes the rounded curves of the MGB rather than the clean cut stiletto appearance of the TR6.
So although it has impacted getting the 6 back on the road, it's not replacing it. Looking at, buying, and hauling home this and the parts car have used up 2 plus weekends that would have finished the TR6. I am now out of town for 2 weeks plus making some dough to pay for all this. Another side effect of all this is the wife has agreed to allow me to put up another garage/shop, so I have started the permitting process to build up a 36 X 24 shop this summer. Man I am really getting over loaded.
When I get back I will post some photo's of the TR6. I will jump to the other forum to describe.
 
Hate to be the one to say it...you may be able to section the outer rocker...but #11, the inner, is completely gone! The only way to replace it is to redo the entire rocker...but, you're correct - looks like the inner & bottom pieces are good....one way to find out is to cut the dogleg away - after you have a new one to use as a patern....then you can get a good look inside.
 
Tony
Your reply has me confused, but that's easy to do.
You state that the inner is completely gone. Question, is the yellow rectangle located on the inner sill panel #11?

Then you state that I am correct looks like the inner and bottom pieces are good.

Do you mean, that if the inner is rusted or gone that the entire outer has to come off to be able to repair the inner #11?

Looking at the car and the IBP, the part #13 is the inboard most part of the sill/rocker, it is joined by #12 the castle panel to #11, which has #10 the outer rocker covering it. The rear fender dog leg covers the rear end of #10. The hole in the photo is rusted through the fender and #10, then next piece of metal going towards the center of the car would be #11. That is what I have the yellow rectangle on. If that is correct the inner is intact and the #13 is further in towards center and can't be seen due to the inner #11.

I don't want to antagonize, but I can't get to the car and want to understand what you are explaining. I also edited another photo
MGBRust1Dogleg-1.jpg

to try and clarify.
Let me know
Thanks
 
Back
Top