
-
 Hey Guest!
British Car Forum has been supporting enthusiasts for over 25 years by providing a great place to share our love for British cars. You can support our efforts by upgrading your membership for less than the dues of most car clubs. There are some perks with a member upgrade!**Upgrade Now**
(PS: Upgraded members don't see this banner, nor will you see the Google ads that appear on the site.)
You are using an out of date browser. It may not display this or other websites correctly.
You should upgrade or use an alternative browser.
You should upgrade or use an alternative browser.
TR2/3/3A Boot Seal Pics
- Thread starter CJD
- Start date
TexasKnucklehead
Jedi Knight
Offline
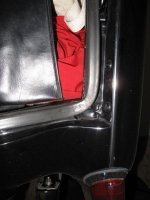
OK, here's what I did on my 59. This picture was taken before I glued it -as you can see the right corner is loose. Once glued into the channel, the rubber tore from the right and left hinge studs. Before I glued it, it continually popped out. It keeps water out fine, but has two semicircular matching cuts. I think if the lip was facing inward, it would still be cut by the nuts on the hing studs. -I'm sure you will find a better way, but mine isn't broken at the moment...
Let me know if I can provide a better picture.
Let me know if I can provide a better picture.
Attachments

OP
CJD
Yoda
Offline
Wow...you guys brought up exactly what was concerning me!
On the TR3A the seal channel was rounded, so it made sense to angle the seal outward, and that worked great. The hinge nuts on the early lid almost preclude angling the seal outward, as they will clip the seal and almost definitely tear it.
Then...with the seal angled inward, the sharp corners become and issue! When the seal is turned inward, rounding a sharp corner bunches the seal lip so it sticks straight upward...lifting the deck lid with it. If you angle outward, then the seal lip sits better, but you are back to the close hinge nuts again.
I am leaning towards seal inward to clear the hinges...and mitered corners to help it lay properly.
Thanks for the inputs! I was hoping someone had tried the mitered corner technique and had a pic.
TexasKnucklehead
Jedi Knight
Offline
Another option might be to cut the studs a little shorter, and use thinner nuts on the inside? (Sometimes size does matter.) -Maybe skip the lock washer too.


TexasKnucklehead
Jedi Knight
Offline
Randy,
Quit looking for dirty pictures and get that TR6 ready for the club drive tomorrow.
Even those pictures look like the seal is torn (or cut) at the hinge, and the lip looks to be pointed outward.
Quit looking for dirty pictures and get that TR6 ready for the club drive tomorrow.
Even those pictures look like the seal is torn (or cut) at the hinge, and the lip looks to be pointed outward.
mgedit
Jedi Knight
Offline
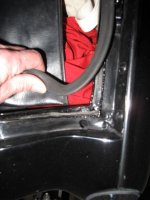
Here are a couple of how I did mine. Trying to recall whether I had to trim the seal a bit or not, but I think I did. Also thought I had more pictures!
Can take more pictures after car is out of storage, but that may be a few more weeks as we just got another 5 inches of snow yesterday.
Cheers, Mike


Can take more pictures after car is out of storage, but that may be a few more weeks as we just got another 5 inches of snow yesterday.
Cheers, Mike
2liter4cyl
Senior Member
Offline
This search for a proper boot seal came up 2 years ago and my experience then was like now. With the gas tank yet to be installed, I was able to view the fit up of the seal. With the lip outward, a first best choice, the fit was BAD. Pressure points and many gaps. The lip inward was much better. I then measured the gaps and stress points for location and amounts. For this I made extensions of the flange and cut away high spots. I could then see a great fit! Having said all of this, I suspect the flange was a random height meant for spot welding. The lip outward may have been better with a better flange. I have a TR3A comm. # TS75773L 1960. Le T.
OP
CJD
Yoda
Offline
Thanks Mike and Le T!
As I study more and more pictures, seal out is predominantly what everyone is doing. Also, 100% of the cars with seal outward show gouges in the seal from the hinge nuts! I can see why Standard changed the seal design post 60k, as the sharp corners just do not fit well. T, your work with modifying the flange is likely the way to go...but I wish I had known this was an issue before the paint went on the car. Oh well.
As I study more and more pictures, seal out is predominantly what everyone is doing. Also, 100% of the cars with seal outward show gouges in the seal from the hinge nuts! I can see why Standard changed the seal design post 60k, as the sharp corners just do not fit well. T, your work with modifying the flange is likely the way to go...but I wish I had known this was an issue before the paint went on the car. Oh well.
OP
CJD
Yoda
Offline
I played with the seal for a couple hours today. I have come to the conclusion that there is no good way to mount it.
If you go lip out...the hinge nuts will gouge it, and it rubs on the deck lid about 3 inches in from the top sides.
If you go lip inward, it clears the hinge nuts, but then it hits the 3 latch asssemblies at the bottom, and still gets gouged.
It's basically a loose/loose design. I see why they redesigned it for the 60k up cars.
Don Elliott
Obi Wan
Offline
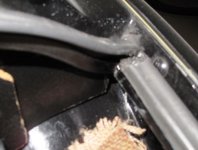
In 1990, during the restoration of my early TR3A, I saved the original seal for the trunk lid and put in new seals as they had been originally.
There is a long piece which goes down one side - then turns the corner, the goeas up the other side. The seal flares towards the outside and there are no cuts or mitres in the lower corners.
There is a second piece cut to fit all across the top. This is angled inwards towards the trunk opening so as to not interfere with the hinges of the securing studs.
Originally, both seal pieces had been glued down into the channel that supports the seal pieces. But in 1990, I cut the pieces a bit longer than needed in case some schrinkage occurred later. I have run it like this for the next 112,000 miles with these seals not glued in. It has neven leaked and when I want to clean out the boot and this channel area, I just pull out the seal pieces, clean it and then put the seals back into place.
Don Elliott, Original Owner, 1958 TR3A
Attachments


OP
CJD
Yoda
Offline
Yeah, Don is great answering originality questions! I had thought about reversing the seal, but discarded the idea thinking there is no way that would look original. Turns out the factory had to go through the same thought process, and wound up reversing the seal to solve it too.
Great post from Don - thanks!
He helped me a lot as well.....
Regarding the factory change in the seal type: The old seal needed a channel where it is push into. This required a set (4) angled pieces of sheet metal, they have to be welded to the body parts (and are prone to rust, as this channel has no drainage).
The later seal ist clipped onto the outer section of the former channel: So no need for channels, welding etc.
My assumption was: Saving cost was the motivation for the change (as for some others during the production of the TR3-A-B)
Cheers
Johannes