-
 Hey Guest!
British Car Forum has been supporting enthusiasts for over 25 years by providing a great place to share our love for British cars. You can support our efforts by upgrading your membership for less than the dues of most car clubs. There are some perks with a member upgrade!**Upgrade Now**
(PS: Upgraded members don't see this banner, nor will you see the Google ads that appear on the site.)

Tips
- We have a special forum called "Member Articles" where you can submit actual articles for consideration for publication. Learn More
- Don't have an Avatar? If not, your avatar will default to the 1st character in your username. Go into "Account Details" to change your Avatar.
- Some basic forum navigation info: click
 Hey - did you know if you click on the title of a thread it will take you to the first unread post since you last visited that thread?
- Hey Guest - Is your British Car Club in our Clubs database? If not, send me a PM - Basil

- Looking for a local club? Click the "Clubs" tab above and browse hundreds of clubs world-wide.
- Add Android or iPhone APP: click
- Did you know - any picture or video you add in your posts in any marque-specific forum will also get added to the Media Gallery automatically.
- A few more tips about posting and replying: click
- Hey there Guest - be sure to keep your profile page up to date with interesting info about yourself: learn more
- More tips and tricks on Posting and Replying: click
 but were afraid to ask:
  STOP!! Never post your email address in open forums. Bots can "harvest" your email! If you must share your email use a Private Message or use the
  smilie in place of the real @
- Want to mention another member in a post & get their attention? WATCH THIS

- So, you created a "Group" here at BCF and would like to invite other members to join? Watch this!
- Hey Guest - A post a day keeps Basil from visiting you in the small hours and putting a bat up your nightdress!
- Hey Guest - do you know of an upcoming British car event?
 Pretty Please - add it to our Events forum(s) and add to the calendar! >> Here's How <<
- Hey Guest - you be stylin' Change the look and feel of the forum to fit your taste. Check it out
- If you run across an inappropriate post, for example a post that breaks our rules or looks like it might be spam, you can report the post to the moderators: Learn More
- If you would like to try some different "looks" or styles for the site, scroll to the very bottom, on the left and click the Style Selector.
You are using an out of date browser. It may not display this or other websites correctly.
You should upgrade or use an alternative browser.
You should upgrade or use an alternative browser.
BN1 with H6 carbs : what setting ?
- Thread starter matt78
- Start date

Dandare
Jedi Trainee
Offline
Hello guys.
I'm afraid I won't be able to help answering, as right now I am still trying to understand how somebody might have made such a mess of my two carbs...
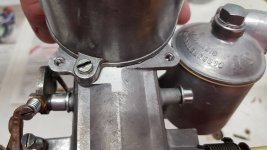
I stripped them down this evening, and guess what ? Each of them has an unused boss wide OPEN...
The front carb has a machined aluminium cylinder (for the fast idle linkage), threaded to fit inside the carb where I discovered the first leak :
.jpg")
But on its opposite side, the boss isn't blanked off at all :mad-new::
.jpg")
On the rear carb, the left boss is wide open, too...
No wonder that tuning the carbs following the book or your advices was, say... strange !
Got the phone of a welder to solve these issues.
What will the next surprise be ? Don't know...
Matt
I'm afraid I won't be able to help answering, as right now I am still trying to understand how somebody might have made such a mess of my two carbs...
I stripped them down this evening, and guess what ? Each of them has an unused boss wide OPEN...
The front carb has a machined aluminium cylinder (for the fast idle linkage), threaded to fit inside the carb where I discovered the first leak :
But on its opposite side, the boss isn't blanked off at all :mad-new::
On the rear carb, the left boss is wide open, too...
No wonder that tuning the carbs following the book or your advices was, say... strange !
Got the phone of a welder to solve these issues.
What will the next surprise be ? Don't know...
Matt
Matt, are you saying that the bosses are drilled through the body and into the throat of the carburetor? I ask because, when new, the bosses on both sides are blind drilled, not drilled through. In this fashion they are ready to be tapped for the fast idle cam pivot bolt.
Yes, that's the way I thought it was always done, so I didn't even think of checking that these boss weren't open...
But, yes, these 3 bosses are threaded and drilled into the throat !
One (slightly leaking due to imperfect sealing) bearing the fast idle command, and TWO wide open.
Due to the boss bore size, I wonder if instead of welding it would'nt be better to plug them with a bonded screw (mix resin / aluminium powder) ? As the carb body is rather thin, there's a risk of burning several holes...
Matt
Offline
Matt,
The Durafix rod shown above is in fact a braze - it melts at 700 degrees f. Far lower than the aluminum itself. This would work well for attaching the nice little boss you made. It would be great for plugging the unused bosses.
Watch the aluminum soldering videos - they use it to fill a hole in a soft drink can without collapsing the aluminum.
It uses a propane torch.
Last edited:
Thank you Steve for your encouragement.
Unfortunately, I'm a really poor welder, and very afraid of damaging the bodies. I made a test yesterday evening (not with Durafix, but an equivalent melting @ 380 °C) on small aluminium sheets : works great, but when I tried with the carb, I wasn't able to build enough heat to melt the stick by touching the body, and didn't insist - fear of seeing the body collapse locally...
Maybe I use the wrong type of tool, because I only have a very small oxyacetylene torch - too high a risk of burning a hole with it ?
If I can't manage the welding job, the last - yet not the smartest - solution would be to screw in plugs...
Another topic now : having noticed the throttle shaft play in the body, I intended to replace them, but as you guessed before the bores are worn out, so there's a play even with the new shaft... I thought that shafts in the SU kits where oversized : in fact, they appear to be nominal, but are supplied with new bearings to insert. Having no machining tool, I need to find a workshop to do it - really don't want to screw everything up...
The road is long, long...
Matt
Offline
Matt,
I've had good results with titanium or steel epoxy. That might work for attaching the boss.
Oversize shafts are a bad idea because you have to bore out all the hardware.
Edit: oxy torch might be too localized. Propane torch or pro-mapp would provide more general heat. Having said that, don't blame you for being nervous about heating an aluminum carb with a torch. :wink-new:
Last edited:
OK Steve.
The customized small machined boss bearing the fast idle cam is threaded, so that it can directly be screwed in the open carb body boss. The other bosses with their big holes have been tapped with ISO thread, so I can also use some EU screws... It's rather tempting, even if I'd prefer a more elegant solution.
I've one or two days left to think about it, as the bodies are currently in a workshop to get their new bearingseaceful:
Matt
The customized small machined boss bearing the fast idle cam is threaded, so that it can directly be screwed in the open carb body boss. The other bosses with their big holes have been tapped with ISO thread, so I can also use some EU screws... It's rather tempting, even if I'd prefer a more elegant solution.
I've one or two days left to think about it, as the bodies are currently in a workshop to get their new bearings
eaceful:Matt
Hello.
Here is a small update :
- bores have been machined, new bearings and throttle shafts fitted --> OK
- I finally chose to blank off the wide open bosses with screws, using sealing liquid for bearings (more heat resistant) on the threads, and special washers with a rubber ring inside (don't know their name). Purists will disapprove, but I thought it was better than ruining the bodies... Same fixing and sealing solution for the fast idle cam support, of course.
Little question : when I rebuit the carbs, I noticed that jet centering on one of them was rather difficult, because after torqueing the jet locking nut, jet sliding effort was significantly higher, and the piston wasn't free to come fully down, as if the jet wasn't straight... on this carb, I tried the method without putting the jet adjusting nut : could it be the cause ? A soon as the jet isn't at the higher position (the adjusting nut is still full screwed in), say 1 or 2 mm, there's no more issue. Maybe I put too much torque on the locking nut ? As you'd have understood, I'm totally new to SUs...
Now, on to adapting the new linkage and (hope so) fitting back all the stuff under the bonnet.
Matt
Hello.
Another question for you knowledgeable people.
I fitted the two carbs on the car, and before starting the engine I gradually torqued the inlet banjo bolts to the float chamber lids to get a good sealing without taking too much risk of seizing.
In order to stay on the safe side, I kept the system in charge by frequently activating the fuel pump, so I could check the remaining leaks at the banjos. Everything seemed to be allright, but I noticed that gasoline suddenly started flooding from the front carb lid top.
My first (and stupid, but it was a reflex...) action was to increase the torque of the cap nut, before remembering it was an air vent...
So I guess that there's an issue regarding the fuel regulation, and that something is wrong with the needle and seat assembly.
It's hard to believe that new and genuine SU parts could be defective : did you already experience this, or is there another fault I didn't identify yet (bad interface between seat and lid for example) ?
Of course, I had tested the floats sealing, thoroughly cleaned all the parts and set the right float's height...
Any idea about fault finding ?
Matt

Offline
Most likely dirt in the needle valve. Take the lid off, check that the float hasn't sunk. If that's ok, blow some air through the needle valve and reassemble. No need to torque the banjo bolts; they just need to be snug.
Offline
If the float lever is incorrect for the lid, it can drop too far, causing the needle to stick in the open position, which would cause overflow.
Was going to refer to Joe Curto's videos on float levers and chambers, but his site is down being replaced by a new site.


Both lids are new style:
Left HD6 has incorrect lever apparently for old-style lid, allowing incorrect level and drop. Right HD8 shows lever for new-style lid, showing correct level and drop.
Was going to refer to Joe Curto's videos on float levers and chambers, but his site is down being replaced by a new site.
Both lids are new style:
Left HD6 has incorrect lever apparently for old-style lid, allowing incorrect level and drop. Right HD8 shows lever for new-style lid, showing correct level and drop.
Last edited:
Thank you for your replies.
Having not found anything wrong with the lid, the lever, nor anything else, I replaced the needle/seat assembly by a new one including a small ball instead of the needle : I am not saying that THIS is the solution, but fact is that the issue was solved...
Next (and final, I hope) step : carbs fine tuning.
Matt
Offline
Matt,
If the floats are brass, you can check them for leakage by submerging in a pan of almost-boiling water. If bubbles appear, they leak. Mine did and I replaced them with the black foam type.
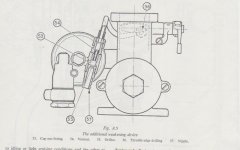
Are you OK with the tuneup procedure? IIRC you have this book, which has the procedure:

If the floats are brass, you can check them for leakage by submerging in a pan of almost-boiling water. If bubbles appear, they leak. Mine did and I replaced them with the black foam type.
Are you OK with the tuneup procedure? IIRC you have this book, which has the procedure:
Last edited:
Steve,
You are right. As previously mentionned, I already checked the good float buoyancy before re-assembling the carbs, and it was ok - it was also ok when I lifted the lid after the flooding sequence : float was quietly swimming on top of its gasoline pool
Regarding the tune-up, yes I have read this book and also use the detailed notice provided by SU with their kits - almost the same one, btw, as the book seems to be a compilation !
Matt
Hello.
After one month away from my shed, I'm back.
My two carbs are fitted on the car, there's no more gasoline or air leak.
I did the first tune-up following the book, and the result seems OK, because the car performs well and the engine runs smooth, without any issue - maybe a little bit too rich ? I will check this on mid term, with various climate conditions.
At the end, I simply can't believe that my two carbs were so much malfunctioning due to wide open holes in their bodies, leaking boss, bone-dried cork seals, nor disc-throttles not fully opening when flooring the pedal (yes...).
This proves that my BN1 is a very nice car for accepting this and keep running ! And that I definitely can't rely on the workshop sponsored by the official club here, too...
So, once again, thank you very much for all your useful advices and information, which helped me to solve my problems.
Matt