• Hi Guest!
    You can help ensure that British Car Forum (BCF) continues to provide a great place to engage in the British car hobby! If you find BCF a beneficial community, please consider supporting our efforts with a subscription.

    There are some perks with a member upgrade!
    **Upgrade Now**
    (PS: Subscribers don't see this gawd-aweful banner
Tips
Tips

BJ8 Trans Cover Carpet

AUSMHLY

Yoda
Country flag
Offline
Hello,

Another carpet question.

BJ8 tranny carpet has jute under it, with carpet held in place by snaps. (All carpet is unbound.)

How does the transmission carpet tunnel meet the bulkhead carpet?

Does tranny carpet stop at the fiberglass tunnel lip, or does it extend past, example by an inch?

Does the bulkhead carpet have jute behind it?

How is the carpet (with or without jute) attached to the bulkhead front and side?

Does the tranny carpet go over or under the bulkhead carpet?

Looking for a clean look where they meet.

The tunnel use 8 sheet metal screws through the bottom lip (4 per side) to hold the tunnel down.
Did the factory use any sheet metal screws on the front lip to bulkhead?

Anyone have any photos of this area?
 
Last edited:
Hi Roger,

I just finished our BJ8 Skinner interior.

The foot-wells and tunnel bulkhead did have jute originally. The jute was approximately 1/4-inch thick.

You might find this Geoff Chrysler BJ8 Trimming video useful:

It shows how the carpet is installed. And, I do not believe the front edge of the BJ8 fiberglass tunnel is screwed into place (at least, mine was not); just 4 screws at the bottom edge on both sides (8 total).

Regards, Bill
 
Hi Roger,

Not sure how far along you are, but I used a 1/4-inch thick closed cell foam (will not absorb water) instead of jute. The foam is designed as an underlayment for marine carpet and it holds up well in hot environments.

Since I had lined the tub with KoolMat, I had to glue the foam to the KoolMat using silicone adhesive; and it worked very well. Unfortunately, I had to remove the KoolMat installed on the vertical panels initially, and then install the improved composite foam-KoolMat pieces. :( 
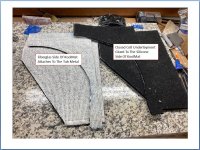
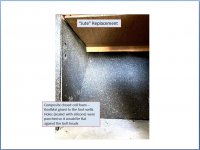
This was because it was better to glue the foam to the KoolMat when it was laying horizontally with weights, and letting it cure for 24 hours. You understand the drill: move ahead one step and then move back two steps after we learn how to do it.

The first picture shows the composite foam-KoolMat pieces and the second shows them installed in the foot-well area. The third and fourth pictures show the KoolMat installed with the composite pieces on the tunnel area and all edges sealed. The foam is glued to the vertical panels and is loose on the horizontal panels, as was the original jute.

The upper cardboard seen in the second picture is a form I used to make a fiberglass cover that screws to the upper panel to seal it.

The last picture shows the finished foot-well area and the carpet folded under the transmission tunnel as described in the video (really difficult to photograph black carpet in a car in a garage). The lighter gray area is a Cocomat used to protect the new carpet. They send you paper patterns to customize for an exact fit. Its a 1960s sportscar. It has to have Cocomats!

It was a lot of work, but our BJ8 is cool and much quieter now.

Regards, Bill
 

Attachments

  • Jute Replacement2A1.JPG
    Jute Replacement2A1.JPG
    231.4 KB · Views: 111
  • 1 Foot-Wells.JPG
    1 Foot-Wells.JPG
    128.8 KB · Views: 115
  • 1 KoolMat Install.jpg
    1 KoolMat Install.jpg
    1.4 MB · Views: 111
  • 1 AA_Tunnel2.jpg
    1 AA_Tunnel2.jpg
    139.5 KB · Views: 114
  • 1 Tunnel Junction.jpg
    1 Tunnel Junction.jpg
    2.8 MB · Views: 115
Last edited:
Hi Bill,

Thanks for the very helpful post regarding koolmat installation. Did you use a different product for the sills?

Joe
 
Hi Joe,

I used KoolMat on both sills and then covered their sides with closed cell foam; and used Dynamat Xtreme on their top surfaces. The clamps shown in the picture were used to glue the foam to the KoolMat until cured.

Regards, Bill
 
Thanks Bill. I saw the dynamat on the top in your sill photo and wanted to confirm.

I glued up a composite test piece for a vertical panel a few days ago and checked it out today. I can see that this is going to work very well.

Joe
 
Hi Joe,

I was afraid of adding too much height to the sill with foam on top.

Good luck with your heat and sound proofing! The work we did resulted in a much cooler and quieter car.

As you are aware, adding insulation or replacing vinyl inner panels with full leather panels will alter the distance between the panel and the metal door frame/strip where drought excluder is installed. The sheet metal door frame/strip can be easily bent as needed so the door closes nicely and still seals well.

Regards, Bill
 
Last edited:
Back
Top