• The Roadster Factory Recovery Fund - Friends, as you may have heard, The Roadster Factory, a respected British Car Parts business in PA, suffered a total loss in a fire on Christmas Day. Read about it, discuss or ask questions >> HERE. The Triumph Register of America is sponsoring a fund raiser to help TRF get back on their feet. If you can help, vist >> their GoFundMe page.
  • Hey there Guest!
    If you enjoy BCF and find our forum a useful resource, if you appreciate not having ads pop up all over the place and you want to ensure we can stay online - Please consider supporting with an "optional" low-cost annual subscription.
    **Upgrade Now**
    (PS: Subscribers don't see this UGLY banner)
Tips
Tips

BJ8 Frame Rust Options?

Peepers

Freshman Member
Offline
I'll try to keep this short, but I'm soliciting opinions on where to go with this.

This is a late production '67 BJ8. I bought it from the original owner about 35 years ago (IIRC).
I only drove it for a year or so, and then life happened and it's been in inside warehouse storage since then.
It's 100% original (but needing much restoration) and with about 42k original miles. I'm only now, in my retirement years, about to jump in with the resto.

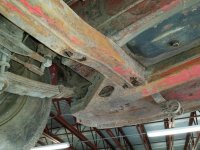
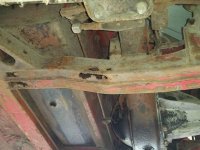
Take a look at the two pics here, and I'll point out that while most of the frame paint is peeling off and there is obvious surface rust, the frame is really in great shape EXCEPT for just the area I show in these two pictures which are of the same area but from two different angles.
I hate to think of replacing the complete frame because it really IS in great shape overall, but as you can see, the last couple of feet of the rear of the right main frame rail has some rust-through spots.
I'll also mention that I'm replacing the original rocker panels as well (for rust), but all of the rest of the car looks pretty good and really only needs lots of TLC stripping, some sandblasting, and epoxy priming.

I may or may not have personal opinions on where to go with this, but I want to hold back on my ideas and get some suggestions from the herd here in the Forum so I can come up with a plan.

So for those who feel that they've "been there, done that" with regard to handling rust issues, I present you these pics.

What do you think, guys?
 

Attachments

  • Healey-1.jpg
    Healey-1.jpg
    79.6 KB · Views: 183
  • Healey-2.jpg
    Healey-2.jpg
    66.3 KB · Views: 176
Country flag
Offline
I believe repair sections of the frame are available, and that would be the easiest route to take.

Note that these frames rust from the inside out, so DO take a good look up the interior of the rails when you open it up.

If you're thinking something along the lines of welding some angle-iron and pieces of plate (old lawn mower blades, etc.) to patch it up, please don't. It will make the car practically unsalable, unless of course, it's sold to an unsuspecting (but well meaning) wife to give to her husband on their anniversary...
 
OP
P

Peepers

Freshman Member
Offline
I believe repair sections of the frame are available, and that would be the easiest route to take.

That actually was/is my first thought, but I guess I need to look a little further because Moss, while showing some sections available, do not show that rear section piece as being available.

I owned and operated an automotive repair and restoration shop for about 25 years (I bought this BJ8 from a customer who originally brought it in for restoration).
So I do understand how rust works.
However, even though I have the experience to cut out those sections of rust and properly repair them with welded plates and fair them in to look original, my old time "professional" instincts lead me to want to replace that section.

I've been out of the business for more than a couple of decades, so can you point me to a source for a frame section for this work?
 

Healey Nut

Luke Skywalker
Country flag
Online
The restoration shop that did my 64 did this see pics . Significant sections of the main frame rail were cut out back to good material are new sections fabricated and grafted in welded etc .
car is complete now and drives straight as an arrow .
 

Attachments

  • 9355CF06-4479-4106-BF1C-B468D007A8B8.jpg
    9355CF06-4479-4106-BF1C-B468D007A8B8.jpg
    58.6 KB · Views: 158
  • C7D07B6F-0A03-478F-9F88-F461823BBABC.jpg
    C7D07B6F-0A03-478F-9F88-F461823BBABC.jpg
    45.1 KB · Views: 156
OP
P

Peepers

Freshman Member
Offline
If anyone makes that frame section, it would be Kilmartin, http://www.kas-kilmartin.com.au/Austin Healey.htm.

What gives me pause is that other frame parts are more known for rust-through. If the rears are rusted through, I would expect other places are too, unless there is an identifiable reason why the rears corroded so badly.

That was exactly my thought as well, but when I had it in the air (picked up with my fork lift to above head height), I had a chance to walk the entire frame and have a close look from front to back.
Doing the "hammer tap" test throughout, everything sounded solid and I could find no other questionable areas.
All I could find visually was either paint peeling off the frame, or areas where paint had been gone so long that there was surface rust but nothing apparently deep.
Many of the areas where paint had peeled were actually clean steel with surface rust not even starting. That leads me to think that the frame as a whole is actually pretty stout other than the two feet of the rear rail I'm discussing.

As to "identifiable reason" for this two foot length of rust-through, my primary suspicion is that there is a drain hole(?) at the bottom of the frame on the left side that isn't on the right, and note that this same area on the left side of the frame shows absolutely none of the rust as does the right. It is only this two foot section at the back of the right rail where this kind of rust is obvious.

Holes are put in frames for two primary reasons: to create a drain hole, or to establish a jig or measurement point for frame assembly at the factory (and then used for repairs later when necessary).
If that hole I found on the left frame rail was a datum point for assembly, then I would think there would have been a corresponding hole on the right side, but there wasn't.
So what I am left with is the theory that a drain hole was omitted on the right side which would easily explain the rust-through in that quite local area.

Healey Nut pointed out in the preceding post how pros can easily fabricate when necessary, and I am a (former) pro (not bragging, just stating a fact), so before making a final decision on how to go, I think I'll cut out some steel beyond the obvious rust areas and take a look inside with my snake-scope camera to see how far it extends.
With the camera able to go a few feet inside the frame, that should tell me what I need to do from there.
 
Last edited by a moderator:

Healey Nut

Luke Skywalker
Country flag
Online
When you picked the car up did you happen to check the door gaps and if they changed or if the doors actually opened on their own or they were different in the way they opened/closed as opposed to when the car was on its wheels .
Big changes in door gaps and door operation with the car in the air are a good indicator of overall chassis condition .
 

vette

Darth Vader
Country flag
Offline
As Healey Nut has shown the frame can be repaired and I believe that if the damage is limited to what you are showing then I believe it can be repaired without stripping the car all the way to the bare frame rails. Obviously the rear axles and other pieces will need to be removed. As noted most Healey frames have rust. So inspect it well before you decide your course. But most are rusted more than many want to see it is just we all hope that they don't go too far. What I am referring to is as said earlier if the door gaps have closed up then you have the potential for more trouble.
When I restored my BJ7 the frame had some rust through on the top of the frame rails near about the transmission area. I believe this is primarily caused because the floor pans are originally welded to the top of the frame rails there-by creating a very good potential to trap water on the top of the frame rail under the floor sheet. So since my rust through was on the top of the rail I felt is was easy to cut the top off the rail and weld a new top on. Also because it was on top it would never be seen again. When I installed new floor pans instead of putting them on top of the rail I bent flanges on them and welded them in at the side of the frame rail. Sure not original but better. Water would never again be trapped on top of the rail.
So getting to yours it appears to me that if the frame rail is solid at about the shock mount the you only have to replace the frame rail from just aft of the shock to the rear cross member or anything else you decide needs it. But that section can be made without too much trouble. And I would install a new fabricated section. Don't plate what's there, you know that will come out terrible as Randy has mentioned. You can make that section by laying out on flat plate the demensions of the side profile and holding them in a jig while welding on top and bottom pieces.
Don't throw the car away and as I've heard some say, 'don't junk it up'. Good Luck.
 
Last edited:
OP
P

Peepers

Freshman Member
Offline
Well, the door gaps were tight, but I determined that was because the lower rocker panels and inner sill panels were rusty (rust-through) which means support was lost for proper door fit. So I am replacing the rocker panels and the inner sill panels on both sides along with both side door rear shut pillars just for grins (the shut pillars only had some rust at the bottoms, but in for a penny, in for a pound...).

I've done some more detailed inspection of all of the frame and I am satisfied that it really is only that back two feet of the right rail that is the problem.
I agree that fabricating that rear rail is a good way to go, and I think it would actually end up being an easier job of it as opposed to trying to patch in pieces.
I'm not trying to do a frame off, show car restoration, but I do want to restore all the steel to it's original integrity, and, I want it to LOOK like a show car from 10 feet away, so it is going to get lots of resto that I wasn't originally planning because I want to end up with a reliable driver.

Off hand, can anyone tell me the gauge of the steel used for the frame?
 

nevets

Jedi Knight
Country flag
Offline
One possible reason why one side of the frame rusted and not the other could be because of proximity to the exhaust system? I owned a Morris Minor which were notorious for chassis rust occurring at the mounting point of the front suspension torsion bar. This problem most often occurred on the side opposite of the exhaust pipe. I seems that heat from the exhaust pipe would promote drying of any moisture captured within the chassis. Just a thought...
 

RAC68

Darth Vader
Offline
Hi Pepper,

Keep in mind that any new section will have greater strength and rigidity than the retained panels. Also consider that the original frame steel was 15-gauge and of a different composition then the 16-gauge commonly used in the replacement sections and adding to this strength differential. Add the loss from internal or external deterioration and it becomes understandable that frame flex will increase stress on the weaker original sections and promote future frame breaches and failures. Where possible and practical (not for major the major frame rust of your rear section) I see it more desirable to patch modestly sized frame voids and replace major rusted components (as your rear frame section).

Just my thoughts,
Ray(64BJ8P1)
 
Last edited:

vette

Darth Vader
Country flag
Offline
Your description of the work you are planning is significant. I know you said that you are not looking at a complete frame off job. Just for the record you do realize that on a Healey all the vertical structures that comprise the body are "WELDED" to the frame. When you go to replace the rockers, inner sill and latch pillar you will be removing much of the structure. I did much the same thing. Heres my point, you will need a fixed reference that does not move so as to rebuild exactly even when bracing to the fullest extent. In my case the fixed structure that did not have to be touched was the door hinge pillars. And my doors were found to be hung with no shims which made it easier. So consider especially this when you go to replace things like the latch pillars. I hung the doors on the hinge pillars and built from there. Good Luck.
 
OP
P

Peepers

Freshman Member
Offline
When you go to replace the rockers, inner sill and latch pillar you will be removing much of the structure.

Right, and it's because my sills were rusted that I am confident that the rusted sills were responsible for the door gap being tighter than the frame itself.
If you look at the picks I posted in the OP, look at the rear cross rail and the area of the part of the right frame that's in front of the rusted rear section.
What you're seeing is just light surface rust with a lot of red paint still on the frame. That's what the entire rest of the frame itself looks like. It's only the short rusted section that is problematic, and I feel relieved that's really my only real frame issue.
As I look through a lot of online build stories, I see nightmares of frame rust that, if they were my car, I would have bailed on the project (I'm 70 years old now and measure time I spend on things very carefully).

As far as jigging the frame for level, I sure miss the Kansas Jack frame machine I used when I had my repair shop back in the early 90's.
Still, with the frame leveled on tall jack stands and supported under the wheels so that it's in "road running" weight distribution, I'm not terribly intimidated with putting things back right while replacing the rockers and sills.

Rac68's observation of the gauge of the frame steel helps a lot, and I'm going to go a little further cutting out more of the rust beyond those areas before I make a final decision whether to replace the rear rail section or fabricate my own. At about $600+ for a short piect of section now, I can do a lot of fabricating, because let's face it, the $600 replacement sections are "fabricated" as well.

As I go further and further into the car, I've decided to take off the front and rear center body sections, and pull the engine/trans. as well, so I guess whether I want to admit it or not, I'm pretty much getting into a "frame off" restoration in most respects.
 
Similar threads
Thread starter Title Forum Replies Date
JamesD BJ8 Top Frame Bumpers Austin Healey 12
M BJ8 Frame Dimensions Austin Healey 2
RAC68 Shim Adjustment of BJ8 Convertible Frame Austin Healey 5
I BJ8 soft top frame dimensions Austin Healey 4
C Top frame pinching soft top - BJ8 Austin Healey 6
CLEAH Found another number on my frame [BJ8] Austin Healey 6
P AH BJ8 hood frame spring where I got hooked Austin Healey 3
R weight of BJ8 Frame with inner body panels Austin Healey 1
Bob McElwee '66 BJ8 Phase III Top Frame Assembly Austin Healey 3
L 1966 BJ8 frame rebuilding questions Austin Healey 1
eschneider value - BJ8 frame, engine, trans w/ title? Austin Healey 8
BOBBYR BJ8 frame measurements Austin Healey 4
J BJ8 1967 Carpet install under convertible frame Austin Healey 3
J Installing glass in BJ8 frame. Austin Healey 11
GregW Late BJ8 frame dimensions Austin Healey 2
B BJ8 frame,sill dimension. Austin Healey 2
Ed_K BJ8 windshield frame to scuttle gasket fun ! Austin Healey 10
R Removing 66 BJ8 Windshield frame Austin Healey 23
R BJ8 Windshield Frame Austin Healey 3
1 BJ8 History Trace Austin Healey 7
Patrick67BJ8 Wanted Looking for a used BJ8 switch panel. Austin Healey Classifieds 5
D BJ8 Top Installation Detail Austin Healey 3
B BJ8 Rear Backrest Hinges Austin Healey 4
S Wanted WTB: 3.5 ratio diff/pumkin for '67 BJ8 Healey 3000 Austin Healey Classifieds 0
AUSMHLY BJ8 Trans Cover Carpet Austin Healey 7
nitro BJ8 Engine Design Austin Healey 1
AUSMHLY BJ8 Carpet and Snaps Austin Healey 2
Overdrive45 BJ8 Interior Trim Austin Healey 8
nitro BJ8 Production Year Austin Healey 6
WHT BJ8 Rear Seat Surround Drain Tube Grommets Austin Healey 0
B BJ8 Seat Sliders Austin Healey 4
B For Sale 1967 Metallic Golden Beige MKIII BJ8 Numbers Matching - The Real Deal Austin Healey Classifieds 0
F Wanted BJ8 Engine Block Austin Healey Classifieds 1
BoyRacer For Sale BJ8 disk wheel hubs, spindles & calipers Austin Healey Classifieds 0
AUSMHLY BJ8 Rear Seat Squab Austin Healey 0
AUSMHLY BJ8 Differential Oil Change Austin Healey 6
S SOLD!! For Sale 1964 AH 3000 MkIII BJ8 Phase 1 Austin Healey Classifieds 2
Patrick67BJ8 BJ8 Factory Hardtop Rear Window Austin Healey 6
AUSMHLY BJ8 Clutch Pressure Plate, Old vs New Austin Healey 4
AUSMHLY BJ8 Clutch Fork Bush Replacement Austin Healey 5
AUSMHLY BJ8 Cylinder Head Installation Austin Healey 6
LAW75 BJ8 Brake Lines Austin Healey 2
AUSMHLY BJ8 Clutch Pressure Plate Brand Preferences Austin Healey 3
BoyRacer For Sale BJ8 spindles & disc wheel hubs Austin Healey Classifieds 0
G Wanted BJ8 Tonneau Cover Austin Healey Classifieds 0
Cutrog1 For Sale Healey 3000 BJ8.... a restoration saga Austin Healey Classifieds 0
AUSMHLY BJ8 Overdrive Oil Passages Austin Healey 2
Scotsman Wiring Diagram for 1966 BJ8 Austin Healey 3
A For Sale 1966 3000 Healey Blue BJ8 Austin Healey Classifieds 3
S BJ8 Front Side Lamp/Turn Signals Austin Healey 1

Similar threads

Top