Hey Guest!

 Hey - did you know if you click on the title of a thread it will take you to the first unread post since you last visited that thread?
 but were afraid to ask:
  STOP!! Never post your email address in open forums. Bots can "harvest" your email! If you must share your email use a Private Message or use the
  smilie in place of the real @
 Pretty Please - add it to our Events forum(s) and add to the calendar! >>
D
Deleted member 26968
Guest
Guest
Offline
Hi.
Need some advice.
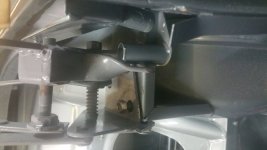
Does anyone have a photo showing the configuration of the hood frame mounting plate on the B post. I am trying to get the hood alignment against the window correct and looking at the mounting plate I have a spring over a bolt on one side of the car and none on the other side. Which is correct and if I need another spring or spacers, who sells them?
I have also just learned there is a huge spring fitted from this hood mounting plate to the floor. Neither of my cars had any sign of floor attachments for this so I
wondered if it is really necessary. There is such a short lever arm I really can't see a spring having any real affect given the weight of a fully loaded hood. None of the Triumphs have sprung loaded hoods.
Also for the hood drain channel pipes, none of the suppliers show whether to over-drill the hole size and fit a rubber grommet. Can you advise what the original procedure was and if all five holes are really required. One of them is right over the driveshaft. Fact is, I hate the idea of drilling all those holes in my brand new paintwork as I hadn't planned to drive the car during a tsunami!
Cheers
Barry
Need some advice.
Does anyone have a photo showing the configuration of the hood frame mounting plate on the B post. I am trying to get the hood alignment against the window correct and looking at the mounting plate I have a spring over a bolt on one side of the car and none on the other side. Which is correct and if I need another spring or spacers, who sells them?
I have also just learned there is a huge spring fitted from this hood mounting plate to the floor. Neither of my cars had any sign of floor attachments for this so I
wondered if it is really necessary. There is such a short lever arm I really can't see a spring having any real affect given the weight of a fully loaded hood. None of the Triumphs have sprung loaded hoods.
Also for the hood drain channel pipes, none of the suppliers show whether to over-drill the hole size and fit a rubber grommet. Can you advise what the original procedure was and if all five holes are really required. One of them is right over the driveshaft. Fact is, I hate the idea of drilling all those holes in my brand new paintwork as I hadn't planned to drive the car during a tsunami!
Cheers
Barry