Hi TH,
At the risk of being redundant I'll add a bit,
"It won't stay in OD without help & it slips in reverse."
The two may be related.
In hindsight, Bill should have tested the OD operation while he had the transmission
The cone clutch is the heart of the OD. It has a front AND a rear gripping surface. In direct drive & reverse, the clutch is forced to the front engagement surface by a group of springs. In OD the clutch is forced to it's rear position by hydraulic pressure.
https://www.britishcarforum.com/lore/article.php?id=073
Start here Item #7 - OD solenoid. Remove the rubber cover & check, clean the small contact.
If this contact is not making, the main solenoid operating coil will not operate & it will not have enough power to operate the OD valve. The contact should open when the solenoid plunger is in the fully engaged position. The solenoid input wire should measure less than one ohm to ground with the contact closed & around eight ohms with the contact open.
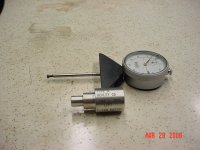
Go to item 5 & check the solenoid arm/operating valve adjustment by measuring actual ball lift while pushing the solenoid plunger fully up. It shold rise between .030" & .050 inch. A dial caliper may work well enough. The original factory, solenoid arm adjustment method of aligning the right hand arm with a hole & inserting a pin, often is not correct after years of wear & tear. Also see below:
----------------
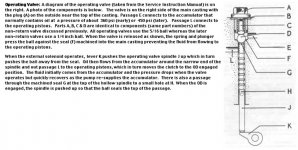
The operate valve - solenoid adjustment. How it works. See the attached pic.
Note that the operating valve ball "D" has to seal to the top of the small seat on the top of the spindle "G" when the OD is operated, (spindle "J" raised by the solenoid & levers).
Also the ball must seal on the housing "F" when the solenoid is NOT operated, to remove line pressure which enters the valve through port "E" & flows to the OD operating pistons through port "L".
The valve spindle "J" has a small bleed hole "H" which lets operate pressure in the OD operate pistons bleed off when the OD is not operated.
---------------
All of this to say - Tap the 5/16" ball into it's lower seat to improve the seal "F", lap the top of the spindle to the ball at seal "G". Replace with a new 5/16" ball, available at hardware stores & bearing supply stores.
Why?
If the solenoid is not lifting the spindle far enough, the OD will be slow to operate.
If the spindle is lifting too far, it may not seat at "F" when the solenoid is released, see below.
If seal "G" is leaking, the OD will not have full pressure.
If seal "F" is leaking, or the relief hole "H" is plugged, tiny hole, the OD will be held partially operated & reverse gear will not hold. Partial clutch movement, or failure to completely release will leave the OD clutch in a more or less neutral position & reverse may not hold. Forward direct drive is also supplemented by another one way mechanical clutch so it may not slip in forward even if the OD front clutch is not making full engagement.
If the solenoid arm adjustment is such that the ball valve tops out against it's spring before the top solenoid contact opens, the solenoid will likely burn out, unless it is separately fused.
Hopefully, the problem will be that the top solenoid contact is not making & allowing the high power solenoid winding to operate.
Really sorry you are having a problem. Don't hesitate to send me an email if things aren't going well.
D

 Hey Guest!

 Hey - did you know if you click on the title of a thread it will take you to the first unread post since you last visited that thread?
 but were afraid to ask:
  STOP!! Never post your email address in open forums. Bots can "harvest" your email! If you must share your email use a Private Message or use the
  smilie in place of the real @
 Pretty Please - add it to our Events forum(s) and add to the calendar! >>