 but were afraid to ask:
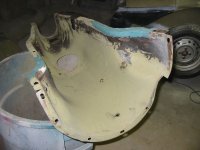
 My transmission tunnel doesn't fit into my 57 worth a crap. I suppose the new floors have something to do with it and the fact that this tunnel (the whole inside of the car for that matter) must have been sitting in 4 inches of water for quite a few years. The tunnel has been welded on , whole mounting sections replaced, etc. Should I just beat it into submission? Drill new holes to match the new existing? How snug should it be around the starter side? How about the driveshaft tunnel? How should it fit up to that? I'm beginning to remember why I took three years off on this project.

-
 Hey Guest!
British Car Forum has been supporting enthusiasts for over 25 years by providing a great place to share our love for British cars. You can support our efforts by upgrading your membership for less than the dues of most car clubs. There are some perks with a member upgrade!**Upgrade Now**
(PS: Upgraded members don't see this banner, nor will you see the Google ads that appear on the site.)

Tips
- We have a special forum called "Member Articles" where you can submit actual articles for consideration for publication. Learn More
- Don't have an Avatar? If not, your avatar will default to the 1st character in your username. Go into "Account Details" to change your Avatar.
- Some basic forum navigation info: click
 Hey - did you know if you click on the title of a thread it will take you to the first unread post since you last visited that thread?
- Hey Guest - Is your British Car Club in our Clubs database? If not, send me a PM - Basil

- Looking for a local club? Click the "Clubs" tab above and browse hundreds of clubs world-wide.
- Add Android or iPhone APP: click
- Did you know - any picture or video you add in your posts in any marque-specific forum will also get added to the Media Gallery automatically.
- A few more tips about posting and replying: click
- Hey there Guest - be sure to keep your profile page up to date with interesting info about yourself: learn more
- More tips and tricks on Posting and Replying: click
 STOP!! Never post your email address in open forums. Bots can "harvest" your email! If you must share your email use a Private Message or use the
  smilie in place of the real @
- Want to mention another member in a post & get their attention? WATCH THIS

- So, you created a "Group" here at BCF and would like to invite other members to join? Watch this!
- Hey Guest - A post a day keeps Basil from visiting you in the small hours and putting a bat up your nightdress!
- Hey Guest - do you know of an upcoming British car event?
 Pretty Please - add it to our Events forum(s) and add to the calendar! >> Here's How <<
- Hey Guest - you be stylin' Change the look and feel of the forum to fit your taste. Check it out
- If you run across an inappropriate post, for example a post that breaks our rules or looks like it might be spam, you can report the post to the moderators: Learn More
- If you would like to try some different "looks" or styles for the site, scroll to the very bottom, on the left and click the Style Selector.
You are using an out of date browser. It may not display this or other websites correctly.
You should upgrade or use an alternative browser.
You should upgrade or use an alternative browser.
TR2/3/3A Beat my transmission tunnel to death?
- Thread starter bnw
- Start date
TR3driver
Great Pumpkin - R.I.P
Offline
My opinion, beat it into submission. At the tunnel, it just lays on top of the fixed part of the tunnel, hopefully with a close enough fit that a strip of felt or caulking compound will seal it. Around the starter, there is a section where it just butts up against the firewall, again hopefully close enough to seal with some caulking compound. None of mine have fit well enough to just sit in place, they have all needed to have all the bolts started first, sometimes with longer than original bolts, and with generous amounts of force applied to line the holes up well enough to start the bolts. Once you have them all started, tighten gradually to pull it into place. I have also brazed more metal around most of the original holes, as they are all split and/or rusted away.
TexasKnucklehead
Jedi Knight
Offline
I found that my tunnel went on easier before I mounted the tub to the frame. The floors can flex a lot, and so can the tunnel. I have some caulk around the starter and where it sits against the firewall as well as the drive shaft tunnel. Those last 2 bolts near the drive shaft were the most difficult to start.

I put new floors in and found that the tunnel holes did not line up. The trick is to not tighten anything until you have all the screws started. For difficult places try using your scissor jack flat on the floor with the bottom against the outside wall and then jack the tunnel into submission at the point where the problem hole is located. I eventually got all but two holes to line up. The last two were too far out of alignment so I drilled new holes in the tunnel flange.
TR3driver
Great Pumpkin - R.I.P
Offline
JIC some are not aware, there are replacement caged nuts available that work really slick. There's a nice article (with photos) on Mark Macy's site:
https://www.macysgarage.com/myweb6/cage_nuts.htm
I now see where he sells the nuts for $1.25 each. If you need a larger quantity, MMC sells a box of (10) for $7.21. (Scroll down to where it says "Easy-Align Weld Nuts")
They are better in every way than the originals IMO, with one exception : they need a bigger hole in the sheet metal than the originals. I found it trivial to open the hole up with a Dremel & cylindrical milling burr; but if you want, you could grind the flange off the nut housing instead. Some simple tests showed the cage to be much stronger than the TR originals, so I don't expect them to spin nearly so easily in the future (even if I do manage to live that long).
There are actually 2 types of tunnels. One fits the older starter and one the newer, so the bump for the starter is different on the tunnel. Berry Nelson and I debated this point, and he maintained they were all the same, but I have both. What is odd is that Berry really knows the tr3. Berry where are you? Anyways, someone also made an aftermarket fiberglass one, maybe Amco. The deal is if one needs to pull the trans or fix the shifter leakage being able to remove the tunnel easily is helpful, so my suggestion is to do a clean and nice job of fitting the tunnel, so that it comes off without too much hassle.
TexasKnucklehead
Jedi Knight
Offline
(even if I do manage to live that long)
I was thinking the same thing; I'll never be taking this tunnel off again because I have the Toyota 5-speed with hydrolic throw out bearing. I installed the tunnel while the tub was supported by 4 bar stools. All the missing or damaged captive nuts were replaced as original. I used larger washers, bent nearly in half on all the bolts. I caulked the gaps from the under side and applied undercoating to the underside and under the floors.
After my first 10 mile drive, I had to remove the tunnel. Apparently I failed to properly apply loc-tite to the shifter conversion, and it fell apart. I knew the tunnel would come off easy enough, but feared getting it back on. With an awl, I was able to line up and start all the bolts without much trouble. I think installing it before securing the tub to the frame helped.
Randall, I hope you have no plans of leaving us anytime soon. You've helped my TR3 to a new life. I'm hoping to drive through California in June and would like to visit with you, and have you see the TR3.
CJD
Yoda
Offline
I'll confirm too...the replacement floors don't fit at all to the tunnel. Since the tunnel was original, and the floors are not, I chose to match the edge of the floor...including nut cages...to the old tunnel. Beat the lip into shape with a big hammer and dolly. When it work hardens,heat it red hot with a torch, and beat some more.
TR3driver
Great Pumpkin - R.I.P
Offline
Me too. Definitely different; in fact the SPC lists three different part numbers. Not sure what the earlier difference was, but it shows the tunnel changing at TS50001, which is when the bellhousing changed.There are actually 2 types of tunnels. One fits the older starter and one the newer, so the bump for the starter is different on the tunnel. Berry Nelson and I debated this point, and he maintained they were all the same, but I have both.