• Hi Guest!
    If you appreciate British Car Forum and our 25 years of supporting British car enthusiasts with technical and anicdotal information, collected from our thousands of great members, please support us with a low-cost subscription. You can become a supporting member for less than the dues of most car clubs.

    There are some perks with a member upgrade!
    **Upgrade Now**
    (PS: Subscribers don't see this gawd-aweful banner
Tips
Tips

BE ignition and high beam jewels...

Whitephrog

Luke Skywalker
Country flag
Offline
... are like socks in the mashing machine. They mysteriously disappear. I'm not sure they really ever existed, only a myth.

Last week I installed my NOS tach in my dash when I noticed that there was no jewel in the high beam slot. The tach came straight from an undisturbed Smiths box. I had a few tach and speedometer spares so I went to get a jewel from one of them. None there either!

Is there a source for these jewels? If not, what have others done? I'm considering using red LED bulbs in those slots but would prefer to have the jewels.
 
I believe Jack Laird recommends taking those colored plastic tabs off of office supply notebook dividers and using a hole punch to make disks to use as jewels. I think he just glues them to the back of the gauge face.

As for the LEDs, I don't remember if you have a generator or alternator on the Bugeye. If you have an alternator the charge warning lamp can be an LED but it's a bit more complicated than simple indicator lights as used for oil pressure, turn signal, etc. If you get to that point I'll be happy to elaborate on what's involved.
 
Using a generator, would the LED work for the high beam and ignition indicator slots?
 
yep, that's what Drew and I did, works fine and you can not tell difference after installed.
 
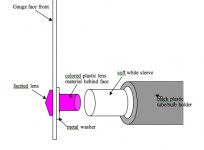
I was playing with these just last night. I took apart my tach and speedo to drill another hole to add another bulb for better night lighting. The highbeam warning jewel separated from the back side, I think the faceted jewel part can come off the rest of the "lens" leaving it in the back. There's a white tube thingy that connects the "lens" to the black tube/bulb holder. I painted the inside of this tube silver (better light out the front?). I hope to just carefully glue the jewel face back on. Doesn't help much does it? I'd be looking through my daughter's old dolls and toys looking for a bit of costume jewelry, sometimes get lucky, troll cheap junk toys at the dollar store?
 
Look in craft stores for plastic beads of the right color...they can be melted and formed...I did that for my turn-signal indicator and it worked out pretty well!
 
Does anyone have a photo of one of these mysterious creature appropriate for a BE?
 
bugimike said:
Look in craft stores for plastic beads of the right color...they can be melted and formed...I did that for my turn-signal indicator and it worked out pretty well!

Great idea. Craft stores have tons of weird things. Am I right that the front part, the jeweled faceted part is connected to the rest of the colored part and not supposed to be separate? I don't have picture but I'll make one a second.
 

Attachments

  • 20291.jpg
    20291.jpg
    36.9 KB · Views: 222
The Bugeye ones did not have faceted jewels, just a little red dot. Punch it out of the binder plastic, and then sand it down so it's press fit into the holder. Us the head of a nail to pop it into place. No glue needed.

Nice and simple. I don't have a picture handy, it looks like it should.
 
Okay, sorry. BE is not the same as MK1 Midget or MK11 Sprite in the warning light area.
 
I had the same issue in a 62 VW bug. I used the folder method. The only issue I had was to double it up to make it darker. I was also missing the jewel in my Spitfire. I went to Jo-ann Fabric and found a bag of beads. Wouldnt you know they had the exact jewel I needed I bought a bag of twelve.

I would like to see a pic of what your jewels (the ones in the dash) look like. I found one from a spit and a midget in my parts bin.
 
I've replaced these a couple of times with plastic "jewels" from a craft supply store. I bought a bag of assorted ones for a few bucks, and found some that were close to fitting. I just sanded off the metal coating on the flat side, epoxied it to a wood stick from a q-tip, which worked as a holder for sanding the edges down to size. Then, broke off the q-tip stick, cleaned it up, and epoxied it in place with clear epoxy. Looks nice, works fine.
 
I'm known in my local Micahel's and Joann stores for having the most off beat uses for the things I buy. Now I have a new one
 
Back
Top