-
 Hi Guest!
You can help ensure that British Car Forum (BCF) continues to provide a great place to engage in the British car hobby! If you find BCF a beneficial community, please consider supporting our efforts with a subscription.
There are some perks with a member upgrade!**Upgrade Now**
(PS: Subscribers don't see this gawd-aweful banner

Tips
- We have a special forum called "Member Articles" where you can submit actual articles for consideration for publication. Learn More
- Don't have an Avatar? If not, your avatar will default to the 1st character in your username. Go into "Account Details" to change your Avatar.
- Some basic forum navigation info: click
 Hey - did you know if you click on the title of a thread it will take you to the first unread post since you last visited that thread?
- Hey Guest - Is your British Car Club in our Clubs database? If not, send me a PM - Basil

- Looking for a local club? Click the "Clubs" tab above and browse hundreds of clubs world-wide.
- Add Android or iPhone APP: click
- Did you know - any picture or video you add in your posts in any marque-specific forum will also get added to the Media Gallery automatically.
- A few more tips about posting and replying: click
- Hey there Guest - be sure to keep your profile page up to date with interesting info about yourself: learn more
- More tips and tricks on Posting and Replying: click
 but were afraid to ask:
  STOP!! Never post your email address in open forums. Bots can "harvest" your email! If you must share your email use a Private Message or use the
  smilie in place of the real @
- Want to mention another member in a post & get their attention? WATCH THIS

- So, you created a "Group" here at BCF and would like to invite other members to join? Watch this!
- Hey Guest - A post a day keeps Basil from visiting you in the small hours and putting a bat up your nightdress!
- Hey Guest - do you know of an upcoming British car event?
 Pretty Please - add it to our Events forum(s) and add to the calendar! >> Here's How <<
- Hey Guest - you be stylin' Change the look and feel of the forum to fit your taste. Check it out
- If you run across an inappropriate post, for example a post that breaks our rules or looks like it might be spam, you can report the post to the moderators: Learn More
- If you would like to try some different "looks" or styles for the site, scroll to the very bottom, on the left and click the Style Selector.
You are using an out of date browser. It may not display this or other websites correctly.
You should upgrade or use an alternative browser.
You should upgrade or use an alternative browser.
BE Hood Tilt Kit
- Thread starter ralph_s
- Start date

Offline
I have that kit on my BE. Since I bought it I used it, but would not buy it again. MiniMania is competition oriented and this kit will allow you to get the bonnet off your car quickly. I had to make an additional part that holds the bonnet to the frame in a more secure manner. I did this for my own peace of mind as the MM kit will work. Now, to get the bonnet off I have to remove the bolts holding the bonnet to the frame. Others on the forum have used different forward tilt kits and some have made their own brackets. I think Jim Gruber is one of those and I am sure he will chime in here. I also used Triumph Spitfire bonnet hold down clamps to secure my bonnet and really like that method of clamping. It looks very good and works. FWIW my .02 cents.
Charlie
Charlie
Jim_Gruber
Yoda
Offline
Ralph,
I'm using the plans that someone posted here a while back and Gerard posted on his web site. It works great for my BE bonnet on Bugsy my '68. I was able to fab it with just a vise, a metal file, drill press. I used 3 pieces of 1/8" aluminum plate held together with JB Weld that I machined together all in one piece for the big bracket. Normally that is 1/4" steel that I figured would be hard to form and cut. Rest of assembly is steel. I like the hood stop, hood can be raised and stops before beehive lenses touch the ground. On this I would go one size larger on the bolts that secure the hood stop to the side of the radiator support bracket. I have bent those bolts before. I found hold down clamps that were adjustable and small out of the McMAster Carr catalog $10-12 ea. I did find that BE Bonnets have incredibly tight tolerances with underhood parts and pieces and I see why BL went to separate hood and fenders as even though there are an incredible numbers of nuts and bolts that fit and alignment is not so critical. Used a 5 or 6 wire trailer harness connector as a quick disconnect for all wiring up front. Two bolts hold the entire bonnet on plus clamps at the rear. Took a few hours to fab up the brackets and more than a few hours getting the alignment correct but the "Cool Factor" cannot be overstated. I got to park next to Trevor's Ugly Bug at British Car Days in Dayton a few years ago and both of us had our forward tilt bonnets going. Here's a Pictue of the hinge.
I'm using the plans that someone posted here a while back and Gerard posted on his web site. It works great for my BE bonnet on Bugsy my '68. I was able to fab it with just a vise, a metal file, drill press. I used 3 pieces of 1/8" aluminum plate held together with JB Weld that I machined together all in one piece for the big bracket. Normally that is 1/4" steel that I figured would be hard to form and cut. Rest of assembly is steel. I like the hood stop, hood can be raised and stops before beehive lenses touch the ground. On this I would go one size larger on the bolts that secure the hood stop to the side of the radiator support bracket. I have bent those bolts before. I found hold down clamps that were adjustable and small out of the McMAster Carr catalog $10-12 ea. I did find that BE Bonnets have incredibly tight tolerances with underhood parts and pieces and I see why BL went to separate hood and fenders as even though there are an incredible numbers of nuts and bolts that fit and alignment is not so critical. Used a 5 or 6 wire trailer harness connector as a quick disconnect for all wiring up front. Two bolts hold the entire bonnet on plus clamps at the rear. Took a few hours to fab up the brackets and more than a few hours getting the alignment correct but the "Cool Factor" cannot be overstated. I got to park next to Trevor's Ugly Bug at British Car Days in Dayton a few years ago and both of us had our forward tilt bonnets going. Here's a Pictue of the hinge.
Jim_Gruber
Yoda
Offline
Jim_Gruber
Yoda
Offline
Jim_Gruber
Yoda
Offline
I can provide hinge details if anyone wants them, blueprints are at Gerard's Garage Web Site
cdsmith
Jedi Hopeful
Offline
I went with the "Gerald's Garage" plans and I'm happy with the outcome.
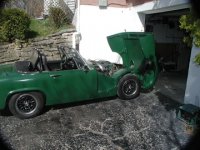
It took a little "finessing" to get them to work. The one thing I did was to have a U-shaped bracket welded up that I mounted to the hood under the intake cowling (I didn't want to drill any extra holes - the holes I used were already there). I will try to attach pictures.
It took a little "finessing" to get them to work. The one thing I did was to have a U-shaped bracket welded up that I mounted to the hood under the intake cowling (I didn't want to drill any extra holes - the holes I used were already there). I will try to attach pictures.
Attachments

cdsmith
Jedi Hopeful
Offline
While I'm here... Could you possibly post a picture of the hold downs you are using?
Thanks
cd
I've been trying to figure out a better method than the "rubber dune buggy" type of hold down.Jim_Gruber said:I found hold down clamps that were adjustable and small out of the McMAster Carr catalog $10-12 ea.
Thanks
cd
Jim_Gruber
Yoda
Offline
Go to https://www.mcmaster.com/#draw-latches/=6agl2c
I used Category C Draw Latch with adjustable distance. These are rated for up to 400 lbs. I tried using the ones from Winner's Circle, really nice latch and inexpensive but after breaking 6 of them over the course of server month( my bonnet is in the process or recurving itself to meet that back of the firewall). Too much stress from the bonnet. These mount with a #6 screw. I tried to take a picture but pics did not come out very well. Area is in partial primer after I plugged and welded some extra mounting holes left over from the Winner's Circle LAtches.
Anyway try the catalog link. Lots of choices for reasonable prices. I went for Stainless, seconndary latch. I adjust them tight enough so that when released, I need to push down to get the latch to release. If you follow the link in the McMAster Carr catalog you'll find a CAD Drawing of the entire latch. More detail than a picture could possibly convey.
bugimike
Yoda
Offline
cdsmith said:While I'm here... Could you possibly post a picture of the hold downs you are using?
I've been trying to figure out a better method than the "rubber dune buggy" type of hold down.Jim_Gruber said:I found hold down clamps that were adjustable and small out of the McMAster Carr catalog $10-12 ea.
Thanks
cd
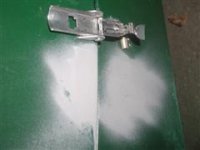
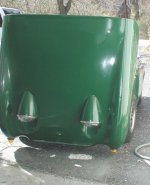
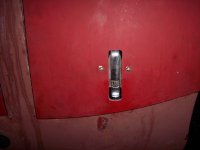
A very tidy set-up for this is using Spitfire hardware. My bonnet is fiberglass, but I believe Coastalman did this to his metal bonnet too!
Attachments
Jim_Gruber
Yoda
Offline
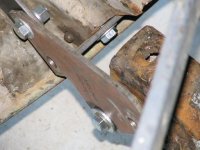
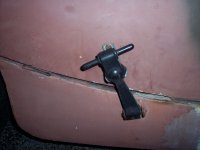
Guy's unfortunately my latches are currently off of Bugsy right now. Doing paint and bondo work, on the bonnet. Give me a couple of days and I can provide pics. I found this image, might help show better how this hinge attaches to the bumper mounts. IT is necessary to grind approx 1/2" off of the back bumper mount bracket bolt so it is parallel to the front mounting bolt. If you ever decide to go back to standard hood setup, bumper could be reattached using a stack of washers back there to obtain proper clearance. On a SWA or RWA Spridget, adding the BE Bonnet does require cutting and grinding off a 1/2" lip on the fender arch that sticks out. After grinding off and finishing, if you did not know it was there originally you would not miss it.
Attachments
Jim_Gruber
Yoda
Offline
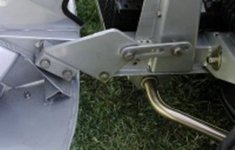
Define what you mean by limit strap. The picture above show the sliding bracket that keeps the bonnet from going too far forward. The blueprints call for a smaller bolt than I'd like on the bolt going into the radiator upright. I put the head of the bolt on the inside of the radiator support as I added quite a number of teflon bushings and washers to make this limit strap easy to go up and down. At the local hardware store I was able to find a teflon/nylon bushing I could use that fits on the hinge slide bracket. I also used large teflon/nylon washers backed up with large metal washers on all contact surfaces. Again having a good hardware store helps. You won't find that stuff at the at Home Depot or Lowes.
Fighting to find proper image resizing software today. I had some on old PC but lost it when Hard Drive crashed.
Fighting to find proper image resizing software today. I had some on old PC but lost it when Hard Drive crashed.
Jim_Gruber
Yoda
Offline