Hey Guest!
This is the start of my acquisition and restoration of my barn find 1958 TR3 A. I will post pics and update info on this thread as I go along.
A bit about me. Have always been a jack of all trades. Background includes construction, mechanical work, welding/fabrication, machine shop (in between hobby and semi-professional!) dirt track racing (built and maintained IMCA modified and late model for 7 years). A few hot rods and sports cars and motorcycles along the way- (69 Chevelle SS 375hp 396 98% original that I purchased in 1976...waiting for frame off, 55 Chevy long bed pickup...chassis and mechanical complete...bodywork and paint next...AFTER this TR3!!!) Have also restored or partially rebuilt a few heavy equipment items and tractors. Pilots license in 96, and owned and restored a couple of planes. (RV 4 in progress, flying a RV 7 currently). Mid life crisis started flying as a crop duster about 15years ago...and never looked back! Currently trying to semi retire and only fly a few months a season. I have done quite a bit of basic bodywork and a lot of painting, and a lot of aluminum skins/fabrication on the airplanes, but my sheetmetal bodywork has not required much for patch panels and welding. (Until now! LOL) So, learning a lot of new skills when it comes to welding sheetmetal! Lot's of good info here on this site! Enough of my background!
THE CAR
The TR3 A belonged to an older friend and neighbor of mine...he passed away and his wife later asked if I would want it. I have always loved the cut down doors and styling of the sidescreen TR's, and so I said yes and dove in!My friend purchased the car in 1972 I believe, while they lived in Kansas City, but shortly thereafter moved to Omaha Nebraska. They then moved near the Springfield MO area and brought it with them in 1976. He parked it in a barn and it never moved again until I pulled it out this past December. (2025) While he was alive, I had helped him work on it and fixed a few things on it, but he never did anything with it, not even transferring title or licensing it here in MO. It appears that it was pretty much 99% original, and had all the original items like covers, sidescreens (and actually a second set slightly different) most tools/jack handcrank etc. No bondo or previously repaired damage (though I may still find some). Rear overider and left fender slightly damaged. And front bumper not great and no overiders on front. I believe it has had a fresh coat of paint over the original, but only the outer panels repainted as far as I can tell. Inside of boot and bonnet, and inside of doors and under dash areas all appear original paint. There is a problem with the VIN I am working on. The car title from Nebraska appears they used the engine number instead of the commission number! (and actually placed a K suffix on it for some reason?? Couldn't read clearly b/c dirt and grease???) I got the BMIHT heritage certificate, and according to them the Commission, engine and body number are correct.
I was able to get ID/OD and used the engine number as vin for Missouri title for now. At some point I will need to get a corrected title with the commission number as vin as it should be.
TIRES AND WHEELS
Started with wheels and tires so I could mount and move frame easily. It still had the original spare tire, and was holding air!!
Sandblasted, a few spokes replaced and trued, and epoxy coated and painted. Sorry, forgot to take a pic with new tires mounted. Maybe add later.
RUST AND BODY REPAIRS
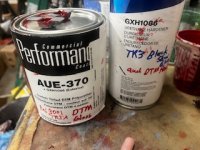
Decided to start learning my new sheetmetal skills at the front. Passenger side was all done with MIG, and did the driver side with TIG. The areas with the body mount doublers weren't too bad. Tedious because I was trying to limit the future sandwich rust problem. I then moved to the doubled reinforcement plate area for the front overrider supports...this proved a little more difficult as I was dealing with domed surface and had to figure out how to shape the metal. First one was sandbag hammer form with shrinker...second I made a hammer form and was able to complete it without having the shrinker teeth marks to deal with. Extra steps here also to limit future sandwich rust. (coated with weldthru primer before spot welding doubler, then mixed and applied epoxy primer spraying thickly on edges and worked in excess with a paint brush to force it in seam...after body sandblasted I will go around all areas with seam sealer. Also, the hole where the bolt goes thru will need to have some seam sealer forced into the seam between panel and doubler plate!) Photos to follow later.


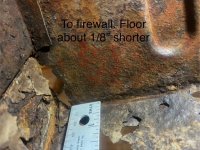
 ) I am not "happy" but short of cutting a section away, or cutting part of the boxed section away, then dealing with distortions and such welding back in I have done about all I can with it. Did I mention I am not a professional body man! Looking back now, time wise probably should have changed up and just removed and replaced a section, but oh well...live and learn!
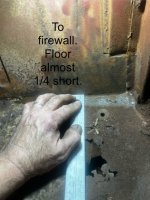

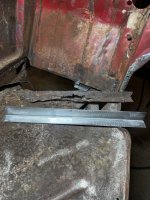
 The sill, a and b post, front firewall and kick panels, and rear quarter sections I believe will all hold the shape without the floorpan. I can then use the old ones, (removed carefully) for measurements to trim and fit the new ones. (Will complete one side at a time, and test fit the tranny cover as I go. Will tack floors in place, with minimum if any to old sills. Then, after floors placed, I will add my interior bracing and cross bracing. Will then dive into the inner sill replacements! One side at a time again...I think I can rig up my gantry crane to lift the tub straight up far enough to work old sill out and new sill in. Or can jack and block one side at a time. Any critiques or recommendations on these steps would be highly appreciated!