 but were afraid to ask:
 I recently had my rear end gone through by my transmission/gear specialist. While I trust that he is knowledgable I want to verify that his suggestion is good. He returned the rear end with the axles loose so that when I install the brakes I can tighten up the seals with the drum/lug nuts. He put new O rings in but did not supply me with the paper gaskets and suggested that I add a very slight amount of sealant around (outboard) of the O ring. I purchased some RTV that says it is for differentials/gear oil resistant. Is it enough just to put the sealant or should I but the paper gaskets from Moss? If the paper gaskets are required, do you use them plain or with the RTV? This is for a late model 3000 rear end and everything is very clean. Thanks for your advice/experience.
-
 Hi Guest!
You can help ensure that British Car Forum (BCF) continues to provide a great place to engage in the British car hobby! If you find BCF a beneficial community, please consider supporting our efforts with a subscription.
There are some perks with a member upgrade!**Upgrade Now**
(PS: Subscribers don't see this gawd-aweful banner

Tips
- We have a special forum called "Member Articles" where you can submit actual articles for consideration for publication. Learn More
- Don't have an Avatar? If not, your avatar will default to the 1st character in your username. Go into "Account Details" to change your Avatar.
- Some basic forum navigation info: click
 Hey - did you know if you click on the title of a thread it will take you to the first unread post since you last visited that thread?
- Hey Guest - Is your British Car Club in our Clubs database? If not, send me a PM - Basil

- Looking for a local club? Click the "Clubs" tab above and browse hundreds of clubs world-wide.
- Add Android or iPhone APP: click
- Did you know - any picture or video you add in your posts in any marque-specific forum will also get added to the Media Gallery automatically.
- A few more tips about posting and replying: click
- Hey there Guest - be sure to keep your profile page up to date with interesting info about yourself: learn more
- More tips and tricks on Posting and Replying: click
 STOP!! Never post your email address in open forums. Bots can "harvest" your email! If you must share your email use a Private Message or use the
  smilie in place of the real @
- Want to mention another member in a post & get their attention? WATCH THIS

- So, you created a "Group" here at BCF and would like to invite other members to join? Watch this!
- Hey Guest - A post a day keeps Basil from visiting you in the small hours and putting a bat up your nightdress!
- Hey Guest - do you know of an upcoming British car event?
 Pretty Please - add it to our Events forum(s) and add to the calendar! >> Here's How <<
- Hey Guest - you be stylin' Change the look and feel of the forum to fit your taste. Check it out
- If you run across an inappropriate post, for example a post that breaks our rules or looks like it might be spam, you can report the post to the moderators: Learn More
- If you would like to try some different "looks" or styles for the site, scroll to the very bottom, on the left and click the Style Selector.
You are using an out of date browser. It may not display this or other websites correctly.
You should upgrade or use an alternative browser.
You should upgrade or use an alternative browser.
Axle to hub paper gaskets....are they necessary?
- Thread starter JSabah
- Start date

Offline
No they are not necessary-nor is the gasket that goes between the differential and the housing. However I use them unless I do not have one on hand. BTW a trick to make installation of them much easier--esp the diff one--is to soak the gasket in water for a minute or so prior to installation. Rather than being a semi-rigid piece that fights going over the studs the gasket will be limp and almost stretchy.
British_Recovery
Jedi Warrior
Offline
I use the paper gaskets, saturated in oil for flex. Remember the small Phillips screws that secure the axle flange before you put the drum on. Also, there are two different paper gaskets. Earlier ones, used before o-rings were used, have a smaller inside diameter.
Bob
Bob
Brinkerhoff
Jedi Knight
Offline
I certainly would not special order just two paper gaskets to complete the job when a thin coat of RTV on a properly prepared surface will work just fine and get you back on the road.
Healey Nut
Luke Skywalker
Offline
The brown paper bags from the grocery store are exactly the right thickness, been using them for years, ready source of gasket paper in the pantry!
X2 best suggestion yet on this thread . I do the same made all kids of gaskets using the grocery brown bags . quick easy and FREE !!!!!!!!
British_Recovery
Jedi Warrior
Offline
Oak tag file folders work great, too.
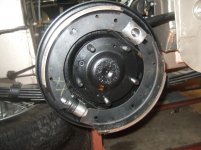
A bit off subject, but in the same general vicinity....I can't seem to find my "before" pics of the rear drum brakes and don't recall if the springs are outboard of the shoes (with the spring hooks facing in towards the backing plate) or between the backing plate and the shoes with the spring hooks facing out. This is a late model 3000 with both springs being the same. Any reminders (or pictures) is appreciated. Also any tricks to getting the shoes and springs on (order of operation,method tools etc.) this all may be obvious when I get into the garage tomorrow...but it is 2am and I am thinking of what I am doing tomorrow (Saturday) ... I.e obsessing just a bit ;-)


Offline
Here's pics of my shoes installed. I put one show on and with the springs on I just man-handled the other shoe on. Use new springs if they appear to be original. Be sure wheel cylinder slides and brake adjustment turns freely. I had to rebuild my one slacker(removing burrs) and then lightly grease it.A bit off subject, but in the same general vicinity....I can't seem to find my "before" pics of the rear drum brakes and don't recall if the springs are outboard of the shoes (with the spring hooks facing in towards the backing plate) or between the backing plate and the shoes with the spring hooks facing out. This is a late model 3000 with both springs being the same. Any reminders (or pictures) is appreciated. Also any tricks to getting the shoes and springs on (order of operation,method tools etc.) this all may be obvious when I get into the garage tomorrow...but it is 2am and I am thinking of what I am doing tomorrow (Saturday) ... I.e obsessing just a bit ;-)
Attachments
Thanks gents...now I can get to work. I've rebuilt my cylinders, bead blasted my adjusters and steady posts, found e brake levers (mine were missing from PO) and had them zinc plated and even black zinc oxide plated the (wheel cylinder) retaining springs. After having my rear end gone through and one side of the tube straightened due to PO being hit ( very difficult to find someone who knows how to do that), fabricating the e brake swivel bracket (also missing) and welding it on and finding a e brake swivel and cross rods on e bay(also missing) and then finally powder coating the axle housing and backing plates and having the cone vibratory bead blasted. It seems like I am on the home stretch with this portion of my rebuild.
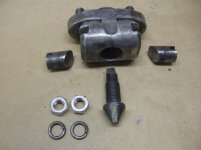
btw, just to be sure, my retaining clips for the wheel cylinder seemed to have been installed backwards from the PO as the boots would not go on the way he had them on. I ended up figuring out that the smaller one goes on first (against the backing plate) with the tangs/teeth facing up and put on from the e brake lever side. Then the larger one slides over so that when snapped together there is a slight recess for the boot to fit under....all with a bit of red rubber grease so that the cylinder slides and the rubber seals to the metal.
btw, just to be sure, my retaining clips for the wheel cylinder seemed to have been installed backwards from the PO as the boots would not go on the way he had them on. I ended up figuring out that the smaller one goes on first (against the backing plate) with the tangs/teeth facing up and put on from the e brake lever side. Then the larger one slides over so that when snapped together there is a slight recess for the boot to fit under....all with a bit of red rubber grease so that the cylinder slides and the rubber seals to the metal.