
-
 Hey Guest!
British Car Forum has been supporting enthusiasts for over 25 years by providing a great place to share our love for British cars. You can support our efforts by upgrading your membership for less than the dues of most car clubs. There are some perks with a member upgrade!**Upgrade Now**
(PS: Upgraded members don't see this banner, nor will you see the Google ads that appear on the site.)

Tips
- We have a special forum called "Member Articles" where you can submit actual articles for consideration for publication. Learn More
- Don't have an Avatar? If not, your avatar will default to the 1st character in your username. Go into "Account Details" to change your Avatar.
- Some basic forum navigation info: click
 Hey - did you know if you click on the title of a thread it will take you to the first unread post since you last visited that thread?
- Hey Guest - Is your British Car Club in our Clubs database? If not, send me a PM - Basil

- Looking for a local club? Click the "Clubs" tab above and browse hundreds of clubs world-wide.
- Add Android or iPhone APP: click
- Did you know - any picture or video you add in your posts in any marque-specific forum will also get added to the Media Gallery automatically.
- A few more tips about posting and replying: click
- Hey there Guest - be sure to keep your profile page up to date with interesting info about yourself: learn more
- More tips and tricks on Posting and Replying: click
 but were afraid to ask:
  STOP!! Never post your email address in open forums. Bots can "harvest" your email! If you must share your email use a Private Message or use the
  smilie in place of the real @
- Want to mention another member in a post & get their attention? WATCH THIS

- So, you created a "Group" here at BCF and would like to invite other members to join? Watch this!
- Hey Guest - A post a day keeps Basil from visiting you in the small hours and putting a bat up your nightdress!
- Hey Guest - do you know of an upcoming British car event?
 Pretty Please - add it to our Events forum(s) and add to the calendar! >> Here's How <<
- Hey Guest - you be stylin' Change the look and feel of the forum to fit your taste. Check it out
- If you run across an inappropriate post, for example a post that breaks our rules or looks like it might be spam, you can report the post to the moderators: Learn More
- If you would like to try some different "looks" or styles for the site, scroll to the very bottom, on the left and click the Style Selector.
You are using an out of date browser. It may not display this or other websites correctly.
You should upgrade or use an alternative browser.
You should upgrade or use an alternative browser.
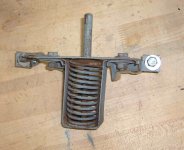
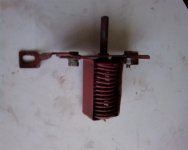
TR2/3/3A Apron support and pin/latch assembly TR3
- Thread starter Tr3aguy
- Start date
TexasKnucklehead
Jedi Knight
Offline
TexasKnucklehead
Jedi Knight
Offline
Great. I know how helpful a picture can be. That assembly is one of those that seems obvious when it comes apart, but after it's painted is very difficult to tell how it went together.
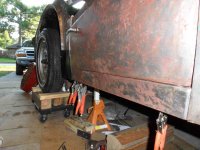
It's finally getting cool enough to go into the garage. I don't think it was over 95 yesterday, but I've got myself involved in a few other projects and the TR3 is buried again. I have made some progress with body panels, and have brackets for seat belts ready to be welded. Both outer rockers and dog leg bottoms have been fitted as well as one rear fender patch. Soon I'll start welding. I wasn't expecting so much reforming of replacement parts. Progress is slow, but coming.
It's finally getting cool enough to go into the garage. I don't think it was over 95 yesterday, but I've got myself involved in a few other projects and the TR3 is buried again. I have made some progress with body panels, and have brackets for seat belts ready to be welded. Both outer rockers and dog leg bottoms have been fitted as well as one rear fender patch. Soon I'll start welding. I wasn't expecting so much reforming of replacement parts. Progress is slow, but coming.
Attachments

Why leave the bolts unpainted? Because it looks good!! I know at the factory they were painted but most of us painted the wings, apron, etc off the car and then assembled. That latch was toward the end of assembly. Brushing in the bolts and washers would be a royal pain and I just think they look better unpainted--assuming that is the way they were all left.
The only clear memory of assembling the latch is that it was not easy and and took more than one effort. I don't think I painted the pin.
Gary
The only clear memory of assembling the latch is that it was not easy and and took more than one effort. I don't think I painted the pin.
Gary
Moseso
Jedi Knight
Offline
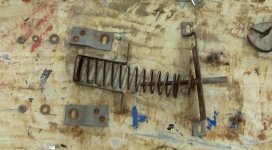
Awww! Where's the fun in that? The last time I did it (out on the driveway) I shot bits of it into the neighbor's yard -- twice -- before finally getting it to go together.Geo Hahn said:When reassembling I probably used zip ties or dental floss or such to hold the spring in a compressed state until all was secure, then cut & set it free.

TR3driver
Great Pumpkin - R.I.P
Offline
Moseso said:Awww! Where's the fun in that? The last time I did it (out on the driveway) I shot bits of it into the neighbor's yard -- twice -- before finally getting it to go together.

MGTF1250Dave
Jedi Knight
Offline
Aloha JP,
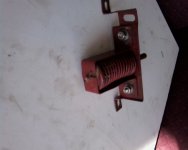
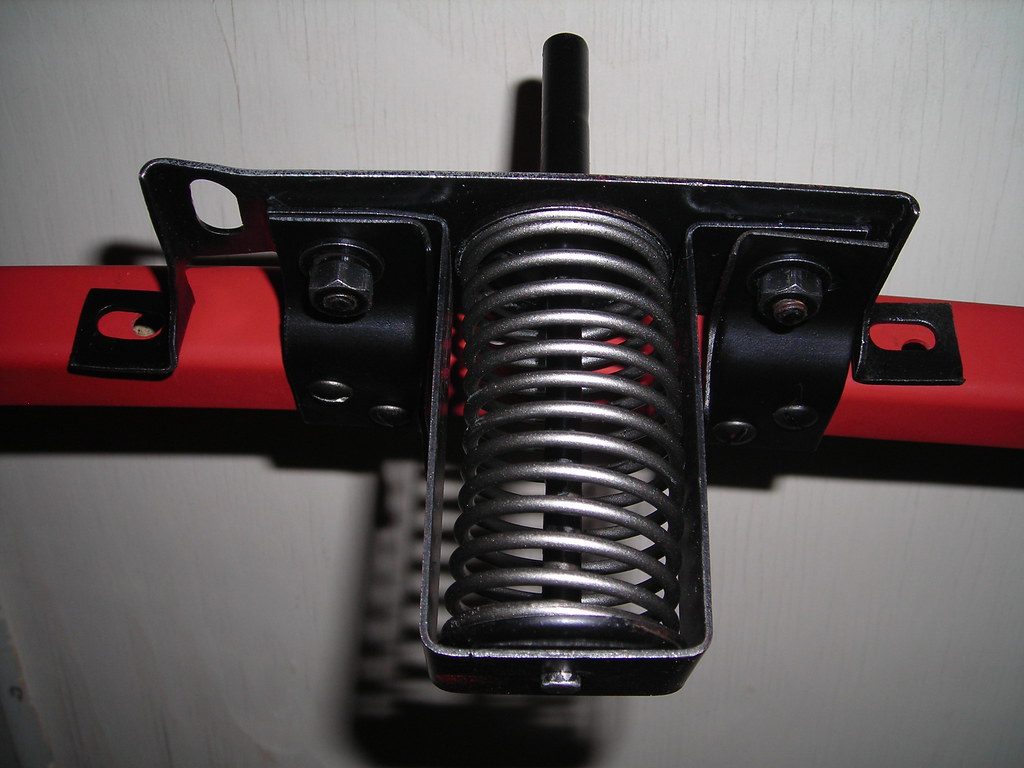
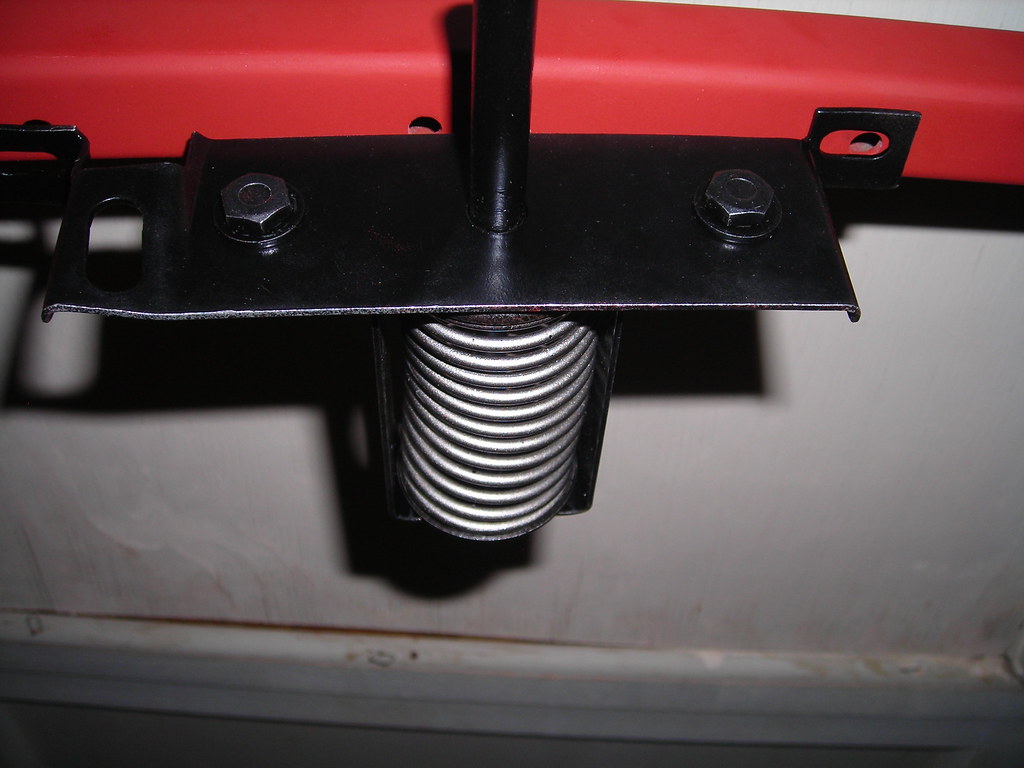
If you want to avoid the excitement of shooting pieces around the garage or over to your neighbor's yard you can try this. Drill a small hole through the bottom of the plunger about 1/8" from the end and use a cotter pin to hold it in the assembly. My plunger was also damaged by vibrating against the top plate of the housing to the point a large slot was worn into it. I had to weld it up and grind it smooth as a repair. To prevent that from happening again I used a nylon gromment by enlarging the hole in the top plate. Here are some photos:
If you want to avoid the excitement of shooting pieces around the garage or over to your neighbor's yard you can try this. Drill a small hole through the bottom of the plunger about 1/8" from the end and use a cotter pin to hold it in the assembly. My plunger was also damaged by vibrating against the top plate of the housing to the point a large slot was worn into it. I had to weld it up and grind it smooth as a repair. To prevent that from happening again I used a nylon gromment by enlarging the hole in the top plate. Here are some photos:
Attachments

HerronScott
Darth Vader
Offline
JP,
Looks great!
Scott
Looks great!
Scott