Hey Guest!

 Hey - did you know if you click on the title of a thread it will take you to the first unread post since you last visited that thread?
 but were afraid to ask:
  STOP!! Never post your email address in open forums. Bots can "harvest" your email! If you must share your email use a Private Message or use the
  smilie in place of the real @
 Pretty Please - add it to our Events forum(s) and add to the calendar! >>
Morris
Yoda
Offline
Hey Jp,
Firstly read this sight https://www.teglerizer.com/alternator/. Then read and re-read Duncan's awesome alternator post. Once all that info is sunk in, check this out.
Firstly, the lower mount on the early Spitfire engine and maybe some early Midget engines is different than what's on Duncan's car.
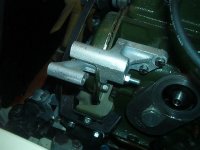
Here is the lower mount for Duncan's car.

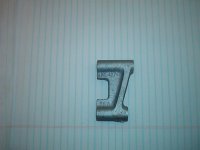
And here is the lower mount for the early Spit engine.

Note the absence of the thick/long "ear" on Duncan's bracket. If you have the early style mount, it makes it possible to flip the orientation of the alternator such that the thicker mounting "ear" on the alternator case engages the lower mount. You can then reuse the old lower mounting bolt from your original alternator. This eliminates the need to grind, drill, or alter the alternator case. I suppose if you have the same style of lower mounting bracket as Duncan's and you don't have a junk Spit motor lying around as I did, you could do your cutting and grinding on the mounting bracket. Most of the Delco alternators you pick up at the local Big Boxes come with a lifetime warranty. It might be easier to get said Big Box to honor said warranty if the alternator case has not been altered.
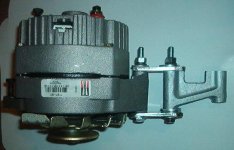
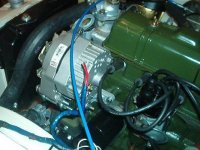
You can get a generic alternator bracket designed for Chevy V8s at your local big box, too. I cut and drilled mine so that it could be mounted like this.

You will need a few washers to space the alt bracket where it mounts to the thermostat housing. (I intend to machine a spacer to replace the washers... someday) You will also need to buy or source a longer 5/16-24 bolt for the thermostat housing as the one currently there will not be long enough with the washers. I had plenty of extras after removing the air pump.

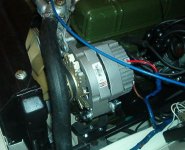
The wiring is the same as detailed in Duncan's write up, but I added a hood from coil wire from an old set of plug wires I had. This hood goes over the main lug on the back of the alternator.

I had to weld a few wrenches and screw drivers to my block before I got motivated to make this mod.
One thing that Duncan mentioned that I respectfully disagree with is that he used a nylock washer on the lower mount so that it would be free to turn. Once you have your belt tight and your upper mount tightened, go ahead and tighten the lower mount good and tight. I also recommend a thick strong lock washer.
Firstly read this sight https://www.teglerizer.com/alternator/. Then read and re-read Duncan's awesome alternator post. Once all that info is sunk in, check this out.
Firstly, the lower mount on the early Spitfire engine and maybe some early Midget engines is different than what's on Duncan's car.
Here is the lower mount for Duncan's car.
And here is the lower mount for the early Spit engine.
Note the absence of the thick/long "ear" on Duncan's bracket. If you have the early style mount, it makes it possible to flip the orientation of the alternator such that the thicker mounting "ear" on the alternator case engages the lower mount. You can then reuse the old lower mounting bolt from your original alternator. This eliminates the need to grind, drill, or alter the alternator case. I suppose if you have the same style of lower mounting bracket as Duncan's and you don't have a junk Spit motor lying around as I did, you could do your cutting and grinding on the mounting bracket. Most of the Delco alternators you pick up at the local Big Boxes come with a lifetime warranty. It might be easier to get said Big Box to honor said warranty if the alternator case has not been altered.
You can get a generic alternator bracket designed for Chevy V8s at your local big box, too. I cut and drilled mine so that it could be mounted like this.
You will need a few washers to space the alt bracket where it mounts to the thermostat housing. (I intend to machine a spacer to replace the washers... someday) You will also need to buy or source a longer 5/16-24 bolt for the thermostat housing as the one currently there will not be long enough with the washers. I had plenty of extras after removing the air pump.
The wiring is the same as detailed in Duncan's write up, but I added a hood from coil wire from an old set of plug wires I had. This hood goes over the main lug on the back of the alternator.
I had to weld a few wrenches and screw drivers to my block before I got motivated to make this mod.
One thing that Duncan mentioned that I respectfully disagree with is that he used a nylock washer on the lower mount so that it would be free to turn. Once you have your belt tight and your upper mount tightened, go ahead and tighten the lower mount good and tight. I also recommend a thick strong lock washer.
 this is wonderful!