• Hi Guest!
    You can help ensure that British Car Forum (BCF) continues to provide a great place to engage in the British car hobby! If you find BCF a beneficial community, please consider supporting our efforts with a subscription.

    There are some perks with a member upgrade!
    **Upgrade Now**
    (PS: Subscribers don't see this gawd-aweful banner
Tips
Tips

Alternator Conversion / Wiring

bill_powell

Jedi Trainee
Offline
Hello All:

Well, I have replaced the starter and am finishing up the alternator. (Working on a bottom bracket) The alternator wiring will be next.

I am the first to admit that I am a complete doofus when it comes to wiring, so I would appreciate any help.

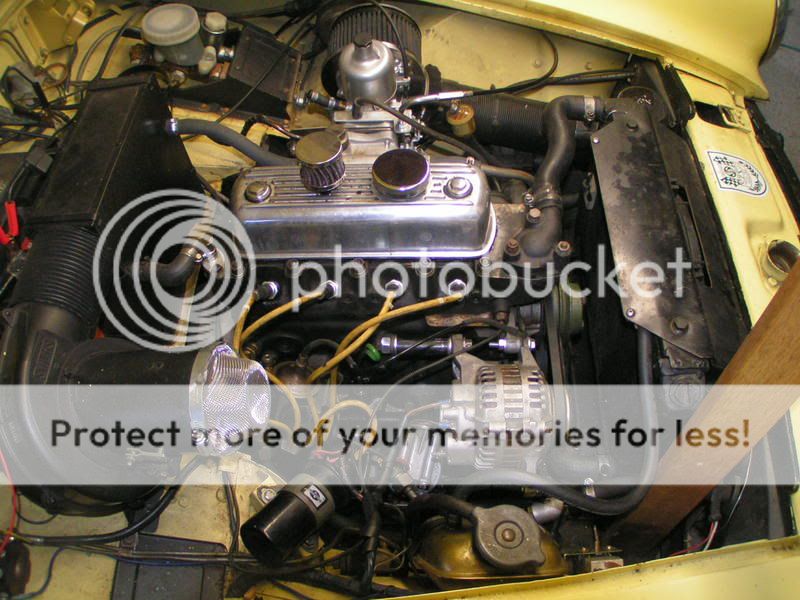
These photos show my configuration:

Regulator
PICT0001-2.jpg


Generator
PICT0005-1.jpg


"New" Mitsu Alternator
PICT0002-2.jpg

PICT0003-1.jpg


Would someone please walk me through which wire goes where? Explain it to me as if I were five years old; crayon drawings optional.

Thanks!
 
Hang on, Bill... I just saw a generator-to-alt write-up, when I was getting ready for my Lucas-to-GM alt swap. I'll see if I can find it again...
 
1. Remove the regulator.
2. All large power wires on the regulator get connected together. (brown, brown / yellow, but not the small brown / yellow)
3. The large brown / yellow originally on the generator is connected to the large terminal on the new alternator.
4. On the regulator, the small brown / yellow is spliced together with the brown / green. (This connects the ignition warning light.)
5. The small brown / green originally on the generator (which is the same wire you just connected to the small brown / yellow by the regulator) connects the one of the small connectors on the new alternator. I'm not sure which, but one will make it charge, the other will not. (the other is possibly a separate input in which case it might need a power supply) Consult a Mitsubishi wiring diagram for that.

I generally use Bosch which only have one large connection and one small connection. Older Delco has two small connections of which one gets a power supply.

That's basically it.
 
Perfect directions. I do without the regulator, then? I thought as much, but thinking has got me in trouble before...
 
I did a fairly extensive write-up on this for the Wiki--look under General Technical Articles. It has a figure showing how to take out the old generator/regulator wiring and where to connect the new stuff.
 
The Mitzu is an internal regulator, and also has an internal fan.

I have set up a "test" wiring (using a jumper):

PICT0007-1.jpg


PICT0009-3.jpg


PICT0010-1.jpg


Ignition light operates as normal, the car fires up as normal, the ignition light then goes out, as normal. I will need to check that the battery is being charged properly, but things 'seem' right.

I cannot thank you all (and this site) enough for the assistance. Gentleman and scholars, every one.
 
Head clearance is even worse on a stock BugEye (with factory tilt to the rear bonnet config)!! :wall:

I've gotten to the point that I just work on mine while on my knees!! :bow:

Wait, is that my car, or my girlfriend, or my boss?!? (All the same I guess, although the car complains the least of the three.....) :devilgrin:

"Cheers!" :cheers:

-Bear-
 
Why not make the control box a busbar and retain the original look. Does not require cutting any wiring. Simply remove all the internal coils and cut all of the connector on the back of the control box. Hook up and reinstall the cover.

RJA
 
RJA said:
Why not make the control box a busbar and retain the original look. Does not require cutting any wiring. Simply remove all the internal coils and cut all of the connector on the back of the control box. Hook up and reinstall the cover.

RJA

I may do just that; I just wanted to be sure I had the wiring straight, and wanted my connections visible in the photos for your expert inspection.
 
Running a single HIF6 (and a LCB exhaust manifold) on a 1275 is a habit from my Mini days. It's my favorite set up.

PICT0005.jpg

PICT0007.jpg
 
Back
Top