
-
 Hey Guest!
British Car Forum has been supporting enthusiasts for over 25 years by providing a great place to share our love for British cars. You can support our efforts by upgrading your membership for less than the dues of most car clubs. There are some perks with a member upgrade!**Upgrade Now**
(PS: Upgraded members don't see this banner, nor will you see the Google ads that appear on the site.)

Tips
- We have a special forum called "Member Articles" where you can submit actual articles for consideration for publication. Learn More
- Don't have an Avatar? If not, your avatar will default to the 1st character in your username. Go into "Account Details" to change your Avatar.
- Some basic forum navigation info: click
 Hey - did you know if you click on the title of a thread it will take you to the first unread post since you last visited that thread?
- Hey Guest - Is your British Car Club in our Clubs database? If not, send me a PM - Basil

- Looking for a local club? Click the "Clubs" tab above and browse hundreds of clubs world-wide.
- Add Android or iPhone APP: click
- Did you know - any picture or video you add in your posts in any marque-specific forum will also get added to the Media Gallery automatically.
- A few more tips about posting and replying: click
- Hey there Guest - be sure to keep your profile page up to date with interesting info about yourself: learn more
- More tips and tricks on Posting and Replying: click
 but were afraid to ask:
  STOP!! Never post your email address in open forums. Bots can "harvest" your email! If you must share your email use a Private Message or use the
  smilie in place of the real @
- Want to mention another member in a post & get their attention? WATCH THIS

- So, you created a "Group" here at BCF and would like to invite other members to join? Watch this!
- Hey Guest - A post a day keeps Basil from visiting you in the small hours and putting a bat up your nightdress!
- Hey Guest - do you know of an upcoming British car event?
 Pretty Please - add it to our Events forum(s) and add to the calendar! >> Here's How <<
- Hey Guest - you be stylin' Change the look and feel of the forum to fit your taste. Check it out
- If you run across an inappropriate post, for example a post that breaks our rules or looks like it might be spam, you can report the post to the moderators: Learn More
- If you would like to try some different "looks" or styles for the site, scroll to the very bottom, on the left and click the Style Selector.
You are using an out of date browser. It may not display this or other websites correctly.
You should upgrade or use an alternative browser.
You should upgrade or use an alternative browser.
A Post Rubber Seals
- Thread starter jjbunn
- Start date
startech47
Jedi Knight
Offline
Looks like it is turned around backwards to me, by the photos.
OP
jjbunn
Jedi Knight
Offline
startech47 said:Looks like it is turned around backwards to me, by the photos.
The thing is, I'm fairly sure this was how the old ones were attached, that I removed. But maybe that was a Pedro's brother special?!
Should the fat part with the hole be on the inside then?
Here's the original set up, with the fat part/hole on the outside edge:

Brosky
Great Pumpkin
Offline
If what I see in your first picture is the top of the frame at the top of the picture, then you have them reversed. The glass needs a raised sealing surface to fit against on the inside surface, while the front edge of the glass butts against the thinner section, cushioning it from the metal frame.
OP
jjbunn
Jedi Knight
Offline
Brosky said:If what I see in your first picture is the top of the frame at the top of the picture, then you have them reversed. The glass needs a raised sealing surface to fit against on the inside surface, while the front edge of the glass butts against the thinner section, cushioning it from the metal frame.
Makes sense. So the PO had them on the wrong way around. Both my photos show the same view:

My sequence is as follows:
1) Paint frame (done)
2) Attach A post seals (wrong way?)
3) Fold top ends of seals over and,
4) Rivet aluminium capping piece in place, with sealant, so clamping top ends of seals
5) Place body-to-frame rubber seal on frame
6) Place new dash topper on dash
7) Place frame on dash, and secure
8) Install new glass etc.
I prefer to install the new glass with the frame on the car.
Step 4 is how the originals were attached. The originals were also folded under the frame at the bottom edge. But I notice on your car, they are not. I am under the impression that the fuzzy door seals are installed right at the end, according to what I read in Roger Williams' book.
2wrench
Luke Skywalker
Offline
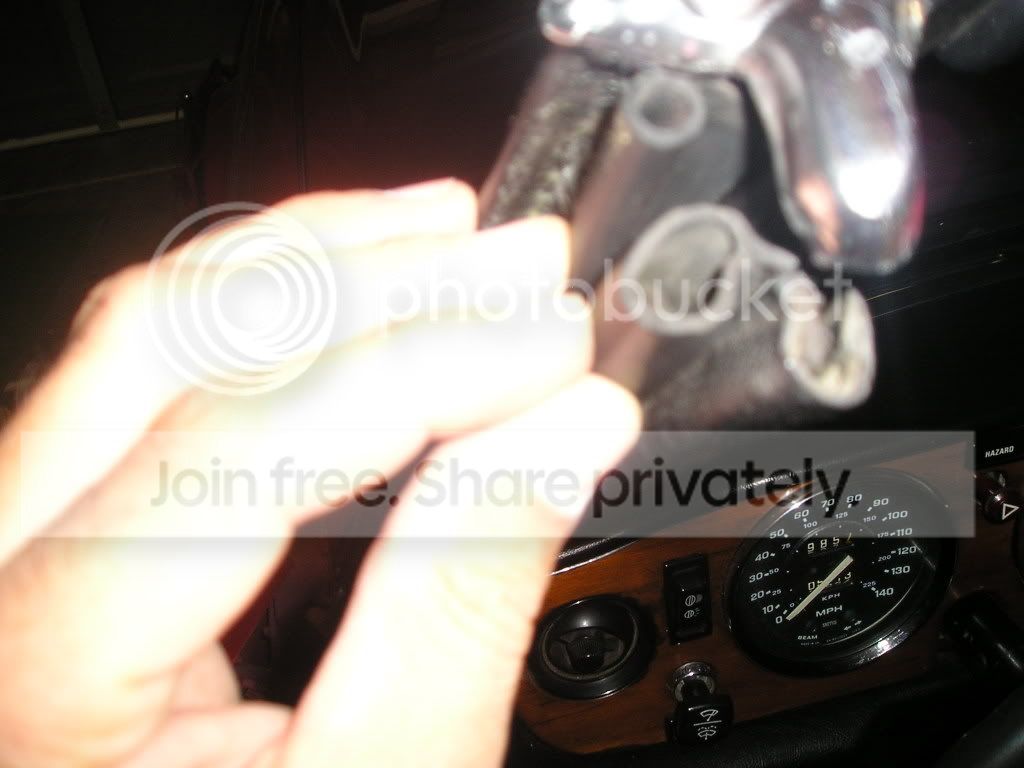
jjbunn said:Here's a close up of the seal. Is it the right way around?

So far that looks right, but tell me what you think
after a review of the photos to follow. It looks short,
because after the windscreen is installed, (which I
recommend before you place these seals anyway), this
seal will run with the flattened side down onto the
inside of the door and be glued in place next to the
light switch. That is how it was on my car anyway.
Then there are two more pieces to finish: One, another
similar rubber seal that will wrap down the inside of the
door, accross the bottom of the door and back up the back
side to finish around where the soft top is where there is
a shiny silver finish piece it juts under to hold it into
place there. It is glued as well, of course.
And two: A stiff u-shaped plastic finish strip that will run along the inside edge of the windscreen; it covers the metal unfinished edge of the windscreen about where you would place your hand while driving with your elbow on the door and holding the windscreen edge.
I hope to show you all three pieces in the photos.
Now view the pics as follows:
2wrench
Luke Skywalker
Offline
Julian: The first pic shows all three pieces.
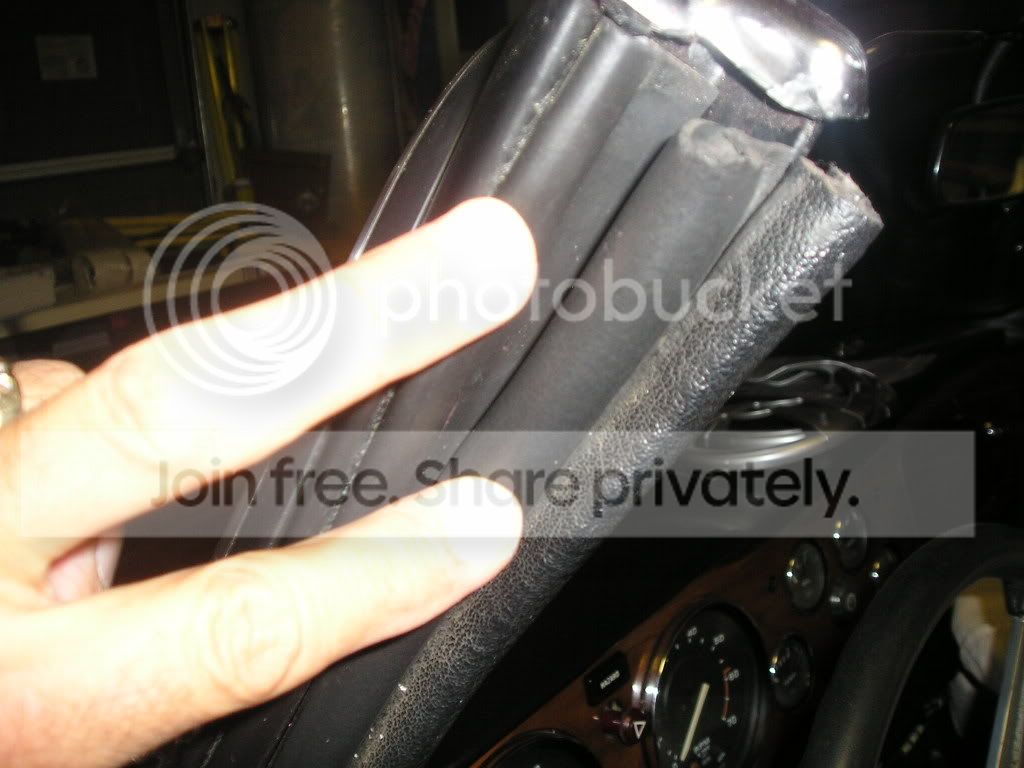
The second pic shows, with my middle finger on it, the
rubber you have in place; and with my index finger,
I touch the second rubber (which has holes in it on my
car). Lastly, notice the hard rubber finish strip
that clips onto the edge of the windscreen.
Hope I'm helping.
The second pic shows, with my middle finger on it, the
rubber you have in place; and with my index finger,
I touch the second rubber (which has holes in it on my
car). Lastly, notice the hard rubber finish strip
that clips onto the edge of the windscreen.
Hope I'm helping.
OP
jjbunn
Jedi Knight
Offline
2wrench said:Julian: The first pic shows all three pieces.
The second pic shows, with my middle finger on it, the
rubber you have in place; and with my index finger,
I touch the second rubber (which has holes in it on my
car). Lastly, notice the hard rubber finish strip
that clips onto the edge of the windscreen.
Hope I'm helping.
Very much so: yes (and Paul).
So I did have it the wrong way, and have now reversed it.
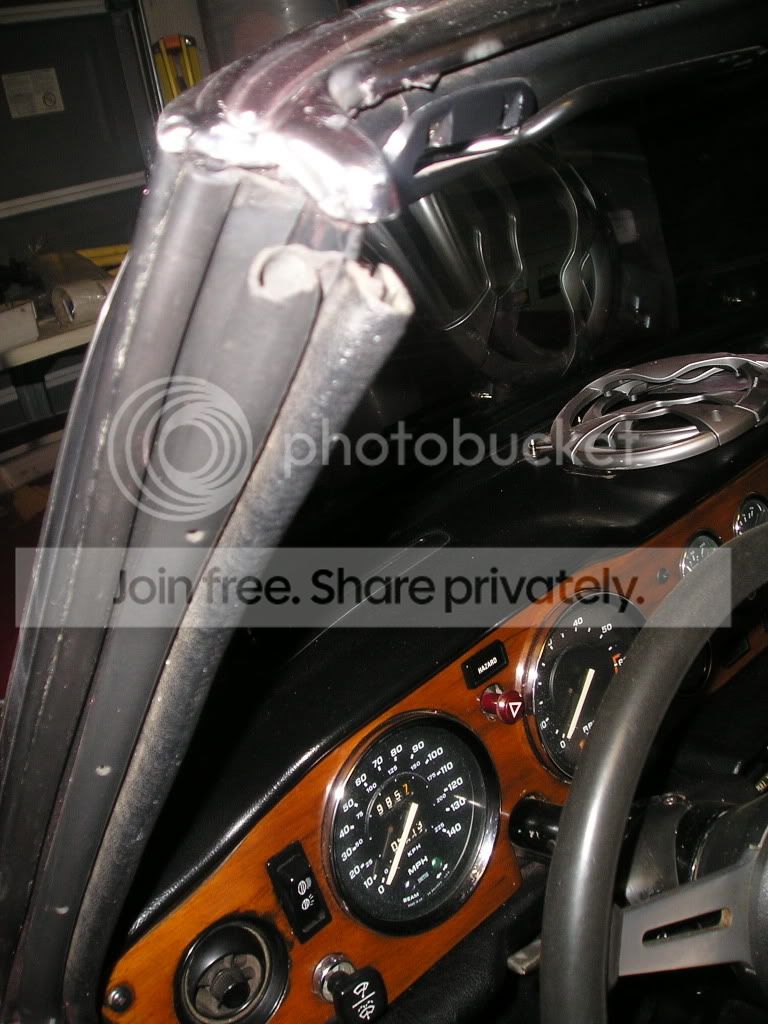
Here is the top right hand side of the windscreen:

The rubber you are touching with your index finger is what I would call the fuzzy door trim. The stuff I have from Moss (at vast expense) and have yet to install has a section that clips to the edge of the windscreen, and a section which is a rubber seal. The part that clips is covered in a fuzzy black material. I think Paul has the same stuff, but in brown fuzzy material.
Next question: at the top of the windscreen your seal appears to be simply cut to length, and not folded under the aluminium topper. On my car the original seal was longer, and the excess folded under the topper and secured by the end rivet. Is that a good or bad idea?

2wrench
Luke Skywalker
Offline
Not really sure about folding under. Mine was not,
but I suspect it had been replaced. Didn't leak
before my work and doesn't leak now.
Just using my best guess and following logic, doesn't
seem a good idea to have anything extra underneath
there cause it might tend to create greater gap, therefore,
greater chance to leak; but I really don't know.
When I put my top strip on, I was a little aggressive
about the rubber sealant I placed. No leaks. Gooey
stuff. Guys here told me what to use. I can't remember
now what it is. Maybe somebody will follow up with
that info, if you need it.
2wrench
Luke Skywalker
Offline
Opps. Julian, I think I mean to be saying you had it
right the whole time.
I hope I am not mistaken, here. Let's go back.
Look closely at my second pic. My middle finger points
to the rubber you have installed. In my pic, we look at
the upper left corner of the windscreen. The way the
first rubber goes on is: Flat side pointing towards
the interior; fat (rolled-looking) part to the outside
edge of the windscreen. Glue it with the fat part running even with the outer edge of the windscreen.
What happens next is the second rubber will go on starting
at the top of the windscreen. This piece I touch with
my index finger in Pic 2. What you will find is that this
second rubber, the roll is larger; it has holes in it; and
the way it installs, has a lip that goes over this unfinished edge of the windscreen and the fat part of the
second rubber now lays/covers (somewhat) the flattened
part of the first rubber you put down. The result is
kind of a look of two rolled edges running down the
side right next to one another. Lastly, the hard plastic
finishing strip is cut to size and pushed onto the unfinished edge of the windscreen. I slightly pulled
these pieces away from the car so you can see what is
going on.
If you need more pictures of something, let me know.
Another option might be a good exploded view from a
repair or parts manual.
OP
jjbunn
Jedi Knight
Offline
Craig: looks good. And which way around did you install the strips?! /bcforum/images/%%GRAEMLIN_URL%%/smirk.gif
2wrench: I'm unsure again now whether I have them the right way around. Aaaaaargh! Do you think that I had them correctly installed originally i.e. in the side-by-side photos I posted above?
2wrench: I'm unsure again now whether I have them the right way around. Aaaaaargh! Do you think that I had them correctly installed originally i.e. in the side-by-side photos I posted above?