Hey Guest!

 Hey - did you know if you click on the title of a thread it will take you to the first unread post since you last visited that thread?
 but were afraid to ask:
  STOP!! Never post your email address in open forums. Bots can "harvest" your email! If you must share your email use a Private Message or use the
  smilie in place of the real @
 Pretty Please - add it to our Events forum(s) and add to the calendar! >>
red57
Jedi Knight
Offline
I thought I would share my major milestone. Over the years I have gotten a lot help and insight from the forums and I know I really like seeing other folks’ projects, so thought I’d share. I know some of you have done a major bare chassis rebuilds and know just how much work and frustration is involved – particularly if you are an amateur who believes in doing it all yourself like I do.
Brief backstory on the car, it’s a 1960 BT7. I hit a deer with it at about 50mph in October ’87 on my way home from work one night (was my DD) – flattened the front shroud & fenders, folded the hood backwards over the windshield, bent the frame, partially collapsed the right side scuttle brace that angles down to the shock mount.
At the time I had a ‘57 BN4 in my shop with a dead motor. So I pulled the 3000 motor and put it in the 100-6 and parked the 3000 in the corner of the garage. I started racing the 100-6 10 years later in ‘97 and enjoyed over 15 years of successful, incident free racing, but at the 2013 SOVREN July Historic races in Seattle, my 100-6 was taken out by a fellow that subsequently forfeited his racing license because of the serious wrecks he caused – unfortunately too late to do me any good!
The 100-6 was worse off than the 3000, so I drug out the 3000 and started work (the 100-6 is now the one stashed in the corner of the shop).
So it’s now just a couple of weeks shy of 8 years since I last drove a Healey! That’s why it feels like such a major milestone…… 8 years.
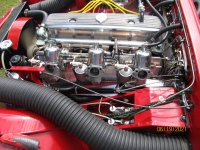
It finally runs!!! This week I put brake fluid in and bled the brakes and clutch. Water and water pump lube, filled the accusump and pressurized it and ran about 3 quarts of oil thru the engine to make sure everything was pre-oiled. Gas in the tank and filled the float bowls. I finally started the motor at about 3:00 Thursday afternoon 6-17-21 and was able to get the cam & lifters bedded (½ hr. at ~2500 rpm). Then on Friday I was able to re-torque the head and adjust the valves, set timing, and do the initial carburetor settings.
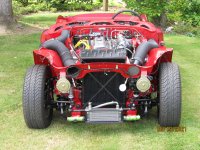
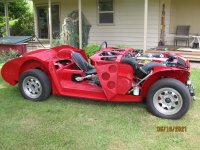
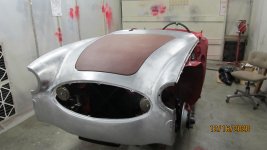
Saturday I actually drove it outside under its own power and took some pictures and celebrated the end of Phase 2. First time on its feet in 8 years, sorta forgot how short these things are .
.
Hopefully not more that another year or two to finish. I’m sure there will be lots of bugs to sort out but I’m a happy camper right now.
This project can be broken down into 4 Phases:
Phase 1 was the cutting and replacing rusted and/or bent structural metal and body patch panels and piecing together the front aluminum shroud, straightening the frame and getting all of the body panels to fit,
Phase 2 was painting the chassis and assembling the mechanical, hydraulic, electrical, and plumbing systems,
Phase 3 will be final body work, panel fitting, paint and assembly,
Phase 4 will be the interior, top, tonneau.
Dave
Brief backstory on the car, it’s a 1960 BT7. I hit a deer with it at about 50mph in October ’87 on my way home from work one night (was my DD) – flattened the front shroud & fenders, folded the hood backwards over the windshield, bent the frame, partially collapsed the right side scuttle brace that angles down to the shock mount.
At the time I had a ‘57 BN4 in my shop with a dead motor. So I pulled the 3000 motor and put it in the 100-6 and parked the 3000 in the corner of the garage. I started racing the 100-6 10 years later in ‘97 and enjoyed over 15 years of successful, incident free racing, but at the 2013 SOVREN July Historic races in Seattle, my 100-6 was taken out by a fellow that subsequently forfeited his racing license because of the serious wrecks he caused – unfortunately too late to do me any good!
The 100-6 was worse off than the 3000, so I drug out the 3000 and started work (the 100-6 is now the one stashed in the corner of the shop).
So it’s now just a couple of weeks shy of 8 years since I last drove a Healey! That’s why it feels like such a major milestone…… 8 years.
It finally runs!!! This week I put brake fluid in and bled the brakes and clutch. Water and water pump lube, filled the accusump and pressurized it and ran about 3 quarts of oil thru the engine to make sure everything was pre-oiled. Gas in the tank and filled the float bowls. I finally started the motor at about 3:00 Thursday afternoon 6-17-21 and was able to get the cam & lifters bedded (½ hr. at ~2500 rpm). Then on Friday I was able to re-torque the head and adjust the valves, set timing, and do the initial carburetor settings.
Saturday I actually drove it outside under its own power and took some pictures and celebrated the end of Phase 2. First time on its feet in 8 years, sorta forgot how short these things are
.Hopefully not more that another year or two to finish. I’m sure there will be lots of bugs to sort out but I’m a happy camper right now.
This project can be broken down into 4 Phases:
Phase 1 was the cutting and replacing rusted and/or bent structural metal and body patch panels and piecing together the front aluminum shroud, straightening the frame and getting all of the body panels to fit,
Phase 2 was painting the chassis and assembling the mechanical, hydraulic, electrical, and plumbing systems,
Phase 3 will be final body work, panel fitting, paint and assembly,
Phase 4 will be the interior, top, tonneau.
Dave