• Hi Guest!
    You can help ensure that British Car Forum (BCF) continues to provide a great place to engage in the British car hobby! If you find BCF a beneficial community, please consider supporting our efforts with a subscription.

    There are some perks with a member upgrade!
    **Upgrade Now**
    (PS: Subscribers don't see this gawd-aweful banner
Tips
Tips

A Late Christmas Present - Rebuilt Wishbones

Jim_Gruber

Yoda
Country flag
Offline
I looked out on the front porch this AM only to find what the FedEx Santa left for me. A present for Bugsy. Now time for it to get a little warmer, 13 degrees this AM. These may need to wait until a little warmer day to reinstall.
 

Attachments

  • 23805.jpg
    23805.jpg
    40.1 KB · Views: 461
For an extra $6.00 per wishbone got a second grease nipple added. Return 5 days after Apple received from me. Straightened, degreased, new bushings, and repainted. One fulcrum pin fits perfect the other is a little stubborn until I get the swarf cleaned out. These came out of a latter Spridget hand have the extra reinforcements around the sway bar holes.
 
Well fitting complete ran another $80 or so. A little work with a tap to clean up junk on threads and I should be all ready to go. Major suspension kit to be installed plus new fulcrum pins. Hopefully a nice tight front end when done.
 
You will not need a tap Jim. Use the pins them selves as a tap, in and out just a bit each time with a screw driver. Easy does it and they will do great. remember both sides are different threads, keep the tap out of there.
 
Very nice, Jim. I had mine rebuilt by Apple too. I didn't think everything through very well, and decided to add an anti-sway bar a few years later. (My car did not have an anti-sway bar originally.) I was able to buy some bad wishbone cores that had good support gussets I needed from Apple and weld them in myself. Very time consuming. I have always been happy with their work.

Jack, are you referring to the kingpin threads that are different? In what way are they different? I just rebuilt my front suspension over the summer and don't remember the threads for the kingpins being different on either side.

Kevin
 
I was able to work fulcrum pins in a little bit at a lime, back out, clean out the threads with a brush, work back in. Took about 20 minutes per side but now they spin right in.Once you get them far enough in a 1/2" wrench fitted in the slot will get them all of the way down. Again keep cleaning the swarf out of the threads, backing it off, and all will go in place.

The other trick was taking a fulcrum pin to Lowes and finding a wide bladed screwdriver that really fit down into the slot of the fulcrum pin. Tried 20+ but finally found one with a thin enough blade that I could really put some torque on the fulcrum pin. All of the other screwdrivers in my box would fit the slot but not go all the way to the bottom on the slot.

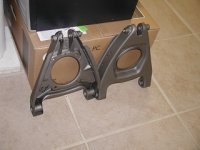
Need to paint springs and wishbones and reassemble the suspension kit but I'm back on theway to putting Bugsy back on the road. 12 degrees this AM. Don't think I'll be spraying paint in the garage today. Will fiish the rest of the prep work though. Trip to hardware store for some cotter pins and steel nylocks for the springpans. Come on Spring. Bugsy wants out of the garage.
 
Well I may not be remembering properly but I surely thought the ends were different. Maybe it is just my old brain. In any case the pin will work as its own thread cleaner.
 
Jack you are remembering right. The sides of the threads on the bushings are indeed different on each side. Must be the British "fiddly bits" thing in the original design.
 
Thanks Jim, thought I was loosing it there for a bit.

Yea, now I remember more, the first end that goes in is smaller so it will pass right through the first set of threads so that both sides screw in at the same time. yep yep.
 
Hi Jim:
Happy 2011 to you and your family.
I am going a different route on repairing my A-arms. I have a friend who says he can sweat out the old threaded inserts and braze in new ones easily, so I am going to take him up on it. I hope I am not creating a big fur ball for myself like I did when I rebuilt two universal joints. That's a two beer story.
I got the job done but only after many hours of work and the help of two friend from the Austin-Healey club. The local auto parts store wanted $36 each including parts and I thought that was too much money--WRONG! I will keep you informed of my progress.
I see the pix of your rebuilt Arms on the BCF page. They really look good, probably better than when they left the factory when the car was new.
I hope you can get some vacation time so you can attend the Spridget 50th in Wisconsin. I look forward to meeting you in person and having a brat and a beer at the track or at the bar in Siebkens Resort in the town of Elkhart Lake.
 
Be careful useing a screw driver to chase the threds. The fulcrum pin is hardened steel and can be brittle. Better tu use 1 1/2" wrench on the flat in the center of the pin as Jim noted.

I just installed a new one I got from Peter Caldwell at nosimports.com
They come with the fulcrum pin in place.

Phil
 
Trick was to work the fulcrum pin in and out now I needt oadd that whenb I first got the bushings from Apple there was lots and lots of trash in the threads that I needed to clean out. A brush perhaps on a Dremel tool might have been a good start to clean things out before they are brazed in place. I shipped my cleaned bushings to Apple for reinstallation,so wishbones I got back from Apple still needed further cleanup.
 
OK so getting ready to refit wishbones and kingpins. Fulcrum pins all ready to go and fitted. Running into issues on upper kingpin bushings and which way to they go on as well as fit. I'm assuming the brass upper bushings need to be reamed to fit as they will not fit on the kingpin. They also can fit two different ways and the descriptions I have on putting this back together do not talk about refitting the kingpin bushings and dust extruder tubes and the spring that fits it all together.

When I pulled the stub axle off, bushings which I am assuming are held in with O rings or some other mechanism all come off in one piece. IS there a good description for removing and refitting bushings so you don't screw up the dust excluder tubes as well as reaming for the upper fulcrum pin bushing. I could go ahead and simply reinstall with od bushings in place but since I have them what's the next step in putting this back together correctly.

Maybe I've finally found what that expensive two step reamer tool is used for. I think a Dremel with one of those round sanding 3M Scrubbie Pads could be used to polish and fit the brass upper bushings. Any other techniques recommended.
 
You have found the use for the expensive two step reamer.

Peter C had someone do mine.
 
I did a set with a homemade bearing scraper and prussian blue transfer pigment. The scraper is made from grinding the teeth off a three corner file. Be careful pressing the bushings out or in since I believe you could bend the assembly. The distance tube slips right out once you disolve the ancient grease. I used various bits and pieces for pressing the bushings including a brace between the upper and lower bushing bosses.
Any decent machine shop should be able to do the job without the expensive stepped reamer.

Kurt.
 
OK I'm convinced once again that my credit card is the best tool in my toolbox at certain times. Thanks all for the response. I don't know anyone locally who can do this work so time to pack things up and ship out to one of the folks who have done this more than once. Goal wwill now be Front End back together by Feb 1.
 
Jim: Did'nt mean to scare you off the project but I found it to be more than I expected. I'm surprised that you don't have a local decent machine shop but I guess this country has "deindustralised". If we can't have China do it, it can't be done.

Kurt.
 
Back
Top