• The Roadster Factory Recovery Fund - Friends, as you may have heard, The Roadster Factory, a respected British Car Parts business in PA, suffered a total loss in a fire on Christmas Day. Read about it, discuss or ask questions >> HERE. The Triumph Register of America is sponsoring a fund raiser to help TRF get back on their feet. If you can help, vist >> their GoFundMe page.
  • Hey there Guest!
    If you enjoy BCF and find our forum a useful resource, if you appreciate not having ads pop up all over the place and you want to ensure we can stay online - Please consider supporting with an "optional" low-cost annual subscription.
    **Upgrade Now**
    (PS: Subscribers don't see this UGLY banner)
Tips
Tips

a discussion on Installing new vacuum advance unit

M

Member 10617

Guest
Guest
Offline
This posting picks up on an earlier thread....

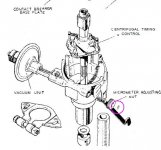
I see that Moss is selling new non-generic vacuum advance units.

I am thinking of replacing my old one with a new one, but I don't know the procedure.

Can someone out there give me some directions on how to remove the old unit and install the new unit (or direct me to some posted instructions). It looks straightforward enough, but appearances are always deceptive!
 

MikeP

Jedi Knight
Offline
Haven't done a TR distributor but on other Lucas ones all you need to do is unhook it from the inside, a little post on the plate probably with a clip. Then pull it loose while turning the manual adjust knob until the shaft throu it comes out.
 
OP
M

Member 10617

Guest
Guest
Offline
Mike,

Having inspected my vacuum advance from within the distributor, it appears that you are right about changing the one on the TR. There is a sping that hooks to a little post on the plate and that appears to be the only connection.

Moss says that their new vacuum advance units come pre-adjusted, so I assume that I don't have to do much else except fine tune with the micrometer knob.
 

MGTF1250Dave

Jedi Knight
Silver
Country flag
Offline
Aloha Ed,

There is a small spring clip that holds the knurled adjusting knob on the vacuum advance unit. Dealing with that and hooking the long spring on to the post on the plate are IMO the hardest part of the job.

Many of us on the forum here have had excellent experience with Advanced Distributors. You may want to consider having him test and rebuild your vacuum advance unit. Here is a link to the website describing the service.

https://www.advanceddistributors.com/services07_2.htm
 

TR3driver

Great Pumpkin - R.I.P
Offline
There should be a retaining clip on the end of the threaded shaft, that prevents unscrewing the knurled knob all the way. But it may be missing from a previous replacement.
 

Attachments

  • 25160.jpg
    25160.jpg
    52.6 KB · Views: 352

TR3driver

Great Pumpkin - R.I.P
Offline
MGTF1250Dave said:
There is a small spring clip that holds the knurled adjusting knob on the vacuum advance unit.
On re-reading this, I realize that Dave was talking about the same clip I circled above.

But note that there are also a couple of springs that need to be accounted for. The bent flat spring that makes the nut click, is particularly apt to launch itself (and sometimes the nut) if you aren't expecting it.
 
OP
M

Member 10617

Guest
Guest
Offline
My adjusting nut just barely "clicks" so I think the flat spring needs to be replaced. There is a retaining clip at the end of the shaft. I'll take care to keep the spring and the nut from "launching" if I remove the old unit. Many thanks for the warning.

As for having my unit rebuilt, I think that it would be easier to go ahead and purchase a new one from Moss. They now make a unit that is specifically for the TR3A and the price has come down from $114 to $89. So a new unit seems to make sense.

I'm still a uncertain as to what further adjustments I would have to make if I install a new advance vacuum unit. Clearly I can mark the distributor and make sure it is rotated to the same spot when I install the new vacuum unit (I have to rotate the distributor to get the old vacuum unit out), but I will have to start from scratch with the adjusting nut on the new unit because I can't mark where the old one was. When I set the timing a couple of weeks ago using a timing light (dynamic method), I didn't have to do anything at all with the adjusting nut because I left it where it was and rotated the distributor. But with a new unit and its new adjusting nut, it seems to me that I will have to reset the timing, either by the dynamic method (advance timing light) or static method (which involves backing off the adjusting nut 4 degrees).
 

70herald

Luke Skywalker
Country flag
Offline
LexTR3 said:
When I set the timing a couple of weeks ago using a timing light (dynamic method), I didn't have to do anything at all with the adjusting nut because I left it where it was and rotated the distributor.

The "proper" method of adjusting timing is by using the adjusting nut. The effect is the same, but if you insist on rotating the distributor, it is going to (or already has) wear the body were it is held by the clamp, then the distributor will no longer remain steadily in place... If the distributor was placed in the correct angle, the adjusting nut should provide more than range to set the timing without turning the body.
 

poolboy

Yoda
Country flag
Offline
I'd put the adjustment in the middle of it's range, thenset the timing by rotataing the dizzy and locking it down afterwards.
That way you can fine tune the timing when the mood or conditions change within the limitations of the of the micro adjustments using the wheel
 

TR3driver

Great Pumpkin - R.I.P
Offline
LexTR3 said:
because I can't mark where the old one was.

I'm puzzled by this, Ed. Perhaps you don't know about the scale on the left, between the vacuum module and the distributor body, that indicates the position of the fine adjustment?
 

Andrew Mace

Moderator
Staff member
Country flag
Offline
Just so everyone is clear, each mark on the vernier scale of that distributor adjustment equals 4 degrees (advance or retard, depending on which direction you're adjusting). There's provision, therefore, for quite a bit of adjustment without turning the distributor body.
 
OP
M

Member 10617

Guest
Guest
Offline
Randall,

You are right. I wasn't aware of the scale between the vacuum module and the distributor body. I need to take a closer look at all this.

Poolboy,

That sounds like a good approach to me. Using the scale that Randall has mentioned, I should have no trouble putting the adjustment in the middle of its range.

70herald,

I have set the timing only once since I acqired the car in October 2009, so the distributor hasn't been rotate much "on my watch." And when I did rotate it, the movement was probably about 1/2 inch. So I don't think I've worn the body much... but I will pay attention to what you have said and take care. Once I have the timing set, and the adjusting nut is in the middle of its range, I believe that all future adjustments will be done with the adjusting nut and not by turning the distributor.

Many thanks to you all.

Sorry I didn't get back to you sooner, but it was a beautiful day today in the Valley of Virginia so I took the opportunity to drive up the valley (north) to some of the battlefields where Generals Hunter and Sheridan fought with Confederate Rangers in 1864.
 

glemon

Yoda
Country flag
Offline
I understand your question is how to keep the timing the same when you switch out the advance units? I guess I would try to get it as close as possible to what it was on the old unit, but there is really no way to be sure unless you re-check re-set the timing for the car. If you have not done this there are a wide variety of instructions on how to in the manuals and on the web.

As others have said good idea to start with the vernier adjustment in the middle of the scale.

You can wear out the distributor body by turning it on the clamp, but most of those problems would be caused by either tightening down too much to secure (clamp digs into the aluminum) or not loosening enough when you adjust it (once again digging into the aluminum).
 

TR3driver

Great Pumpkin - R.I.P
Offline
Andrew Mace said:
Just so everyone is clear, each mark on the vernier scale of that distributor adjustment equals 4 degrees (advance or retard, depending on which direction you're adjusting). There's provision, therefore, for quite a bit of adjustment without turning the distributor body.
:iagree:

Also for clarity, I don't think it is safe to assume that a 60+ year old advance unit has exactly the same length of spring as a new one. Duplicating the marks should be good enough to start the engine, but you could easily wind up 10 degrees different than where you started, just from the variation in vacuum units. Even my collection of originals has some variation from unit to unit.

Probably also a good idea to disassemble, clean and lightly lubricate the points plate where it turns/rubs against the base plate. If it were stuck, that would explain why turning the knob didn't do anything.
 
OP
M

Member 10617

Guest
Guest
Offline
Someone else worked on this for me, and he said the knob didn't do anything. That is: when he turned the knob, the timing as shown by the timing light didn't change. Perhaps the change was too minute to be easily observable. At any rate, he then turned the body of the distributor slightly and got the timing by the timing light "correct."

As for a scale, there is no scale on the side of my advance vacuum unit. I think it is located on the shaft that goes through the unit that holds the vacuum unit in place(as shown on page 21 of the Lucas Technical Service Manual, Section 3, coil/ignition). But none of the hash marks are showing on mine, which I take to mean that the unit is screwed to the end of the scale (where it was when the distributor was rotated for setting the timing.

As the car is running extremely well at this moment, I think I'll leave well-enough alone for the present. At some later date, when I check and reset the timing, I will begin by setting the vacuum unit to the middle of its scale before setting the timing (probably with a timing light). I'll also probably take the opportunity to replace the 50+ old vacuum unit with a new one from Moss (new spring, etc.).

In the meanwhile, as spring has finally arrived here in the Valley of Virginia and in the Blue Ridge Mountains, it's time to hit the road....
 

poolboy

Yoda
Country flag
Offline
Yeah that's a good idea, because if you keep asking questions we'll keep you busy under the bonnet or on the computer instead of out in the fresh air and sunshine.
On the other hand if something actually does break, this is a good place to get various ideas or theories as to the possible causes. Then once you do finally uncover the culprit, we can suggest several different ways to fix it.

Are you getting my point here ?
 
OP
M

Member 10617

Guest
Guest
Offline
poolboy,

For me it's hard to imagine confronting the occasional problems without this Forum to lean on. It has been a real support! I have many more questions, but I don't want to wear out my welcome.

By the way... I discovered today that the real culprit behind the dieseling in my car was the timing. I had the timing set too close to TDC and not close enough to the recommended BTDC position. It's amazing how readjusting the timing instantly fixed the dieseling.

Heading off to a car show with a friend tomorrow in his Amilcar... and to the Blue Ridge Parkway on Sunday with two friends and their TR4 and TR6.
 

poolboy

Yoda
Country flag
Offline
Ask away. Obviously <span style="font-weight: bold"> <span style="font-style: italic">we </span> </span> have nothing better to do and have you greatly outnumbered, so don't think you'll wear <span style="font-weight: bold"> <span style="font-style: italic">us </span> </span> out.
 
Similar threads
Thread starter Title Forum Replies Date
Bob_Spidell New, and lively, 'discussion' on 'What is a 100M' Austin Healey 5
R TR2/3/3A Stromberg vs. SU carbs [discussion/advice] Triumph 17
AUSMHLY Tube vs Tubeless discussion :] Austin Healey 28
RAC68 Another Discussion of Trans/OD Fluid Austin Healey 14
TomMull Off Topic BAT: I know this is in the wrong category but It's following the BAT discussion here. Triumph 6
M open discussion on fiberglass tops Spridgets 18
M discussion on wheel backspacing in general Spridgets 17
M Discussion on 1/4 leaf for Bugeye Spridgets 22
Jim_Gruber Alternative Tranny Discussion Spridgets 7
Moseso TR2/3/3A TR3 Brake/Turn Lighting Improvement Discussion Triumph 12
Brosky Valve Spring discussion Triumph 16
martx-5 TR2/3/3A TR3 discussion over on the Miata forum Triumph 20
RobSelina Rear wheel bearing discussion Spridgets 30
jlaird Per previous discussion on engine paint Spridgets 0
Basil Welcome to the Triumph Discussion forum Triumph 0
J Installing Adapter Hubs for Wire Wheels on a Bugeye Austin Healey 5
S Installing a Radiator Fan Austin Healey 9
G Installing New Rocker Shaft Assembly Austin Healey 3
W Need advice on installing new side curtain glass Spridgets 1
Bayless Help please installing bonnet release cable Spridgets 8
M TR6 Installing Retrosound? Triumph 4
S TR2/3/3A Installing the distributor pedestal. Triumph 3
K TR2/3/3A Question about installing the steering wheel control head? Triumph 1
A TR6 Installing differential and transmission Triumph 10
Z Installing Toe Board Panels Austin Healey 1
K TR2/3/3A Installing Brake Caliper pistons into the bore? Triumph 21
CJ Burton MGB-GT Installing Seat Covers for 1962 - 1967 MGB GT MG 0
A Early 1967 AH Sprite - installing steering column and new directional switch? Spridgets 0
B Installing cam bearings 1275, can I do it? Spridgets 1
bighealeysource Installing stainless steel brake hose on BN2 Austin Healey 5
steveg TR6 Installing stock trailing arm bushings on the car - is it possible? Triumph 2
steveg TR6 Installing adjustable trailing arm brackets Triumph 7
T Installing Garmin GPS in a BJ7 Austin Healey 19
F Installing AC in my 1960 Healey Austin Healey 14
S TR2/3/3A technique for installing a door Triumph 5
R TR2/3/3A Installing wiring harness in steering column Triumph 59
R TR2/3/3A Installing gas tank Triumph 6
C Installing rubber grommets in firewall? Austin Healey 6
S TR2/3/3A installing a fuse in the red tail lights Triumph 4
S TR2/3/3A installing the wiring harness Triumph 8
R Installing Sprite Luggage Rack Spridgets 9
Lukens TR2/3/3A Installing a throttle. Triumph 2
J Powertune booster for a bj8 , trouble installing Austin Healey 2
B TR2/3/3A Installing dzus fastners in bonnet Triumph 8
D Prepping Floors Before Installing Interior Restoration & Tools 6
drooartz Installing front hubs, tips? Spridgets 15
E TR4/4A Wiring the horn when installing a Moto -Lita steering wheel Triumph 4
K TR2/3/3A Installing Moss wheel spacers? Triumph 5
D BT7 tri-carb installing my crank Austin Healey 4
aero3113 Installing Front rotors to hubs Austin Healey 2

Similar threads

Top