• Hi Guest!
    If you appreciate British Car Forum and our 25 years of supporting British car enthusiasts with technical and anicdotal information, collected from our thousands of great members, please support us with a low-cost subscription. You can become a supporting member for less than the dues of most car clubs.

    There are some perks with a member upgrade!
    **Upgrade Now**
    (PS: Subscribers don't see this gawd-aweful banner
Tips
Tips

TR4/4A 1963 Triumph TR4

twcguy

Freshman Member
Country flag
Offline
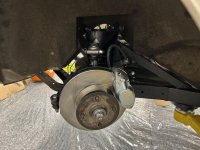
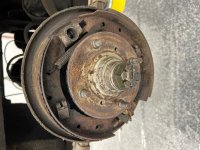
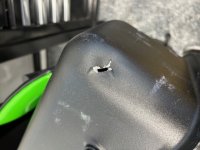
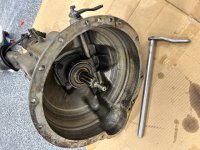
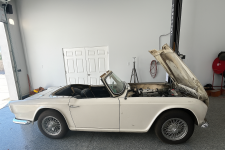
Saw an ad on Ebay for a one owner black plate 1963 TR4, called the seller and was told that he would cancel the auction if it was sold locally. He said that he already have a buyer in Canada who wanted to wire the money, and that I would have to hurry to see it, so we set up an appointment to view the car first thing in the morning. Went with a couple of family members to take a look and then purchased the car. The drivers side rear brake was completely frozen, we had to use a cable winch puller to drag it up onto the U-Haul trailer. Once back home, we took off the wheel and found that someone had already tried to remove the brake drum and had taken a big chunk off of the drum. There was no way to rotate the drum to get at the adjuster, and we had the parking brake released. No fluid in the lines at all. It wasn't the ideal solution, but we ended up using an air hammer to get the remainder of the drum off so that we could get the car off the trailer (not fun when it is over 100 and the car is in the sun).

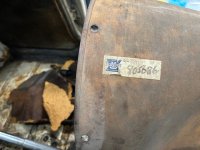
I was able to get the phone number for the original owner from the seller and I gave him a call. His wife had bought a TR3 new in the 1950's, and she traded it in for the TR4 in 1963. He married her in 1972 and they drove the car around their home in Manhattan beach until the motor "started making a noise" in 1985. The car was then parked and had been sitting in the garage until a month ago. The owner said it was never repainted during the time that he had known the car, but that his wife had backed into a wall and bumped a front fender in the past. The rear bumper is pushed in far enough to interfere with the trunk opening and closing.

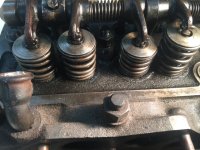
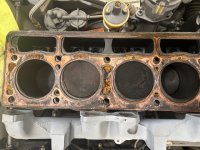
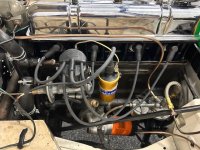
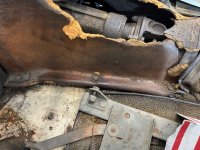
There is very little rust, other than the usual around the battery box and master cylinders. The motor spun easily by hand. I changed out the oil, pulled the plugs and allowed oil to soak the cylinders. After spinning it by hand for a few cycles, we used the starter to see if it would build oil pressure. No weird noises were heard, it sounded fine. Hit it with a shot of starting fluid and it fired up right away. We are going to leave the engine alone for now as we go through the brakes, clutch, suspension, etc. There is always the possibility of noise from the generator, water pump, chain tensioner, or any number of things that we can tackle later.

Not going to restore this one, just going to clean, polish, and replace the hard parts necessary to get it back on the road as a driver.

FWIW, the seller did not cancel the Ebay auction and ran it to the end. He called me and said that he had a buyer lined up and wanted to split the difference, I declined. PM me for details if necessary.

IMG_1885.JPGIMG_1886.JPGIMG_1898.JPGIMG_1899.JPGIMG_1901.JPGIMG_1903.JPG
 
I examined this one pretty well when it was listed. Looks to be a pretty solid car . A good start for a restoration ! Well done.
 
Welcome to the forum, looks like a great start!

Please keep us posted on your progress and keep in mind there are a number of us in SoCal here on the forum.
 
'Clean it up and drive' sounds like a good plan. I've tried that a couple of times but usually succumb to more restoration than I originally had in mind.

Not blaming you -- but that seller should be flogged if he let the auction run to completion after the car was sold. He may be planning on telling eBay the high bidder didn't buy the car (which would technically be true) in an effort to avoid eBay fees. In any case he apparently didn't read his own comments "I am looking for a fair auction...".
 
I'll update this post as the project moves along. I'd really just like to have a Triumph that is driveable, the TR3 (baseboard trim rack in background) is enough of a project for now. But, I know how repairs can snowball into something else...

The auction was at $4k when I bought the car, I think the seller wanted to know if he could have gotten more for the car than I paid him. I sent in a note through my account and received a canned response back.
 
"Clean it up and drive" does SOUND like a good plan ! The last TR I did started out the same way too - same condition etc. - $20K later ( parts only) I had a pretty nice car !
 
The car looks really great. I look forward to seeing your progress. Keep the photos and narative coming.
 
I agree , it does look like a great car . I think my next TR will be a TR4. I've still got a good complete engine for one. This one here just needs a good steam cleaning and it will look great . On a So. Cal car like this I'll bet the original finishes are on the hardware bits too. Not the rusty crap the cars back here have.
 
Was the hood never drilled for the letters or front medallion? What a great looking find, my brother will be envious. He 'deep sixed' his '62 mostly daily driver, (which he bought in '72), due to terminal frame rot (upper midwest snow and salt) in 2010. Oh and what does the odometer show? I'll guess that you've not had a chance to check compression.
 
Ya'll are making me sad. This one is about the same shape as the black one the trucker lost off the trailer on Christmas Eve outside of Atlanta.
Marv
 
Good point TRTEL, I'll have a closer look at the hood today. There is some evidence that the front left corner may have been hit at one point. Unfortunately, the original owner passed and the husband has no recollection of body repairs.
 
There are no holes in the hood, and no evidence of patched holes that I could find. The paintwork (lack thereof with primer showing) on hidden areas of the hood suggest that it is not original to the car. We are guessing that there had been an accident sometime after Triumph started to produce the single hood with no holes as a replacement panel, but prior to 1972. Anyone know of a template for drilling out the emblem mounting holes?

We removed the fuel tank and cleaned it out, replaced all the fuel lines, my brother rebuilt the fuel pump and it ran on gas for the first time in 30 years. We were hoping to find the source of the noise that caused it to be parked before we started rebuilding all of the engine accessories in the event that we had to pull the motor. The two piece crankshaft pulley had loosened and come apart, and was banging around. It looks like it had been off before sometime in the past and whoever did the job did not replace the nylocs. Hopefully it will be a straightforward fix.
 
Well, things got busy. I started a new business, moved across town, and finally built a garage. Nothing to do with procrastination, of course - but the TR4 has been collecting dust and has now been sitting for 40 years... until my brother told me he was taking his restored TR3A to Triumphest. I committed to having the TR4 running and driving in time to take it to Buellton, in a month, as any good brother would. The car remains destined to be a driver, and all work was done with that intention.

With just over 30 days of early mornings, late nights, and weekends to work with the first order of business was machine work on the head to run unleaded fuel. One valve looked “sunken” into the keepers, so I pulled the head and took it to Corbin at Quality Cylinder Head Specialist in Stanton, CA. I ordered all the necessary parts and had them sent directly to his shop. After thoroughly checking and testing the head, Corbin reported that the odd valve was from another car and would likely have failed.
 

Attachments

  • IMG_9035.JPG
    IMG_9035.JPG
    212 KB · Views: 15
  • IMG_0546.jpg
    IMG_0546.jpg
    164.6 KB · Views: 14
The front suspension came off, was degreased, and hit with fresh paint. Nothing fancy, just functional. Mostly agricultural… it is brushed on Rustoleum. I replaced all the perished rubber bits, bushings, tie rods, shocks, etc., using the Moss kit. New front rotors went on, and in the interest of time, I swapped in new calipers to go along with fresh pads.
 

Attachments

  • IMG_0639.jpg
    IMG_0639.jpg
    193.5 KB · Views: 13
  • IMG_0727.jpg
    IMG_0727.jpg
    162.8 KB · Views: 14
  • IMG_0801.jpg
    IMG_0801.jpg
    201.4 KB · Views: 12
In the rear of the car, I found that the passenger-side lever arm shock had disconnected itself from the frame by slowly eating away at its loose bolts. I cleaned it up while it was off and replaced the bolts. The rear brakes were disassembled, the backings painted, and all new parts fitted. A new master cylinder went in along with new hard and soft lines.

The oil I added to the dry differential immediately left the housing via the pinion seal. Another Speedi-Sleeve and a fresh modern seal replaced the original leather factory seal. Two screws driven into the old seal and a few hits with a slide hammer made short work of that job.
 

Attachments

  • IMG_0731.jpg
    IMG_0731.jpg
    149.8 KB · Views: 14
  • IMG_0890.jpg
    IMG_0890.jpg
    102 KB · Views: 12
The steering column was rebuilt with new blocks, and safety wired into place.

I had purchased four new wire wheels with knockoffs and new stainless steel bumpers, front and rear, from England ten years ago. I blew the dust off them and tried to find a local business willing to install tires on wire wheels - no luck. A trip to Harbor Freight and two tire irons later, the tires were mounted.

After picking up and installing the head with new ARP fasteners, I thanked myself for rebuilding the carbs years ago, since they went on easily. The oil pump clearances were checked, a new oil pan gasket (with “Great Stuff” sealant), spin on oil filter and adapter, timing chain, gear set, and crankshaft Speedi-Sleeve went on, along with a freshened-up factory-style fan. A high-torque starter, aluminum radiator, new thermostat and hoses, and fresh ignition points, condenser, rotor, cap, and wires completed the engine for now.
 

Attachments

  • IMG_1015.jpg
    IMG_1015.jpg
    169.2 KB · Views: 11
A week before Triumphest I turned the oil pump drive with a drill, and the motor built oil pressure nicely. The correct distributor height was calculated and a gasket was cut before the car was started. It fired immediately, drawing gas directly from a fuel can into the pump, and idled well but it had no oil pressure. The extremely worn woodruff key had fallen from the drive gear into the block while I was setting the distributor to #1. After draining the oil and removing the extremely well-adhered oil pan, the worn key was found and thrown into the trash. A new key was purchased locally and Permatexed into position.

After connecting the fuel lines and pouring gas into the tank, I discovered that the ethanol fuel left in there from my post 10 years ago had turned into fine particulate rust, clogging the first few feet of the fuel line. Baling wire and several cans of carb cleaner solved the line issue, while the tank soaked in the backyard with a heavy muriatic acid solution and an old chain. After a day and a half of shaking and soaking, I still wasn’t happy with how much rust and crust remained, so I ordered a new tank from British Parts Northwest with rush shipping. The tank arrived with a hole punctured through the top from other items packed in the box. BPN came through and delivered a second tank in time, with candy as usual. (If anyone wants a heavily discounted TR4 gas tank with a small vent hole, let me know...)
 

Attachments

  • IMG_0881.jpg
    IMG_0881.jpg
    106.7 KB · Views: 10
  • IMG_0882.jpg
    IMG_0882.jpg
    157.6 KB · Views: 13
  • IMG_0941.jpg
    IMG_0941.jpg
    97.5 KB · Views: 11
  • IMG_0942.jpg
    IMG_0942.jpg
    171.2 KB · Views: 14
While all this was going on, a new clutch master cylinder went in, and the slave cylinder was rebuilt. There was plenty of throw on the slave cylinder, but the clutch was stuck to the flywheel. I tried many methods found online, but none worked, so on the evening two days before Triumphest, the transmission came out.

That turned out to be a good thing, because the throwout bearing was nearly destroyed and had damaged its carrier. It wouldn’t have lasted long. The offending clutch disc came off easily, but one bolt was missing from the pressure plate. Unfortunately, there’s still a bolt missing, because I didn’t have enough time to remove the flywheel. The replacement carrier slid easily on the input shaft until the new bearing was pressed on, when it became an interference fit. The bearing went on and off many times, pressed to different depths, but I couldn’t get it to work as-is. I eventually gave up and pressed the new bearing onto the ratty old carrier. No, I didn’t have time to cross-drill the shaft either...more on that project later.

The fiberboard transmission tunnel was deteriorated so it was replaced with plastic. With a working clutch, insurance, and tags, I took the car on its first drive in 40 years—with my daughter riding shotgun. The cherry bomb muffler someone installed more than four decades ago is a bit rowdy, but we circled the block without issue.
 

Attachments

  • IMG_0971.jpg
    IMG_0971.jpg
    173.1 KB · Views: 14
  • IMG_0768.jpg
    IMG_0768.jpg
    231.6 KB · Views: 15
  • IMG_0774.jpg
    IMG_0774.jpg
    121.5 KB · Views: 14
  • car.png
    car.png
    2.7 MB · Views: 17
I’m skipping over some rust removal, (spray) painting, top installation, interior prep, etc., but anyone who has done similar things knows what went on there. Some items did not make it in time, like the heater piping, and bits had to be scavenged from my TR3A project, or the windshield wipers which I fashioned out of fuel line segments.

The car was trailered to Buellton and Triumphest was a great time. We met lots of friendly people and saw some beautiful cars. I didn’t go on any of the drives, as the car was completely untested and the drives were far too long, but it fell off and got back on the trailer and made several runs into town to the auto parts store without a hitch. The car had no coolant expansion tank at this moment, brother's TR3A to the left.
 

Attachments

  • IMG_1705.jpg
    IMG_1705.jpg
    215.2 KB · Views: 16
Last edited:
Back
Top