
-
 Hey Guest!
British Car Forum has been supporting enthusiasts for over 25 years by providing a great place to share our love for British cars. You can support our efforts by upgrading your membership for less than the dues of most car clubs. There are some perks with a member upgrade!**Upgrade Now**
(PS: Upgraded members don't see this banner, nor will you see the Google ads that appear on the site.)

Tips
- We have a special forum called "Member Articles" where you can submit actual articles for consideration for publication. Learn More
- Don't have an Avatar? If not, your avatar will default to the 1st character in your username. Go into "Account Details" to change your Avatar.
- Some basic forum navigation info: click
 Hey - did you know if you click on the title of a thread it will take you to the first unread post since you last visited that thread?
- Hey Guest - Is your British Car Club in our Clubs database? If not, send me a PM - Basil

- Looking for a local club? Click the "Clubs" tab above and browse hundreds of clubs world-wide.
- Add Android or iPhone APP: click
- Did you know - any picture or video you add in your posts in any marque-specific forum will also get added to the Media Gallery automatically.
- A few more tips about posting and replying: click
- Hey there Guest - be sure to keep your profile page up to date with interesting info about yourself: learn more
- More tips and tricks on Posting and Replying: click
 but were afraid to ask:
  STOP!! Never post your email address in open forums. Bots can "harvest" your email! If you must share your email use a Private Message or use the
  smilie in place of the real @
- Want to mention another member in a post & get their attention? WATCH THIS

- So, you created a "Group" here at BCF and would like to invite other members to join? Watch this!
- Hey Guest - A post a day keeps Basil from visiting you in the small hours and putting a bat up your nightdress!
- Hey Guest - do you know of an upcoming British car event?
 Pretty Please - add it to our Events forum(s) and add to the calendar! >> Here's How <<
- Hey Guest - you be stylin' Change the look and feel of the forum to fit your taste. Check it out
- If you run across an inappropriate post, for example a post that breaks our rules or looks like it might be spam, you can report the post to the moderators: Learn More
- If you would like to try some different "looks" or styles for the site, scroll to the very bottom, on the left and click the Style Selector.
You are using an out of date browser. It may not display this or other websites correctly.
You should upgrade or use an alternative browser.
You should upgrade or use an alternative browser.
TR2/3/3A 1960 TR3A starting chassis work
- Thread starter Frank Canale
- Start date
OP
Frank Canale
Jedi Warrior
Offline
Thank you for the suggestions about the front holes. Yes the steel table has made it much better to get this done. The owner is a car guy also and has been very understanding and supportive of my project. I am taking the weekend off. I may have a problem with the driver tower. Earlier I posted that the driver front outrigger was 3/16" forward. I don't know where I came up with this but it looks like it is coming back to bite me. The passenger side is confirmed correct from two points, the front outrigger and the lower spec from the spring mount. The driver side is hauntingly 3/16" forward of the front outrigger and the lower spec for the spring mount. I will go back and check this. If it is off then that is life, I made a mistake, I will fix it and move on.
OP
Frank Canale
Jedi Warrior
Offline
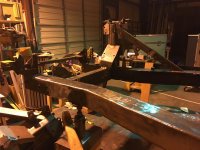
I went to West Tennessee to visit my Mom this weekend as I do most weekends. Friday night I was very upset with myself and I could not hide it from my Mom when I called her to let her know I was on the way Saturday morning. I spent the weekend working on a 60 year old Yazoo lawnmower getting it ready for another season of grass cutting. The frame remained on my mind and after some good food and a few laughs it was time to return to Nashville Sunday afternoon. The drive time gave me plenty of time to form a plan. Returning to the shop this evening I remeasured the tower and the gauges . Yes the tower is off. The plan, leave the lasers off sharpen the pencil and lay out all the points marking center lines and with squares and a plum bob mark where the tower should be. The question does the new layout match the passenger side, and if you move it does it make the front diagonal measurements match. The answer was a very loud YES. Now that was done time to remove the tower. This time the plan was to remove it very carefully in tact and especially not to damage the fulcrum pin mounting brackets or the frame. Surprisingly it was not as hard as before. The welds were not gobbed up so easier to see where to remove welds and did not create near the heat as before. Very happy to say no damage to the frame or the tower. Because the mounting brackets were not damaged the fulcrum alignment is much easier, the height is already set. With a little luck tomorrow evening we will be back on track. New taps should arrive tomorrow and I can get the nuts for the bottom of the frame done.
Attachments
LionelJrudd
Jedi Trainee
Offline
I second that David. A good ride on my motorcycle lets things rattle into place for me.
OP
Frank Canale
Jedi Warrior
Offline
The time away did me good. Tower was removed Sunday night, clean up from all the grinding and started refitting Monday night, rechecked position tacked and welded the tower last night. For a bonus I got the new body mounts welded to the outriggers. Having the laser set up made checking the body mount height easy. I was amazed at how good the tower cross tube fits now. This week has been an emotional roller coaster. Very low to very high. I could not be more pleased with the frame now. A few more welds on the bottom when I flip it to weld the cage nuts on and clean up a couple of welds and it should be finished. This afternoon I am going for a bicycle ride. Outdoor riding season is here so time will be shared with my other passion. Frank
I have those same holes. My guess is they are there to vent out moisture. Hopefully by the apron coming down and the engine heating the area, things are improved over trapped moister. Because of the age of the car, I am going to put some wax oil or something like David suggested.
I hear you Frank just got back a couple of days ago from a drive to East L.A. and some wild desert outside San Diego. The Oregon weather was soooooo bad highway 101 washed out right behind us, crazy.
I hear you Frank just got back a couple of days ago from a drive to East L.A. and some wild desert outside San Diego. The Oregon weather was soooooo bad highway 101 washed out right behind us, crazy.
OP
Frank Canale
Jedi Warrior
Offline
I had planned on having the frame E coated. Found a place in Mississippi that will do one off frame coatings. It first goes to one company that bakes all the oil, paint and such then it goes to an acid bath to remove all the rust inside and out. This can take a couple of days as the acid bath is mild so that only the rust is removed. Then it goes to Systems Electro coating for the E coating. SES does the E coating for Nissan truck frames. The cost is $450 for the cleaning and $450 for the E coating. This seems to be the best corrosion protection but is it worth that much. I am a little concerned with the acid dip process that it eats away places in the frame that are not evident. Any thoughts? Frank
When I hear acid, I get nervous. Even those so called hot tanks for parts cleaning keep eating away at the metal because they basically change the outside molecule near as I can tell. Iron oxide at the molecular level is the last band of the electron around the proton of an iron atom taking in a free electron to make 4 electrons in the last band because that is what nature does, creating iron oxide.
Metal like gold has 4 electrons on the last band as does not oxidize because the atom is sealed by having 4 electrons on the last ring. Maybe too much thinking, but most chemicals that clean do damage. There are acids that seal the atoms band and usually turn the metal black. This can sluff off over time and you need to paint over the blackened metal. My concern would be the paint will not stick well to the blackened metal. I see it like welding; you want the iron clean for stuff to stick to it, like paint.
Anyways in my view a hot soapy water bath for the grease and a sandblasting with lightweight sand then some primmer and paint should do it. On the inside I use something like wax oil.
I figure that will outlast me and the second owner will be a head of the game with oxidation and it might out last them because they will probably up in years to appreciate the car. Plus I can do that myself for 200.00
steve
OP
Frank Canale
Jedi Warrior
Offline
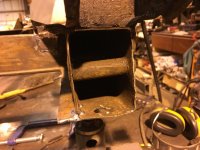
Thank you for that explanation. It did not take me very long to rule out the E coat for several reasons. I removed the front cap on the driver side to see how much junk would blow out of the frame. I was surprised at the amount of rusty dust that blew out. I am working on a wire brush that I can start at the back of the frame and pull it thru the frame while spinning it in a drill. Once the loose rust is removed I plan to degrease the inside of the frame, then I am not sure yet if I am going to go with a rust converter or a paint for rust. maybe POR 15 or rust bullet, maybe wax oil. Need to do some more research. I found it funny that my number to do the frame was the same as yours. I to believe it will hold up plenty well over time.
Attachments
Rhodyspit75
Jedi Knight
Offline
I have used the Eastwood internal frame coating several times and it does a good job of coating the inside of areas through just a small hole.
Guys like you and John who weld with quality open my eyes to possibilities I had not thought of because you can remove and reinstall pieces I had not considered. Removing that end piece to see inside is good thinking Frank. I appreciate you sharing what you found in there; I would be afraid of what I would find. Again, my mind does not go there naturally because I would have to weld the piece back, and I have seen too many of my welds fail. Simply put, I do not have a lot of experience or training in that area, but I stay at it.
Once when I was repairing a body tub I used the original inside rocker panels. They were in ok shape plus I discovered the rocker itself is open on the back end in the wheel well, so I did what you are doing with the frame and cleaned it out and made a mop and put some rust inhibitor paint in the channel. Going back to my chemistry story, the free floating electron that is picked up by the incomplete iron atom is a loose oxygen electron, making iron-oxide.
Peace out steve
OP
Frank Canale
Jedi Warrior
Offline
I knew there was something wrong with me now I know , I have a loose oxygen electron. Frank
OP
Frank Canale
Jedi Warrior
Offline
Steve, you seem to have a chemistry grasp on rust. My question to all is I will be able to wire brush the inside of the frame. Would it be better to convert the rust and paint or encapsulate the rust. The Eastwood system would be the easiest but still seems like just covering the rust. Still trying to decide how to proceed. Frank
https://www.ebay.com/itm/Triumph-TR...746415?hash=item34066782ef:g:ngoAAOSwTfBciBXn
https://www.ebay.com/itm/Triumph-TR...746415?hash=item34066782ef:g:ngoAAOSwTfBciBXn
Frank here is a cross tube if you still need one. I thought you mentioned you needed one
https://www.ebay.com/itm/Triumph-TR...746415?hash=item34066782ef:g:ngoAAOSwTfBciBXn
Frank here is a cross tube if you still need one. I thought you mentioned you needed one
OP
Frank Canale
Jedi Warrior
Offline
Thank you Steve, the problem was not with the cross tube but the towers that it bolts to. The flanges were bent up by PO. straightened them up and after repositioning the driver tower it fit perfect. Thanks for thinking of me. Frank.
OP
Frank Canale
Jedi Warrior
Offline
I have started cleaning the front suspension vertical link and associated pieces. I am not real happy with the wishbone pin that is part of the trunion. A lot of pitting from rust. I am also having trouble unscrewing the trunion from the vertical link. I have removed the steering stop bolt and adjusting sleeve. Started to remove the grease zert fitting but the bottom part that it threads into spins so that will have to be delt with later. The trunion turns about a 1/4 turn before it gets tight. Soaked it with lube, letting it set. Am I overlooking something, should it be that hard to get off. The seal above the trunion was gone so that might be part of the problem. Any suggestions are appreciated. Frank
Rhodyspit75
Jedi Knight
Offline
Could it be that there is a left and right hand thread depending on which side you are working on? You may be turning it the wrong way.
It sounds like the trunnion is shot Frank and I know what you mean about the grease fitting not coming out and turning round and round . The trunnions are usually shot so no big deal, and they are available from the big 3. I have removed the pin before in hopes of putting a new one in, but a new trunnion was the way to go; the other end in the arm has to be honed anyway. Hopefully the vertical link is not bent. They get bent kind of easy in a wreck, but I have seen them fixed. John fixed a bunch a while back. Some of those grease fittings are proprietary with the threads, I think. I do have some around here, so if you need some let me know. The idler arm is critical for getting smooth steering also.
steve
steve
OP
Frank Canale
Jedi Warrior
Offline
I was pretty sure I was going to have to get new trunions. Hope I can get the old ones off without damaging the vertical link.