-
 Hi Guest!
You can help ensure that British Car Forum (BCF) continues to provide a great place to engage in the British car hobby! If you find BCF a beneficial community, please consider supporting our efforts with a subscription.
There are some perks with a member upgrade!**Upgrade Now**
(PS: Subscribers don't see this gawd-aweful banner

Tips
- We have a special forum called "Member Articles" where you can submit actual articles for consideration for publication. Learn More
- Don't have an Avatar? If not, your avatar will default to the 1st character in your username. Go into "Account Details" to change your Avatar.
- Some basic forum navigation info: click
Hey - did you know if you click on the title of a thread it will take you to the first unread post since you last visited that thread?
- Hey Guest - Is your British Car Club in our Clubs database? If not, send me a PM - Basil

- Looking for a local club? Click the "Clubs" tab above and browse hundreds of clubs world-wide.
- Add Android or iPhone APP: click
- Did you know - any picture or video you add in your posts in any marque-specific forum will also get added to the Media Gallery automatically.
- A few more tips about posting and replying: click
- Hey there Guest - be sure to keep your profile page up to date with interesting info about yourself: learn more
- More tips and tricks on Posting and Replying: click
 STOP!! Never post your email address in open forums. Bots can "harvest" your email! If you must share your email use a Private Message or use the
  smilie in place of the real @
- Want to mention another member in a post & get their attention? WATCH THIS

- So, you created a "Group" here at BCF and would like to invite other members to join? Watch this!
- Hey Guest - A post a day keeps Basil from visiting you in the small hours and putting a bat up your nightdress!
- Hey Guest - do you know of an upcoming British car event?
 Pretty Please - add it to our Events forum(s) and add to the calendar! >> Here's How <<
- Hey Guest - you be stylin'
Change the look and feel of the forum to fit your taste. Check it out
- If you run across an inappropriate post, for example a post that breaks our rules or looks like it might be spam, you can report the post to the moderators: Learn More
- If you would like to try some different "looks" or styles for the site, scroll to the very bottom, on the left and click the Style Selector.
You are using an out of date browser. It may not display this or other websites correctly.
You should upgrade or use an alternative browser.
You should upgrade or use an alternative browser.
TR2/3/3A 1960 TR3 A Door Check Assembly
- Thread starter Tinkerman
- Start date
trglory
Jedi Trainee
Offline
No, it looks symmetrical to me, can go either way. But speaking of PITA, the piece in the A post that the check strap is attached to is broken on the passenger side of my car (I only have the back half of the circle). Anyone have ideas on how to rehab this connection?
Joe
Joe
Last edited:
If that is the part number you need, I accidentally ordered 2 extra. If you want them, I will sell them for $40 each. If the part you need is in the front post which connects to the part number referenced, I never found anyone to sell them so I made one after my wife (engineer) did a drawing of it .
Jerry
Jerry
trglory
Jedi Trainee
Offline
That's what I thought too and that's why it hasn't been fixed yet. Things like this don't break until you are done with a full restoration. It's all part of Murphy's Law, I guess. :grumpy: However, the cost associated with doing it right simply doesn't justify the end result, so I'll just need to come up with a "brilliantly engineered" plan B.
Joe
Joe
martx-5
Yoda
Offline
... But speaking of PITA, the piece in the A post that the check strap is attached to is broken on the passenger side of my car (I only have the back half of the circle). Anyone have ideas on how to rehab this connection?
Joe
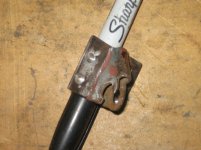
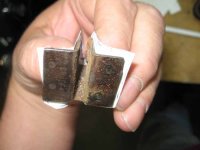
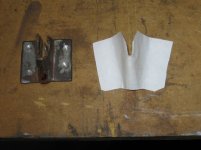
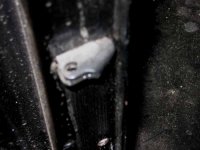
I had a broken one on the driver's side, and wound up fabbing a new one. I drilled out the spot welds in the A post to take out the old one. I wrapped paper around it and traced the outline. Then I laid the pattern out on a piece of steel and cut it out. I found an electrical box cover that was the same gauge materiel as the piece. With some careful bending and contorting, I managed to make a pretty good replica. Too bad the pic I took of it is out of focus.
Of course, the front wing has to be off for this job.


trglory
Jedi Trainee
Offline
Art; That's a real nice reproduction you made. I was getting very excited until I got to the "of course" part. I'm not coming up with any other great ideas, so I might just have to bite the bullet and start taking the car apart. Let's see what we need to remove to get to this itsy bitsy part .... bumper, fog lights, door, fender, kick panel, ....
Joe

Joe

