• Hi Guest!
    You can help ensure that British Car Forum (BCF) continues to provide a great place to engage in the British car hobby! If you find BCF a beneficial community, please consider supporting our efforts with a subscription.

    There are some perks with a member upgrade!
    **Upgrade Now**
    (PS: Subscribers don't see this gawd-aweful banner
Tips
Tips

TR2/3/3A 1959 TR3 Inner and Outer Rocker Replacement Bracing

antiqueynot

Freshman Member
Offline
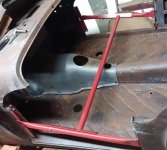
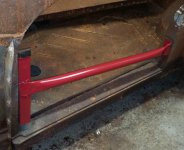
I have seen other discussions about this topic but would still appreciate opinions. I am about to begin the replacement of the inner and outer rocker panels on both sides. I will do one at a time of course. I have the car to a temporary chassis made from dimensional lumber, supporting the body at the same points as the real chassis does. I have made braces in both door frames connecting the upper and lower hinge mounting points to the striker plate mounting. There is a cross beam connecting these two braces. I am in the process of making an X brace going from the point where the body cross member meets the rear fenders to the opposite side door opening brace and welded to one another. I have tried to take an example from the bracing the people use when chopping the top on a car. I only need to remove the blocks that are presently located at the body mounts attached to the inner rockers. I plan to support the cabin area under the floor just inboard of these mounts. I feel that this will well support everything but I sure don't want to hear that BOING noise when I start cutting out the rocker panels. Once I have the cross bracing completed I will have photos available. Am I missing anything ? Thanks very much, Tony AKA Antiqueynot

PS I hope these photos of the door braces come through, I hope to have the X brace finished today.
 

Attachments

  • Cross Brace - From Above.jpg
    Cross Brace - From Above.jpg
    180.7 KB · Views: 215
  • Drivers Side Door Brace 03 - email.jpg
    Drivers Side Door Brace 03 - email.jpg
    180.2 KB · Views: 208
Mark the current height of the floorpan on the rear section of the trans tunnel. check the lip on the new pan to see if they are the same height and that way you can get the same alignment when it goes back in. Take lots of pictures and measurements before cutting begins!
 
TR3aguy,
Thanks for the quick reply. I am not intending to replace the floor pans, they seem to be in pretty good shape. I see that I did not say, nor show in the photos, that I have installed, fully bolted up, the trans tunnel. I saw this advised in another forum. I will be bracing the floor pans from underneath just inboard of the rocker panel attached body mounts, connecting these supports to the floor pan to keep this area from moving up or down. I do appreciate and will certainly take measurements and check, check, check before welding, and then check again after initial welds. I will not weld too much in any one area to avoid heat distortion. I have a clamp type spot welder and will use this where ever I can, and MIG weld the rest. I have been taking photos to document my work and give encouragement to the owner. Thank you very much for your advice and experience, Antiqueynot
 
It looks like very nice bracing to me. The front is substantial...I cannot see how you are attaching at the rear "B" post, though. If you have a decent vertical brace, then I think you are good. If it is just bolted to the door latch point, then it may be worth one additional brace to the top of the "B" post to ensure the angle of the post...and therebye the rear of the body...does not change while the sills are out.

If it is possible, after doing the tacking in of the new sills, it would be good to re-install the body on the frame while final welding.
 
CJD, tanks for the reply. I too had thought of running a brace at the top of the door opening to give two points of contact. I think you just made up my mind for me. Thanks, Antiqueynot.
Just preparing to tack the X brace together, photos to follow soon I hope.
 
Here's the fully welded cross brace, only the bolts or tack welds at the rear need to be done.
CJD, your advice is certainly valid, I plan to run a tubular brace with flattened ends and tack it on the outside of the body following the line of the "crease" in the door and body line. I'll run one or possibly two vertical braces from this to the already installed door bracing. My thought is that this will prevent any "droop" in the sill opening when the rocker metal is cut out. Thank you for your insight, Antiqueynot081414 - TR3 Cross Brace - From Above - For Email.jpg
 
If it is possible, after doing the tacking in of the new sills, it would be good to re-install the body on the frame while final welding.

CID is absolutely correct here, minute movements, with even with the best of bracing, screw up door gaps and such, to an amazing extent. Quite easy to tweak with tacks only, nearly impossible when all welded. Try to replicate body mounts and shims too. Tom
 
Tom, thanks very much. After I put the body on the fake chassis to do the rocker work (the chassis has been restored and I don't want to mess it up), I checked the fit of the doors and it was good, or at least as good as it was when it was sitting loosely on the chassis. Above and beyond the bracing already done, as CJD suggested I am going to put a brace at the top of each door opening. Finally I am going to support the floor pan from underneath to attempt to eliminate any "droop" when the rocker panel is removed. Lastly I intend to make a "door pattern" from cardboard or even luan. I very much appreciate all the cautions and advice and benefits of all your experiences, Antiqueynot
 
Here is what I see as fly in the ointment. Your door brace is inside the door area. Therefore, you cannot install the door to determine the fit of the rocker panel to the closed door. And of course it is that door and the spaces around it that you are working hardest to make look good. If your brace was inside the cockpit just inside of the door area then you could bolt on the door and determine if the rocker is in the position that you want it to be for final welding. I am of the opinion that just replacing the rockers is not nearly as big a deal as replacing the sill and floors on either or both sides. When doing that you really do subject the body to all sorts of potential movement.
On my work, I have always welded a brace inside the body across the upper and occasionally the lower part of the door opening as well as across the cockpit. I then can install the door and close it to better determine what the final product will look like.
Charley
I need to amend my comments as I got carried away thinking of rockers only. But you are referring to the sill as the inner rocker. Replacing the sill is in fact a big deal. But my comments regarding being able to hang the door is even more important. Further having the body sitting on the actual frame loaded with the drive train and sitting on the wheels is the ideal situation. The braces should be put in with the car in the described setup.
I also use two braces across the door opening, one high and one low. Both inside the cockpit so the door can be mounted to be able to verify A and B post location on the sill.
good luck!
Charley
 
Back
Top