-
 Hey Guest!
British Car Forum has been supporting enthusiasts for over 25 years by providing a great place to share our love for British cars. You can support our efforts by upgrading your membership for less than the dues of most car clubs. There are some perks with a member upgrade!**Upgrade Now**
(PS: Upgraded members don't see this banner, nor will you see the Google ads that appear on the site.)

Tips
- We have a special forum called "Member Articles" where you can submit actual articles for consideration for publication. Learn More
- Don't have an Avatar? If not, your avatar will default to the 1st character in your username. Go into "Account Details" to change your Avatar.
- Some basic forum navigation info: click
 Hey - did you know if you click on the title of a thread it will take you to the first unread post since you last visited that thread?
- Hey Guest - Is your British Car Club in our Clubs database? If not, send me a PM - Basil

- Looking for a local club? Click the "Clubs" tab above and browse hundreds of clubs world-wide.
- Add Android or iPhone APP: click
- Did you know - any picture or video you add in your posts in any marque-specific forum will also get added to the Media Gallery automatically.
- A few more tips about posting and replying: click
- Hey there Guest - be sure to keep your profile page up to date with interesting info about yourself: learn more
- More tips and tricks on Posting and Replying: click
 but were afraid to ask:
  STOP!! Never post your email address in open forums. Bots can "harvest" your email! If you must share your email use a Private Message or use the
  smilie in place of the real @
- Want to mention another member in a post & get their attention? WATCH THIS

- So, you created a "Group" here at BCF and would like to invite other members to join? Watch this!
- Hey Guest - A post a day keeps Basil from visiting you in the small hours and putting a bat up your nightdress!
- Hey Guest - do you know of an upcoming British car event?
 Pretty Please - add it to our Events forum(s) and add to the calendar! >> Here's How <<
- Hey Guest - you be stylin' Change the look and feel of the forum to fit your taste. Check it out
- If you run across an inappropriate post, for example a post that breaks our rules or looks like it might be spam, you can report the post to the moderators: Learn More
- If you would like to try some different "looks" or styles for the site, scroll to the very bottom, on the left and click the Style Selector.
You are using an out of date browser. It may not display this or other websites correctly.
You should upgrade or use an alternative browser.
You should upgrade or use an alternative browser.
1950 Prefect Front Bench Seat
- Thread starter algot1901
- Start date


Offline
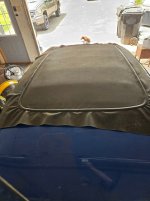
I suspect it is like the '48. There should be 4 "U" shaped straps that bolt down through those 8 holes in the wood floor. There should be caged nuts under the floor, 1/4-20 if I remember right. I can post a photo of a strap but I don't have a weekend care giver for my wife so can't get it before Monday. On another thought, I am trying to install the rubber retainer strip for the fabric top insert. This is proving to be almost impossible. How in the world did you do it?
OP
Offline
No rush, from your description I have it right, I will ave my son email you as he is the one who put our roof on and I think it was a 2 day job in the hot sun. Say hi to wifey for me and my prayers are to herI suspect it is like the '48. There should be 4 "U" shaped straps that bolt down through those 8 holes in the wood floor. There should be caged nuts under the floor, 1/4-20 if I remember right. I can post a photo of a strap but I don't have a weekend care giver for my wife so can't get it before Monday. On another thought, I am trying to install the rubber retainer strip for the fabric top insert. This is proving to be almost impossible. How in the world did you do it?
God Bless
Jim
OP
Offline
Here is what my son posted on a different site and I hope this helps everyone with a soft top.No rush, from your description I have it right, I will ave my son email you as he is the one who put our roof on and I think it was a 2 day job in the hot sun. Say hi to wifey for me and my prayers are to her
God Bless
Jim
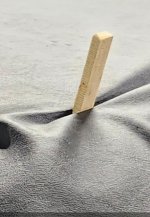
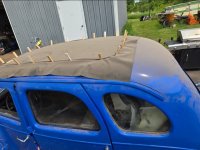
2 people is preferable but this is how you struggle by yourself like me lol. Make sure it's hot or very warm outside or in garage as the vinyl needs to stretch a bit. If you don't have the old seal like me, use wedges and make sure you round the wedge so you don't tear the vinyl. (As you are putting in your seal that you keep checking your wedges that they are tight) Start in the back middle, wet the vinyl and under the seal constantly as it dries up. You start off by pulling on the vinyl while you push the seal to the inside to catch the lip. You will be leaning on it (to keep vinyl tight after pulling on it) with your forearm and left hand which is also holding the trim tool in a convoluted position and gently tapping the rubber seal into the channel (trying not to tear the vinyl top). I would get about 3 to 6 inches in then hammering the seal down (dont forget to keep it moist, trial and error will tell you how much to use, check wedges). Corners are the worst! Once you get as far as you can on the corner go past the corner & get it in on the other side then work backwards on that corner as it's easier to get the rest of the corner in. Water, Trim Tool & Covered Dead Blow Hammer.
Attachments


OP
Offline
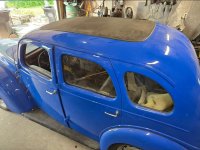
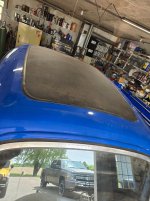
I wish you a successful install, as it is not easy cannot imagine how a person in 1950 could stand there day after day pounding the moulding into the slot. Well have to reinstall the gas tank today. I left off some kind of metal piece that goes onto the trunk floor pan in the very left rear, the filler comes up through this oblong hole and then goes through the body. This trunk floor pan item should have a gasket, but nothing is listed. The headliner is all that is left, and I have to add a cable splice to the stater cable as it is too short, and are you ready for this, I can start the bean fart up, yay. Headliner, I am thinking, will need to be installed at a shop as I am in no condition to be a contortionist.Thanks Jim. Looks like I am doing it about the same way. Sure is a tight fit though.
Jim
OP
Offline
My son revised his how to install soft top:Thanks Jim. Looks like I am doing it about the same way. Sure is a tight fit though.
How to install soft top.
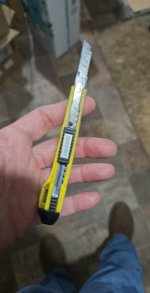
2 people is preferable but this is how you struggle by yourself like me lol. Make sure it's hot or very warm outside or in garage as the vinyl needs to stretch a bit. Tools needed are Water in a small spray bottle, Trim Tool & Covered Dead Blow Hammer. If you don't have the old seal like me, use wedges and make sure you round the wedge so you don't tear the vinyl. (As you are putting in your seal that you keep checking your wedges that they are tight) Start in the back middle, wet the vinyl and under the seal constantly as it dries up. You start off by pulling on the vinyl while you push the seal to the inside to catch the lip. You will be leaning on it (to keep vinyl tight after pulling on it) with your forearm and left hand which is also holding the trim tool in a convoluted position and gently tapping the trim tool on the side of seal to get rubber seal into the channel (trying not to tear the vinyl top). I would get about 3 to 6 inches in then hammering the seal down (dont forget to keep it moist, trial and error will tell you how much to use, check wedges). Corners are the worst! Once you get as far as you can on the corner go past the corner & get it in on the other side then work backwards on that corner as it's easier to get the rest of the corner in. As for trimming the excess vinyl I lifted the seal & vinyl and stuck my long skinny razor knife in with a fresh blade and cut it right before it goes into the channel that way the seal sits nice and flush against the roof.
*I hope this helps others, posting this 8 months after I did mine so I'm hoping I remembered everything I did*