but were afraid to ask:
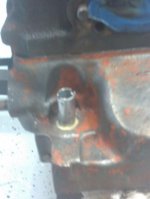
 Bypass nipple on the underside of the head is broken off flush. Tried WD40, heat and "easy" out with 4 foot cheater to no avail. Anyone know what the thread is on the nipple? Seems to be sort of 5/8 but with a thread between fine and regular. If I can find the right thread chaser I can drill and clean out the threads. Otherwise, any good ideas on how to seal it? Weld patch, bash in a copper or brass plug?...... :madder:

-
 Hey Guest!
British Car Forum has been supporting enthusiasts for over 25 years by providing a great place to share our love for British cars. You can support our efforts by upgrading your membership for less than the dues of most car clubs. There are some perks with a member upgrade!**Upgrade Now**
(PS: Upgraded members don't see this banner, nor will you see the Google ads that appear on the site.)

Tips
- We have a special forum called "Member Articles" where you can submit actual articles for consideration for publication. Learn More
- Don't have an Avatar? If not, your avatar will default to the 1st character in your username. Go into "Account Details" to change your Avatar.
- Some basic forum navigation info: click
 Hey - did you know if you click on the title of a thread it will take you to the first unread post since you last visited that thread?
- Hey Guest - Is your British Car Club in our Clubs database? If not, send me a PM - Basil

- Looking for a local club? Click the "Clubs" tab above and browse hundreds of clubs world-wide.
- Add Android or iPhone APP: click
- Did you know - any picture or video you add in your posts in any marque-specific forum will also get added to the Media Gallery automatically.
- A few more tips about posting and replying: click
- Hey there Guest - be sure to keep your profile page up to date with interesting info about yourself: learn more
- More tips and tricks on Posting and Replying: click
 STOP!! Never post your email address in open forums. Bots can "harvest" your email! If you must share your email use a Private Message or use the
  smilie in place of the real @
- Want to mention another member in a post & get their attention? WATCH THIS

- So, you created a "Group" here at BCF and would like to invite other members to join? Watch this!
- Hey Guest - A post a day keeps Basil from visiting you in the small hours and putting a bat up your nightdress!
- Hey Guest - do you know of an upcoming British car event?
 Pretty Please - add it to our Events forum(s) and add to the calendar! >> Here's How <<
- Hey Guest - you be stylin' Change the look and feel of the forum to fit your taste. Check it out
- If you run across an inappropriate post, for example a post that breaks our rules or looks like it might be spam, you can report the post to the moderators: Learn More
- If you would like to try some different "looks" or styles for the site, scroll to the very bottom, on the left and click the Style Selector.
You are using an out of date browser. It may not display this or other websites correctly.
You should upgrade or use an alternative browser.
You should upgrade or use an alternative browser.
1275 Water bypass nipple
- Thread starter erstearns
- Start date
mightymidget
Jedi Knight
Offline
I found that if you cut the wall of sleeve with a small metal saw, it releases pressure so part can be removed without thread damage. if you cut to far it just puts a line in the threads. I have not tried it in the area you are talking about tho
Spridget64SC
Jedi Trainee
Offline
Thread is 3/8" BSP, British Straight Pipe. Not tapered and doesn't match with SAE stuff. Matches with some JIC/plumbing and AN type threads. MM's suggestion is a good one. Use a Dremel tool and cutoff wheel and then a punch and hammer to curl the piece into the bore. Probably can drill with a 1/2" on the drill press to thin a bit more. I usually drill with a 9/16" on the mill and then thread for a 3/8" NPT plug since I'm usually doing this for racing purposes. If I've centered really well on the hole, the 9/16" drill will cut everything out and leave the threads in good condition. Just a cleanup with a dental style pick.
HTH,
Mike Miller
HTH,
Mike Miller
Hap Waldrop
Yoda
Offline
These are really hard to remove when not broken off, and I never gotten one off without using heat. When they are in whole, I use a pice of dowel to put into the ID, then I grabbed REALLY tight with a pair of vice grip, and use a fair amount o heat, and pentrating lube, and be patient.
Since your is broken off flush, I's do what Mike says and keep drilling it out with larger drill bits. We don't even run thm on the race cars, we either use a water pump that the bypass is undrilled or we tap the bypass in the water pump to 3/8" and put a bolt in it, then use a plug on the cylinder head, the Copper S 1275 head did not run the byass from the factory, those head just have a big brass plug in the head.
Since your is broken off flush, I's do what Mike says and keep drilling it out with larger drill bits. We don't even run thm on the race cars, we either use a water pump that the bypass is undrilled or we tap the bypass in the water pump to 3/8" and put a bolt in it, then use a plug on the cylinder head, the Copper S 1275 head did not run the byass from the factory, those head just have a big brass plug in the head.
Will try the wax and heat..... tried heat and WD40 to no avial. If that does not work will drill out with 1/2 and 9/16 and tap with 3/8 iron pipe thread tap. If all else fails can drill threads out and pound in a copper plug. Any suggestions as to which type to try? Have seen cup type that looks similar to standard copper type cap but tapered for hight pressure fluid sealing.
Hap Waldrop
Yoda
Offline
Eric, just be patient, that fitting is without a doubt the most difficult thing to remove for a A series engine.
dklawson
Yoda
Offline
Hap Waldrop said:the Copper S 1275 head did not run the bypass from the factory, those head just have a big brass plug in the head.
I have one of the first 500 1275 -S engines. It came with the AEG163 head and it has the bypass nipple. When I rebuilt the engine I installed a later big-valve head based on the 12G940 casting. It also had the bypass nipple. I thought it was not until they went to the A+ block that some of the heads were built without the bypass nipple.
Regardless, I have an acquaintance who uses almost the same method as you to remove the nipples from the head.
If you know how to grind an engraving graver I have a couple of homemade tools for this kind of job. Made out of old triangluar files. I would cut thru to the threads 2 cuts approximatly 60 degrees apart. Then use a good punch to drive the small segment out. Use the punch to loosen the remainder and it should screw out easily. Just my technique!
Kurt.
Kurt.
Being somewhat impatient.........I drilled out the aluminum with a 12" 1/2" bit. The chuck of the drill was up against the crank, as it drilled in it offset some and I was left with some aluminum on one side and engine block on the other. It was smooth and since there was no way the alum thread was coming out without some real effort I went ahead and tapped with a 3/8" pipe thread. Gobbed on some thread sealant and screwed it in. Fingers crossed.....hope for no leaks.