• The Roadster Factory Recovery Fund - Friends, as you may have heard, The Roadster Factory, a respected British Car Parts business in PA, suffered a total loss in a fire on Christmas Day. Read about it, discuss or ask questions >> HERE. The Triumph Register of America is sponsoring a fund raiser to help TRF get back on their feet. If you can help, vist >> their GoFundMe page.
  • Hey there Guest!
    If you enjoy BCF and find our forum a useful resource, if you appreciate not having ads pop up all over the place and you want to ensure we can stay online - Please consider supporting with an "optional" low-cost annual subscription.
    **Upgrade Now**
    (PS: Subscribers don't see this UGLY banner)
Tips
Tips

100/6 Front Wheel Alignment

OP
P

prutland

Freshman Member
Country flag
Offline
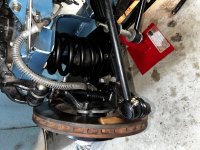
After pulling apart the front suspension on my 100/6 to replace bushes and the like, I have a conundrum in terms of the resulting wheel alignment.

Works completed were essentially to pull all the front suspension apart to replace the following:
  • lower fulcrum pins and rubber bushes
  • trunnion pins and rubber bushes
  • trunnion bearings
  • replace steering box oil seal and top felt bush
Apart from the front lever arm shock absorbers which remained in place, all the front suspension components were completely removed. All front suspension components were re-used after checking for wear except for those noted above as being replaced. Steering side rods and the cross-tube remained in place where practicable, and no adjustments were made to the cross tube length upon reassembly.

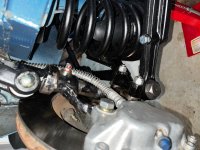
Upon reassembly it has become apparent that the front wheels have developed significant toe out (visible to the naked eye), and subsequently measured at about 1/2" (12-13mm) each side measured from front to rear of each wheel on the rim (using the "string line" method to verify). Notwithstanding that the suspension has been dismantled and reassembled, it is not obvious how such a change in the wheel alignment could have occurred. The cross tube was not touched and was reattached at 22.5" centre to centre (which seems to have been stated as a typical number on a previous post I have read).

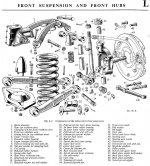
I can adjust the cross tube to bring the wheels into alignment, but it would require shortening as it is at the limit of its adjustment inwards at the moment. However, I am concerned that something might be amiss as the result of the reassembly and therefore I am reluctant to start adjusting the cross tube length in case something has been reassembled incorrectly. Noting that everything seems to be in its correct place and reassembled in accordance with Section L of the Workshop Manual.

Any thoughts on the above would be much appreciated.
 

BobHaskell

Jedi Warrior
Silver
Country flag
Offline
Paul,

The first bullet (lower fulcrum pins and rubber bushes): do you mean the lower A-arm / chassis bushings? Are the stepped washers seated correctly in the chassis mounts' holes?

Did you remove the steering arms? Swapping them side to side will mess up the toe.

Some new tie rod ends are longer, resulting in toe out.
 

Healey Nut

Luke Skywalker
Country flag
Offline
Ditto on the steering arms if you have switched them by mistake .
 
OP
P

prutland

Freshman Member
Country flag
Offline
Thanks all for your responses.

A couple of photos of the completed install are attached (apologies they seem to have uploaded in landscape mode!).

To answer the questions posed:
  • Upper trunnions are installed correctly as per the Workshop Manual (see extract + photos).
  • The lower fulcrum pins and bushes mentioned are those where the lower A-arms are mounted on the chassis. Stepped washers and pins are pulled up tightly and the former are correctly located in the mounting bracket "holes".
  • Steering arms attached to the steering box and idler respectively have not been swapped as I only removed the one on the steering box. The idler and its arm remained in place.
  • The cross tube and its associated tie rod ends was not removed. It was only disconnected at the steering box end. No adjustment to it length was made on reassembly.
As I mentioned originally, I suspect I can get the front wheels correctly aligned by shortening the cross tube, it is just odd that the suspension has gone back together with such a discrepancy in toe-in (out) compared with what existed prior to carrying out the work.
 

Attachments

  • AH Suspension Manual.JPG
    AH Suspension Manual.JPG
    196.6 KB · Views: 92
  • BN4 Drivers Side.jpg
    BN4 Drivers Side.jpg
    754.1 KB · Views: 93
  • BN4 Passengers Side.jpg
    BN4 Passengers Side.jpg
    806.4 KB · Views: 91

BobHaskell

Jedi Warrior
Silver
Country flag
Offline
Is the car sitting on the ground? If so, how does the camber look? When tightening the lower A-arm's inboard fulcrum pins, the car needs to be on the ground. Otherwise the suspension/tires won't sit properly.
 

BoyRacer

Jedi Warrior
Country flag
Offline
Two of the above posters have suggested what your problem may be. But you have not responded to their specific point. The steering arms are item #40 in the exploded diagram. They are handed. That is, there is a right side and a left side. If you installed them incorrectly then you will have the exact problem you are describing.
 
OP
P

prutland

Freshman Member
Country flag
Offline
Thanks for comments on the steering arms. Yes both steering arms #40 were removed, I was confusing the steering arms with the steering levers. As far as i am aware they have been remounted on the same sides as original as they were separately bagged.

I agree they are handed, as currently installed the arms slope upwards from their attachment to the hubs which appears consistent with the workshop manual and other posts.

I have subsequently shortened the cross tube / rod ends by about 10mm and this has easily reversed the toe out so perhaps I will just accept that the new bushes etc. have altered the alignment sufficient to throw it completely out. I will take tha car out for a couple of short trips around the block and see if anything untoward arises.
 

John Turney

Yoda
Silver
Country flag
Offline
The photo in post #5 shows that the steering arm is on the correct side.

It also shows that you don't have a 2" block of wood under the shock arm. I hope you did when you tightened the A-arm bushings. Doing so, sets the suspension a approximately normal ride height so the rubber bushings don't get over-stressed on bumps.
 
OP
P

prutland

Freshman Member
Country flag
Offline
Hi John,

Yes I used the 2" spacer before tightening up the suspension bolts. Once the springs are back in you cannot recreate the 2" it seems.

The test drive appeared to go OK, so I will get a proper wheel alignment and see how it goes from there.
 
Similar threads
Thread starter Title Forum Replies Date
H Healey 100 Front Wheel Bearing replacement Austin Healey 4
56HealeyDan 100-4 Front Crankshaft Seal Austin Healey 2
K 100-6 Exhaust Front Mounting Bracket Austin Healey 2
K For Sale TR3 front passenger side fiberglass floor panel.....$100 CAD OBO plus shipping. Triumph Classifieds 3
L 100/6 replacement front seats Austin Healey 7
L Denis Welch Front Disc Conversion Kit 100/6 Austin Healey 6
MikeAH100M 100 Front Hub Spacer/Distance Piece Austin Healey 2
C 100-6 front drum brakes? Austin Healey 36
A Wanted Front Bumper Brackets/Spring bar assembly for 100-6 Austin Healey Classifieds 0
L Front Brake 100/6 Austin Healey 1
D front shocks 100 m Austin Healey 12
T Front transmission seal not on 100-6 Austin Healey 2
C AH 100 Best Options for front and rear suspension? Austin Healey 9
cmc140 Austin-Healey 100 front splash pan / splash shield question. Austin Healey 8
T 100 4 Front Sway Bar Austin Healey 12
W 100-4 front main bearing cap issue Austin Healey 5
M 100-4 BN2 Front Fender with extra Groove Austin Healey 2
bighealeysource front disc brakes conversion for 100-4 Austin Healey 21
Y Restoring a 58 100 six front shroud Austin Healey 1
R 100-4 front fender removal Austin Healey 2
T 100 Front Shroud Attachment Austin Healey 0
M Healey 100-4 Front Spring Stiffness Austin Healey 2
bighealeysource 100-4 front shock replacement Austin Healey 2
bighealeysource Removing front shocks on a 100 -4 Austin Healey 12
S 100/4 front suspension/Mt Washington Hill Austin Healey 3
J Does anyone need a front valance for a 100-4? Austin Healey 1
mbrooks 100 oil leak from front of engine Austin Healey 3
Editor_Reid Healey 100 Front Springs Austin Healey 7
timbn2 Front Shroud for 100 Austin Healey 2
Michael Oritt Looking for a good 100 crankshaft Austin Healey 3
A 100/6 BN4 Restoration Austin Healey 4
Editor_Reid Healey 100 Frame Diagram Austin Healey 1
A 100/6 BN4 Door Lock Austin Healey 15
R 100-4 Transmission Austin Healey 1
W For Sale Selling 1958 100-6 w/ hardtop Austin Healey Classifieds 4
R Healey 100 Dipstick Stuck Austin Healey 12
T 100 BN2 Possible Ignition Issue Austin Healey 7
T For Sale New Premium Water Pump for 100-6 Austin Healey Classifieds 0
3 100 Clutch Freeplay Austin Healey 7
E For Sale Austin Healey 100 and 3000 parts Austin Healey Classifieds 1
R Big Healey 100 Head Austin Healey 4
G For Sale 100 Year Grille Badges Other British Classifieds 3
Guido36 Webers on a Healey 100 Austin Healey 6
R For Sale 100 engine block w/head Austin Healey Classifieds 3
kodpkd For Sale Alloy valve cover for AH 100-6 3000 PRICE DROP! Austin Healey Classifieds 1
A SOLD!! 1959 100-6 Austin Healey Classifieds 0
dougie '56 100-4 Racer For Sale Austin Healey 12
longbridgehealey SOLD!! 1957 100-6 BN-4 Austin Healey Classifieds 0
longbridgehealey Letting the 100-6 Go Austin Healey 26
P Wanted Wanted: Healey 100-4 frame Austin Healey Classifieds 4

Similar threads

Top