• The Roadster Factory Recovery Fund - Friends, as you may have heard, The Roadster Factory, a respected British Car Parts business in PA, suffered a total loss in a fire on Christmas Day. Read about it, discuss or ask questions >> HERE. The Triumph Register of America is sponsoring a fund raiser to help TRF get back on their feet. If you can help, vist >> their GoFundMe page.
  • Hey there Guest!
    If you enjoy BCF and find our forum a useful resource, if you appreciate not having ads pop up all over the place and you want to ensure we can stay online - Please consider supporting with an "optional" low-cost annual subscription.
    **Upgrade Now**
    (PS: Subscribers don't see this UGLY banner)
Tips
Tips

100 4 Does anyone recognize this rear main seal mod?

esa

Freshman Member
Offline
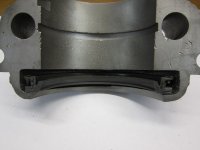
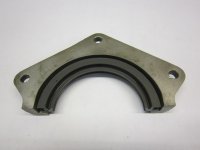
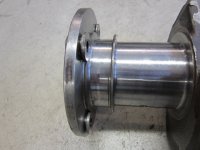
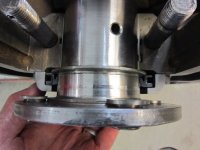
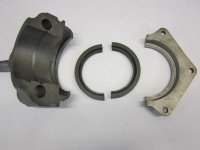
Half way through the rebuild of my 100-4 BN1 motor I've run into an unexpected problem. Apparently a previous owner modified the crank to take a GM seal, part number 460571. I didn't figure this out until I got my crank and block back from the machine shop and they returned the two semicircular halves of the seal with my old parts. Stupidly, I had not taken pictures of the rear main bearing block and the upper rear seal housing during dis-assembly. So I have no idea how the seal pieces were held in place. (The motor was not leaking at the rear main before I took it apart, so the modification was apparently working.)

New seals are available, but I can't figure out how they are held in place. They fit snugly on the crank journal and the flange surface that was machined, but they are not positively located by the bearing block or the upper seal housing, both of which appear to be unmodified. They would "float" in the original as-cast inner cavities of those two pieces.

Has anyone ever run into this modification? Any idea how the seals halves are held in place? Any help would be greatly appreciated.
 

Attachments

  • IMG_1876.jpg
    IMG_1876.jpg
    77.5 KB · Views: 267
  • IMG_1874.jpg
    IMG_1874.jpg
    54 KB · Views: 260
  • IMG_1869.jpg
    IMG_1869.jpg
    88 KB · Views: 272
  • IMG_1875.jpg
    IMG_1875.jpg
    91.4 KB · Views: 255
  • IMG_1872.jpg
    IMG_1872.jpg
    92.3 KB · Views: 268

dougie

Luke Skywalker
Country flag
Offline
This looks like a similar mod we make on our 6-cylinder race motors. I don't have any pics, but my machine shop mills the block to accept a chevy,
high-quality seal that out performs any of the current alternatives.
 

Genos2

Jedi Trainee
Offline
According to the part # you listed, it also fit '53-91 Chevy & 7.4 merc (boat) engines. It also comes with a tube of sealer which may secure it & seal the ends. I like the looks of it, & have used it on many older Chevy engines without issue. I think it would be a great alternative To to more expensive & labor intensive add-on seal kits. I think i will research it more & talk to my machinist. cheers
 

Legal Bill

Jedi Knight
Country flag
Offline
How is it different from the aftermarket rear seal kit I've seen advertised? Doesn't the piece with three holes mount to the rear engine plate?
 

Genos2

Jedi Trainee
Offline
Legal Bill, goggle the #, it fits inside the rear main cap, no mod to end plate or anything other than crank reverse screw needed. cheers
 
OP
E

esa

Freshman Member
Offline
Well, I've installed the new seal halves in the original rear main cap and upper housing. As I said in the 2nd paragraph of my original post, the issue is that the seals are not positively located in the cap and housing - they can "float". So I secured them around the crank with a big o ring that I happened to have, filled the extra space in the cap and housing with black "Good Stuff", and buttoned them up. We'll see if it works as well this time. Thanks to all for the input.
 

ahealey1004

Senior Member
Offline
hi esa- was searching the forums on a 100-4 rear main seal mod and stumbled across your post. I'm curious if this GM seal modification has worked for you (assuming you got your engine going)? I have a Denis Welch seal kit but after reviewing the instructions with my machinist, we both felt a little skeptical about drilling a new hole in a 60 year old main bearing cap as suggested in the DW instructions. Curious to hear your, or other's thoughts, on alternate seals such as this GM seal mod. Or, is the original scroll seal not that bad?
thanks,
Austin
 

dougie

Luke Skywalker
Country flag
Offline
hi esa- was searching the forums on a 100-4 rear main seal mod and stumbled across your post. I'm curious if this GM seal modification has worked for you (assuming you got your engine going)? I have a Denis Welch seal kit but after reviewing the instructions with my machinist, we both felt a little skeptical about drilling a new hole in a 60 year old main bearing cap as suggested in the DW instructions. Curious to hear your, or other's thoughts, on alternate seals such as this GM seal mod. Or, is the original scroll seal not that bad?
thanks,
Austin

I've used this GM rear seal mod on all my race motors with great results. If you have a good machinist, they can make this work better then the DW "bolt on unit".
 

Bob_Spidell

Yoda
Gold
Country flag
Offline
... we both felt a little skeptical about drilling a new hole in a 60 year old main bearing cap as suggested in the DW instructions...

Had the same instructions on a seal kit we got from BCS--the kind where you machine the crankshaft and add a 'collar' to the rear plate--and my dad didn't want to do that either (so we didn't). I think the hole is considered necessary to drain the seal housing since you don't have the 'Archimedian' screw to drive oil volume back into the sump, but it probably would weaken the rear cap somewhat.

As to the OP's original question, I think there should be a wound wire 'spring' that has to be connected inside the seal (yeah, it's a PITA).
 

CraigC

Jedi Trainee
Country flag
Offline
The seal, as shown in the OP's first picture is placed incorrectly. The circumferential groove in the seal should be straddling the inward facing lip of the main cap. Both the main cap and what is referred to as the "rear cover" have been machined to create that lip which matches the lip of the small block Chevy rear main cap and block for which that seal was original equipment. The modifications can only be carried out when the engine is out of the car, completely stripped and requires the use of the equipment used to line bore/hone the main bearings and a crankshaft grinder. This is why the "add on" type rear main seal kits are more popular, since they "can" be done with engine in place.
 

Bob_Spidell

Yoda
Gold
Country flag
Offline
... This is why the "add on" type rear main seal kits are more popular, since they "can" be done with engine in place.

The ones I've seen, and the one we installed, for 4-cyl engines require machining of the crankshaft. The one for 6-cyl cars are 'bolt on' (BTW, I have a new one; if someone wants it drop me a PM).
 

ahealey1004

Senior Member
Offline
Thanks all, very helpful. The DW kit instructions weren't quite clear and I want to be very specific with my machinist so he doesn't carve off the wrong metal!
For anyone who has done this mod on a 100, would you please look at the two pics and let me know if the items pointed to in red get machined smooth?
1) does the highlighted "lip" protrusion on the inner portion of the scroll of the crank get machined off? Or am I just directing my machinist to remove the scroll to 2.500"?
100 crank.jpg
2) does the curved scroll housing "bulge" on the external side of the rear main bearing cap get machined off such that the face is flush with the block? I assume that's the case.
Fyi, I've also emailed DW with same questions but haven't heard back. 100 block pic.jpg
 
Similar threads
Thread starter Title Forum Replies Date
simon1966 Does anyone use 48 spoke wheels on a 100? Austin Healey 21
J Does anyone need a front valance for a 100-4? Austin Healey 1
B Does a 100 Six with no heater have demister vents? Austin Healey 5
A 100/6 BN4 Restoration Austin Healey 4
Editor_Reid Healey 100 Frame Diagram Austin Healey 1
A 100/6 BN4 Door Lock Austin Healey 15
R 100-4 Transmission Austin Healey 1
W For Sale Selling 1958 100-6 w/ hardtop Austin Healey Classifieds 4
R Healey 100 Dipstick Stuck Austin Healey 12
T 100 BN2 Possible Ignition Issue Austin Healey 7
T For Sale New Premium Water Pump for 100-6 Austin Healey Classifieds 0
3 100 Clutch Freeplay Austin Healey 7
E For Sale Austin Healey 100 and 3000 parts Austin Healey Classifieds 1
R Big Healey 100 Head Austin Healey 4
G For Sale 100 Year Grille Badges Other British Classifieds 3
Guido36 Webers on a Healey 100 Austin Healey 6
R For Sale 100 engine block w/head Austin Healey Classifieds 3
kodpkd For Sale Alloy valve cover for AH 100-6 3000 PRICE DROP! Austin Healey Classifieds 1
A SOLD!! 1959 100-6 Austin Healey Classifieds 0
dougie '56 100-4 Racer For Sale Austin Healey 12
longbridgehealey SOLD!! 1957 100-6 BN-4 Austin Healey Classifieds 0
longbridgehealey Letting the 100-6 Go Austin Healey 26
P Wanted Wanted: Healey 100-4 frame Austin Healey Classifieds 4
M For Sale Austin Healey 100-4 Lemans Kit OEM Austin Healey Classifieds 5
A 100-6 Brake Lights Austin Healey 2
prb51 100-6 Brake Master Cylinder Bore Austin Healey 5
C What to do with my late father's Healey 100 Austin Healey 5
P 100/6 Front Wheel Alignment Austin Healey 10
andrea 100-Six Photo Album Links Austin Healey 1
prb51 Wanted Wanted...hardtop for 100-6 BN 6 2 seater Austin Healey Classifieds 1
prb51 100-6 Drum Brakes Austin Healey 9
S 1958 100/6 Bumper Brackets Color Austin Healey 2
S Wanted Used Austin-Healy 100/100-6/3000 Restoration Guide By Gary Anderson And Roger Moment Austin Healey Classifieds 14
Michael Oritt 100 Flywheel Weight Austin Healey 16
healeynut For Sale 100/4 block and head Austin Healey Classifieds 1
boxofparts 100-4 Engine Options Austin Healey 12
BoyRacer 6 cylinder flywheel on a 100 engine? Austin Healey 0
K 100-6 Interior Austin Healey 4
56HealeyDan 100-4 Timing and Vacuum Austin Healey 5
K 100-6 Exhaust Front Mounting Bracket Austin Healey 2
C Wanted Austin Healey BN2 100-4 Austin Healey Classifieds 2
R 100 Motor and Gearbox Available Austin Healey 2
B Austin-Healey 100-6/3000 Electrical Drawing Austin Healey 2
B Austin-Healey 100 BN2 Electrical Diagram Austin Healey 0
B Austin-Healey 100 BN1 Electrical Diagram Austin Healey 0
K For Sale TR3 front passenger side fiberglass floor panel.....$100 CAD OBO plus shipping. Triumph Classifieds 3
C For Sale Parts, Factory Manual, Restoration Guide for 1959 100-6 Austin Healey Classifieds 4
T 100-Six Clutch Recommendations Austin Healey 5
J Owners of my 100-4 Austin Healey 1
andrea AH 100/6 1957 Longbridge Photo Albums Austin Healey 5

Similar threads

Top