 but were afraid to ask:
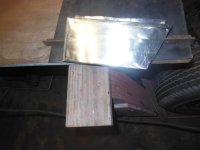
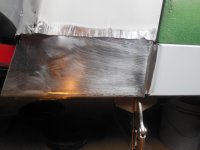
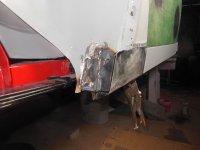
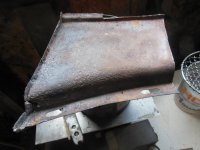
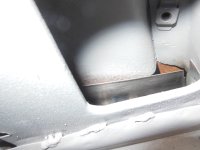
 I made a small piece to use on the bottom quarter panel, but I am afraid to try and weld the piece in place along the front. I can weld the bottom and both sides, but where the 2 piece overlap in the front, I know/kinda that I will burn through sorta. I am thinking about gluing it with panel adhesive. thoughts and ideas please
-
 Hey Guest!
British Car Forum has been supporting enthusiasts for over 25 years by providing a great place to share our love for British cars. You can support our efforts by upgrading your membership for less than the dues of most car clubs. There are some perks with a member upgrade!**Upgrade Now**
(PS: Upgraded members don't see this banner, nor will you see the Google ads that appear on the site.)

Tips
- We have a special forum called "Member Articles" where you can submit actual articles for consideration for publication. Learn More
- Don't have an Avatar? If not, your avatar will default to the 1st character in your username. Go into "Account Details" to change your Avatar.
- Some basic forum navigation info: click
 Hey - did you know if you click on the title of a thread it will take you to the first unread post since you last visited that thread?
- Hey Guest - Is your British Car Club in our Clubs database? If not, send me a PM - Basil

- Looking for a local club? Click the "Clubs" tab above and browse hundreds of clubs world-wide.
- Add Android or iPhone APP: click
- Did you know - any picture or video you add in your posts in any marque-specific forum will also get added to the Media Gallery automatically.
- A few more tips about posting and replying: click
- Hey there Guest - be sure to keep your profile page up to date with interesting info about yourself: learn more
- More tips and tricks on Posting and Replying: click
 STOP!! Never post your email address in open forums. Bots can "harvest" your email! If you must share your email use a Private Message or use the
  smilie in place of the real @
- Want to mention another member in a post & get their attention? WATCH THIS

- So, you created a "Group" here at BCF and would like to invite other members to join? Watch this!
- Hey Guest - A post a day keeps Basil from visiting you in the small hours and putting a bat up your nightdress!
- Hey Guest - do you know of an upcoming British car event?
 Pretty Please - add it to our Events forum(s) and add to the calendar! >> Here's How <<
- Hey Guest - you be stylin' Change the look and feel of the forum to fit your taste. Check it out
- If you run across an inappropriate post, for example a post that breaks our rules or looks like it might be spam, you can report the post to the moderators: Learn More
- If you would like to try some different "looks" or styles for the site, scroll to the very bottom, on the left and click the Style Selector.
You are using an out of date browser. It may not display this or other websites correctly.
You should upgrade or use an alternative browser.
You should upgrade or use an alternative browser.
TR2/3/3A gluing it with panel adhesive
- Thread starter sp53
- Start date

Online
Moisture reactive polyurethane (Gorilla Glue) is good for body panels if there is enough contact surface.
Bob
Bob
Alfred E. Neuman
Jedi Trainee
Offline
If you have a good automotive paint and body supply shop near you, pick up 3M Panel Bonding Adhesive. It's a 2 part epoxy that you run it through a gun with a mixing tip. If you do your panel prep per their intructions, when it sets up it's not ever coming back apart. I've seen demonstrations where the metal tears before the panel bond lets go.
3M Panel Bond
3M Panel Bond

Thanks you guys I will look into the glue stuff more. Hey Bob there is about a ½ inch overlap on the metals. The overlap and how to get in and get out without making only a mess, I see as a problem. It seems I could smear the adhesive on both sides---- slide the piece into place--- put a screw in it---- and wait then weld sides and bottom. I am developing the plan on the fly, so that should work right you all???
steve
steve
Alfred E. Neuman
Jedi Trainee
Offline
I might worry about welding on a small panel that I'd bonded into a car. I'm not sure how that epoxy would respond to the heat.
Offline
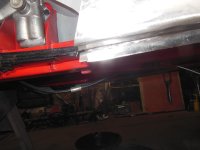
You are NOT doing this right.The repair panel must be shaped a bit at the bottom.Also there is a cage nut
that must be installed prior to welding the panel on. There is some access to the inside, so any warping
can be dealt with later. Never weld close to a bonded joint. DO NOT become your avatar in real life.
Mad dog
that must be installed prior to welding the panel on. There is some access to the inside, so any warping
can be dealt with later. Never weld close to a bonded joint. DO NOT become your avatar in real life.
Mad dog
Alfred E. Neuman
Jedi Trainee
Offline
I didn't think Steve was making the lower quarter/dogleg patch in this repair. I though that was a repair to the outer portion of the inner sill.You are NOT doing this right.The repair panel must be shaped a bit at the bottom.Also there is a cage nut
that must be installed prior to welding the panel on. There is some access to the inside, so any warping
can be dealt with later. Never weld close to a bonded joint. DO NOT become your avatar in real life.
Mad dog
Now that I look at it again, I might be wrong.
Online
Looking at the work now, I think that a number of plug welds (like spot welds, only done thru a small hole in one flange) would be the ticket. You almost certainly will not burn these thru and you can back up the lower panel with copper sheet to guarantee it.
Bob
Bob
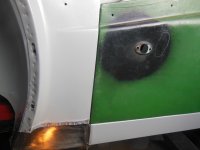
For sure Mad Dog my plan is incomplete. I found this area a real challenge. When I cut a quarter panel off an old tub I had, my plan was to butt weld the pieces together, but that looked to be weak plus the welding would be difficult for me.
The area had been done before by the PO, but was really sketchy. When I cut that repair out, I kept the cut low because I figured I would stay on the line of the door jam bottom hoping to fool the eye if my work came out too poor. I still could be the quarter panel piece in after I cleaned it and coated with about 3 coats of sealer.
The rock guards cover the bottom where the last bolt goes, and I figure I would put some metal wedge in and then sculpt a fill in with Duraglass and call it good.
I need to test how hot the metal gets with in about 6 inches. I usually feel the metal close to the weld after I weld to see how hot things are. The metal cools quick and it seems if I remember right the metal is cool to the touch at about 6 inches in any direction.
I like that idea Bob
I am totally open for ideas especially with body work.
Steve
Attachments
CJD
Yoda
Offline
Just a thought...if it's really thin, then you can sandwich a strip of 16 gage steel between the panels to make it harder to burn through during welding. Turn the welder to the lowest heat and use the thinnest wire you can find. Weld in short bursts, allowing the metal to cool from glowing before continuing down the seam.
The down side of glue is that is is like bondo. The steel will eventually rust and bubble through it.
The down side of glue is that is is like bondo. The steel will eventually rust and bubble through it.
CJD
Yoda
Offline
If you braze, some guy like me will be cussing up a storm when I restore it the next time. Once you braze, you can never weld that panel again. Plus, it envolves using more heat than MIG or especially TIG...so you have increased trouble with panel distortion too. In the old days brazing used less heat than torch welding, so it was popular. Once MIG, and again, especially TIG, came along, brazing is obsolete.
I am closely watching these new laser rigs. Most of the adds are AI BS, but I know they are real and will be the bomb when the prices come down.
I am closely watching these new laser rigs. Most of the adds are AI BS, but I know they are real and will be the bomb when the prices come down.
In my heart of hearts I would like to weld something in there. If I use the new sheet metal piece, I am going to try and weld the piece in place.
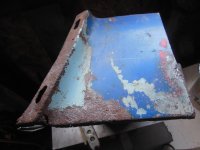
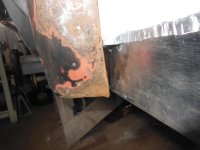
I like the idea of using the little blue quarter panel piece I have because the curves in the metal would be complete. The piece is mostly rust and leaded in on the outer kick panel side--- which brings in another situation, but I could seam sealer where the 2 pieces meet????. Plus, I would need to do something with the bottom of the piece.
Seems to me the new sheet metal piece would be strongest, and I should be able to add a small piece to fill in the curve without using too much filler.
I really appreciate the input because I am stuck ..... Steve
Offline
Once the mig is set on the "right settings" for the metal you are working. You clamp the
part up and weld a spot the size of an eraser ,which you allow to cool for a minute or so
Compressed air can force cool it. Then you do another one.Taking your time is the trick to
a good repair. Even grinding the nubs flat every so often is good as it lets the heat stay evenly
in the panel. It is not absolutly necessary to weld it solid,though most do. In any case filling
over the welds with Tiger Hair rather than bondo is imperative for durability .
Mad dog
CJD
Yoda
Offline
Honestly, Steve, if the metal you are dealing with is so thin you are worried about burn through, it will likely rust through within a couple years anyway...whether you weld or glue it together. I had a similar problem with the rear fender just above the trunk floor in my TR2. It was WAY to big of a job to replace the entire fender, and the rest of the fender was pretty decent. In the end I kept blowing through the weld, stopping and increasing the size of my patch...blowing through again...and again! Finally I got a patch large enough that it accounted for the very thin rusted area and I was able to weld it in.
Wish I was closer?!?
Wish I was closer?!?