• Hey Guest!
    British Car Forum has been supporting enthusiasts for over 25 years by providing a great place to share our love for British cars. You can support our efforts by upgrading your membership for less than the dues of most car clubs. There are some perks with a member upgrade!

    **Upgrade Now**
    (PS: Upgraded members don't see this banner, nor will you see the Google ads that appear on the site.)
Tips
Tips

TR2/3/3A It begins in earnest

Alfred E. Neuman

Jedi Trainee
Country flag
Offline
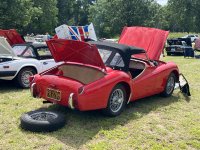
Got the TR2 into the shop on Friday afternoon and spend Saturday and Sunday with my wife removing all the bolt-on body panels.
It's bad. Not as bad as it could be, and I've seen way worse repaired here, but it's bad.
The entire car is covered in a weird silver that's making it look a lot worse than it is. The underside of everything is also COMPLETELY covered in a fine grey powder. It's like it was rallied on crushed stone roads and then parked. Forever. Maybe it was.
TR2 Front.jpg

TR2 Rear.jpg
 
Congrats on taking the first step in a rewarding journey! Hope the grey powder isn't also inside the engine ... Would be interesting to know the car's history details.

What's the first thing to do in bringing your TR back to life?

Tom M.
 
Every panel will need a fair bit of work, both from rot and fender benders/dings/dents/cracks.
Front fenders and bonnet are by far the worst, I think. Fenders will require the mounting flanges to be separated and repaired, then repair the fenders and mount them back together. At least John has the design of the lower flanges where the front fenders mount to the inner sill. Other than that, I'm going to be spending a lot of time forming and welding 20 gauge to get everything looking good.

Front Fenders Outer.jpg
Front Fenders Inner.jpg
Fender Flange Damage.jpg


Fender Flange Damage 2.jpg
Fender Flange Damage 3.jpg
 
Congrats on taking the first step in a rewarding journey! Hope the grey powder isn't also inside the engine ... Would be interesting to know the car's history details.

What's the first thing to do in bringing your TR back to life?

Tom M.
Thanks Tom! It's going to be a LOOONG journey, but I'm in it for the hobby.

First step, once I get the rest of the body fully stripped, is to get it braced and onto a cart so I can assess the frame. I think the frame looks very good and should clean up with just some minor repairs to the outriggers and rear bumper mounts. If it measures square, it will get stripped and wire wheeld so I can build my body to the frame I plan on using. If it is bent or rusted, I'll have zero hesitation ordering a Ratco frame. I plan on driving this thing with some beans. It's going to be solid and as "safe" as a TR2 can be.

I'll have the body media blasted so I'm working with a clean sheet instead of staring at all the rust and rot. The doors fit very well right now, so I'm thinking the best course of action is to NOT mess with the doors yet and use them to build the inner/outer sills and floorpans. The frong fenders are so bad, I'll build them to the tub and doors later.
Once the sills are back together and the tub is stable again, I'll move to either the back or front of the tub and get those straight. Then I'll build my body panels to fit the straight tub.
Sounds "simple" in practice. Not so much in execution. :oops:
Engnine/running gear/suspension/steering/brakes will all get rebuilt as I need a break from metal work. Same with interior and electrical and trim pieces.
 
Front shroud isn't too bad. Some flange work and a little strightening and welding up the ususal holes and cracks in the mout from the crank handle.

Shroud Front.jpg
Shroud Rear.jpg
Shroud WTF.jpg
Shroud Flange.jpg


Doors aren't too bad, but will probably require un-crimping the skin to get everything cleand and any minor repairs done. I don't think I'll have to get whole new skins or anything.
 
Boot lid will need some work to the lower edges where water collects, as usual. I was planning on removing the bracing to clean and rust proof anyway, so hopefully not a huge deal.
Bootlid Outer.jpg
Bootlid Inner.jpg
 
Bonnet is horrible. It's bent, rusted, and oil canned. TR2 didn't have any sort of strengthening lip at the rear. It's just a big sheet of thin metal and bends like a potato chip. Combine that with some corrosion and damage, and I'll probably have to use parts of the two other bonnets I have to make one good TR2 bonnet. I may cheat on this one if I can find a way to scavange the four vent secton and pop it onto a TR3 bonnet. 🤷‍♂️
 
Doors look OK. I'll have to disassemble them to do some minor repairs and for cleaning and rust prevention on the frames. I think the skins look good. Should be able to re-use with some repairs.
Doors Outer.jpg
Doors Inner 1.jpg
Doors Inner 2.jpg
 
I like your work space!
Plenty of room, that's for sure.
The problem is I have to push it in to work on it over the weekends or after work, then push it out again before I have to earn some money to pay for the thing. ;)

Since you've been down this path and worn in a trail, I have a few questions.
I think I've got a good general plan for the bodywork is to blast tub, use my doors to build on a good frame.
Repair the front and rear of the tub after the sills and floors are stong again.
Restore/repair/rebuild/make new :oops: panels and get bodywork fitting correctly.
Once I'm as good as I can get on the metalwork, blast the tub again and immediately get it in to epoxy.
One panel at a time compeltely de-rust and immediately epoxy.
Fit up panels for filler/polyester primer to get smooth
Final primer and sanding
Paint and wet sanding

My specific questions come to the nature of the TR2/3 tub. It doesn't seem like it leds itself to a rotisserie. I was planning on laying a bunch of moving blankets down and tipping it gently on its side for getting at the underside of the and inner fenders. Will it hold up well enough to laying on its side on a pile of blankets? I would need to do this to prime and paint everything under there.
 
It sounds like you've got a good game plan. If you are sourcing out the sand blasting, make sure they understand to use the minimum pressures and abrasive possible. You may even want to have them try a spare panel before committing. The 18-20 gage panels on the TR2 can get wavy very fast with too much aggressiveness with the blasting.

My biggest fault is I don't like spending a lot of time and money on temporary things, like a rotisserie!?! I tend to go with the simplest system to get the job done. I used 2x4's and 2x6's to build an "H" shaped structure that would support the tub at the 4 main mounting pads. This H frame then got large 6" wheel castors. This allowed the tub to be rolled easily where I needed it. The bonus is that, because the castors are rather inboard of the mounting pads, the tub can be very easily tipped up on its side...to work on the bottom. I would always have pads down when I tilted it, of course. I never screwed the tub to the wood frame, as it allowed me to pop it off when needed to access the underside.

Pigot's book and others recommend building braces for the tub when not on the frame. In 2 restorations, I did not find that necessary. In my 15 years on this forum, I only remember 1 owner that had trouble when not using bracing. If I recall, he strapped the un-braced frame to a trailer and then drove a good distance with it. Of course, bouncing on the trailer did spring the tub open. But normal handling will not damage the un-braced tub, unless it is severely rusted out...and if it is, it won't matter much anyway?!

A new build is an exciting time! My happy place is out in the shop with good tunes playing...
 
Thanks for the insights.
We have a body dolly that will work for rolling it around, but it's not super tall. It's stout enough to mount the frame to and then build the body to the frame while all is on the rolling dolly. I can't wait to get the frame checked and make sure it's usable. Then I can start thinking about getting rid of all this rust.

We have a company that will come out and do "dustless" blasting behind the shop. I think they use soda. The cars I've seen them do haven't had any waving when finished.

I did use my Christmas money on a new welder. The machines we have at the shop are very old and don't have any of the cool features of the new machines. I got HTP's new Freedom 250. Does MIG ang TIG, with pulse, spot, stitch, the whole 9 yards. If I'm going to be welding up thin metal for the next however many months, I'm going to try and use TIG as much as I can.
 
TIG is the bomb! I wish I had it when I did my TR2. The beauty is you can adjust the heat to the amp for very thin panels. That said, with MIG I can show a newby how to do it and have them looking pro in 30 minutes. TIG will take weeks...months...years to get welds like a pro!?! I practiced by building this aluminum greenhouse, and I still screw it up occasionally.
IMG_2938.JPG
 
I had my tub on a bed of sand from blasting and rolled the tub to one side and then the other. With the fenders off the car, when flipped on its side, it basically sits on the inner fenders on both ends were the cage nuts are.

The silver paint stuff to me looks like some of the old school aluminum sealer paint often used on mobile homes to fix leaks. Love that shop.

Steve
 
Hello,
I just saw your posts about starting a restoration of a TR2. I have been deep down this path so I have a good idea what you are facing. It does seem like you have a good work space which is very important, and from your pictures it looks like most of your body isn't in too bad of condition. There's some rust and a little rot, but not nearly as bad as it could have been. Hopefully overall most of your parts are there and in good condition because one thing I have noticed over the past few years is many TR2 parts are becoming unavailable. This is especially true since the very unfortunate fire at TRF because for me they tended to have good parts that the other suppliers may not have had.

Good luck!
 
PS...when you get to this point, an excellent source for the interior is John Skinner Interiors in England, but I will warn you to plan waaaay ahead because it sometimes takes him a very long time to make the interior. With that said, the ONLY good supplier for the seat springs is TRF. TRF is the ONLY supplier who builds them correctly. Everyone else, including Skinner, builds the springs like a mattress which is incorrect.
 
One more thing. I cannot tell from your pictures if you have an earlier TR2 that has four vents across the rear of the bonnet/hood, or two vents that the later TR2s have that have the pop-up air vent. If your TR2 is the pre-popup air vent then yes, use the bonnet/hood that has the four rear vents. The bonnet/hoods with the two vents is to prevent gases from the engine to be sucked into the interior when the vent is open.

You are correct that trying to get these bonnets/hoods to fit right is very difficult. This drove my body guy crazy trying to get everything to fit correctly, mostly due to the lack of support along the back edge of the bonnet/hood. Some bonnets/hoods, like mine, the metal is flat and some have a small curl along the back edge which does help some (but not a lot) to make the back edge a little more rigid.
 
@1955TR2 , Thanks for joining in!

The car doens't really have a lot of rot, but just about EVERYTHING is going to need a lot of work. One of the reasons I got this car over a '56 TR3 in driver condition is that I wanted to expand my capabilities. I got the car fairly inexpensively. I know I'll have a steep learning curve, but I also know I'll put in the time and effort to have exactly the car I want when I'm done.

I was already planning on going with Skinner for my interior when the time came, along with top and sidescreen material. I want the cat to be black with the deep maroon "Blackberry" interior. Piggot lists the top/sidescreen options for that color combination as either Blackberry for Fawn. Fawn is a grey-ish light tan, which might look pretty good. But if I go Blackberry, I'll want enough material to make sure my top, sidescreens, tonneau, and hoodstick cover all match the interior panels.

Unfortunatly for me, the bonnet is indeed the early four vent with no lip at the back. I may cheat this thing since it's so bad, and cobble the 4 vents into a much better later bonnet. I'll see how my metal fab skills are working when I get to that point :cheers:
 
That's great that you have the short-door TR2, more value than the long-door like I have (but some parts might be a little harder to source). I like the interior combinations that you're considering, especially the Blackberry because it will look very classy and unique. BTW, I wish you luck in finding a decent set of wedge style side curtain frames because they are getting hard to find. Fortunately, I was able to source a set of wedge frames from Albert at TRF prior to the fire. When you do find a set of frames, TRF finished mine about a year ago and they did a fantastic job.

As for the top, I used a Stayfast material top from Robbins but I got my cloth tonneau cover from Skinner and it was very nice. (I'm not sure if Robbins offers the cloth top option for TR2s any longer, but if you ask maybe they will make one for you). Another Triumph club member got his top from Skinner and like my tonneau cover it was very nice too and Skinner offers a cloth option.

I entered my TR2 for the first time at the VTR in La Crosse, WI in July and I had zero points deducted for my interior. I've attached some pictures of my TR2 including one of the interior (BTW, the dash material is the original 'wicker' material that came in the car). I've also attached a picture of the TR2's stablemate a TR8 that I bought last April.

Good luck with your project. It will be fun to follow your progress.
 

Attachments

  • DF71F9F3-B7BD-47DC-B28C-0F0C5B6E05EA-IMG_1719.jpeg
    DF71F9F3-B7BD-47DC-B28C-0F0C5B6E05EA-IMG_1719.jpeg
    3.6 MB · Views: 23
  • 60941621-8547-45C0-8D26-6090A2E58778-IMG_1720.jpeg
    60941621-8547-45C0-8D26-6090A2E58778-IMG_1720.jpeg
    2.4 MB · Views: 22
  • IMG_1565.jpg
    IMG_1565.jpg
    1.2 MB · Views: 22
Back
Top