-
 Hi Guest!
You can help ensure that British Car Forum (BCF) continues to provide a great place to engage in the British car hobby! If you find BCF a beneficial community, please consider supporting our efforts with a subscription.
There are some perks with a member upgrade!**Upgrade Now**
(PS: Subscribers don't see this gawd-aweful banner

Tips
- We have a special forum called "Member Articles" where you can submit actual articles for consideration for publication. Learn More
- Don't have an Avatar? If not, your avatar will default to the 1st character in your username. Go into "Account Details" to change your Avatar.
- Some basic forum navigation info: click
 Hey - did you know if you click on the title of a thread it will take you to the first unread post since you last visited that thread?
- Hey Guest - Is your British Car Club in our Clubs database? If not, send me a PM - Basil

- Looking for a local club? Click the "Clubs" tab above and browse hundreds of clubs world-wide.
- Add Android or iPhone APP: click
- Did you know - any picture or video you add in your posts in any marque-specific forum will also get added to the Media Gallery automatically.
- A few more tips about posting and replying: click
- Hey there Guest - be sure to keep your profile page up to date with interesting info about yourself: learn more
- More tips and tricks on Posting and Replying: click
 but were afraid to ask:
  STOP!! Never post your email address in open forums. Bots can "harvest" your email! If you must share your email use a Private Message or use the
  smilie in place of the real @
- Want to mention another member in a post & get their attention? WATCH THIS

- So, you created a "Group" here at BCF and would like to invite other members to join? Watch this!
- Hey Guest - A post a day keeps Basil from visiting you in the small hours and putting a bat up your nightdress!
- Hey Guest - do you know of an upcoming British car event?
 Pretty Please - add it to our Events forum(s) and add to the calendar! >> Here's How <<
- Hey Guest - you be stylin' Change the look and feel of the forum to fit your taste. Check it out
- If you run across an inappropriate post, for example a post that breaks our rules or looks like it might be spam, you can report the post to the moderators: Learn More
- If you would like to try some different "looks" or styles for the site, scroll to the very bottom, on the left and click the Style Selector.
You are using an out of date browser. It may not display this or other websites correctly.
You should upgrade or use an alternative browser.
You should upgrade or use an alternative browser.
General TR Oil Pan Questions
- Thread starter RJS
- Start date
charlie74
Jedi Warrior
Online
These sump washers spread the load.

I don’t use cork gaskets as they deform too readily especially if you try the 18ftlb
There are 2 other gaskets a paper one and a thicker card type. A smear of aviation permatex on either side of the gasket and you should be fine. If the tin sump has been dressed flat esp at the bolt holes
I use an ali sump and you don’t have these issues.
This is what I did with my OEM oil pan. I bought a sheet of gasket material and got a pro to cut it for me:
I like them Hamish, I can imagine how well they will work with 3/32 paper gasket and some non-hardening permatex, that I will try it soon.
RJS, for me, the other places the pan can leak would be the rear main sectionfor the seal. However, I installed one of those aftermarket seals for I think 150.00.
Another place where it could be leaking is felt gaskets on each side of the rear cap, but that seems unlikely by the way the felt ends on the block.
I had an oil pan with a crack in the sheet- metal that leaked worse when the engine warmed up.
There is another place I am thinking about on this engine where it leaks might be on the front seal and the oil is moving towards the back of the engine as I move.
Plus there is the open crankcase that could spread oil as it breaths. However,I am not too sure about this because I am not sure when the vent is sucking or blowing air.
Steve
OP
RJS
Jedi Warrior
Offline
Steve
Thanks. I feel pretty good about getting this all back together at this point. Your rear seal was an "engine out" job, correct? If so, not an option for me right now.
I am considering two more options before I reassemble everything
Bob
Thanks. I feel pretty good about getting this all back together at this point. Your rear seal was an "engine out" job, correct? If so, not an option for me right now.
I am considering two more options before I reassemble everything
- Mine is a TR4A with the PCV valve. Having owned this car 25 years, I am not convinced the PCV is the best engineered solution to block venting. I am considering removing the block plug behind the fuel pump and installing a catch tank (Racetorations sell them). I am not looking to open a debate on PCVs and engine breathing. My only question is, if I ever want to reverse this, can I easily replace that plug with the engine in the car (i.e. can I tap a new one into the block from the outside)?
- Front sealing block - is it worth considering pulling this and renewing the seals and the two cork "T" gaskets? Or, is this potentially opening a can of worms if I remove that?
Bob
On the sealing the bridge piece, I have done it before, but I also removed the bear plate on the front of the engine with the engine in the car, no fun because the engine mounts are on the bear plate.
Anyways this time I will not remove the bear plate and will see how the bridge is and go from there. Separating the small bridge piece from the bear plate gasket should not be too difficult if need be, but those are my famous last words some time. if removeal of the bridge piece become problematic, I should be able to seal the front of the bridge piece and bear plate with the same RTV used on the ends. The ends on the bridge piece are where a leak could easily be, so at some point the bridge piece probably needs to come out when chasing oil leaks.
I did not know a tr4a did not have a hole in the block for the vent tube. I thought the hole was plugged and could be removed to fit a vent tube.
Steve
charleyf
Luke Skywalker
Offline
The TR4A engine that I am using in my TR4 does have the vent tube hole. Which I removed the plug and am using it with the vent tube. So at least some did have the hole ( plugged) in the block.I did not know a tr4a did not have a hole in the block for the vent tube. I thought the hole was plugged and could be removed to fit a vent tube.
Steve
Charley
OP
RJS
Jedi Warrior
Offline
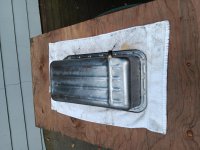
OK, not sure it shows in these pictures but, a lot of work went into cleaning up the oil pan. Removed all the oil RTV Black Max. Used acetone to soften it, a razor to scrape most and then finally a wire wheel to lightly/carefully remove the last bits. Then removed remainder of old paint. Then spent most of yesterday on the work bench straightening the pan. When I did this 8 years ago, the pan was straight. Simply shocking how bent it got when I remounted with the cork gasket which is 3/16" thick (mistake #1), used RTV (mistake #2) and then torqued to spec at 18 lbs-ft (mistake #3). I will not be repeating those.
Flattening the pan took several hours with various tools (straight edges, large ball peen hammer, small ball peen hammer, 15mm socket, wood dowels I made). But, checking with a long straight edge, I was able to get it flat to under 0.008" in all places, and less than 0.006" in most. The corners were by far the hardest (it is nearly impossible to get it flat to satisfy the long edge of the pan and the short edge of the pan at the same time - if that makes any sense). Then finally cleaned it up by lightly sanding with 400 grit and then going over it with a Scotch pad.
When I re-mount, I plan to go with a paper gasket, torque to only 10 lbs-ft and only dress the front sealing block (likely with Permatex #2 80015) and the the corners (for reasons noted above) (likely with Permatex #3 80019 (equivalent to Wellseal) or Permatex Permashield 85420 (equivalent to Hylomar). The rest of the gasket will go on "dry". If that doesn't work, at least it will be easy to pull down again next time.
Now I just need a day where the humidity isn't 100% so I can shoot the paint. I plan on using Eastwood 2K Hi Temp Ceramic Engine paint. Oh, and I still need to clean the block - that should be a good few hours of fun under the car...
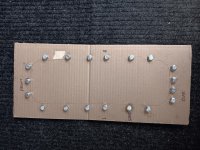
Pictures attached of pan and fasteners. Those are grade 5 bolts with flat washers and lock washers.
Bob
Flattening the pan took several hours with various tools (straight edges, large ball peen hammer, small ball peen hammer, 15mm socket, wood dowels I made). But, checking with a long straight edge, I was able to get it flat to under 0.008" in all places, and less than 0.006" in most. The corners were by far the hardest (it is nearly impossible to get it flat to satisfy the long edge of the pan and the short edge of the pan at the same time - if that makes any sense). Then finally cleaned it up by lightly sanding with 400 grit and then going over it with a Scotch pad.
When I re-mount, I plan to go with a paper gasket, torque to only 10 lbs-ft and only dress the front sealing block (likely with Permatex #2 80015) and the the corners (for reasons noted above) (likely with Permatex #3 80019 (equivalent to Wellseal) or Permatex Permashield 85420 (equivalent to Hylomar). The rest of the gasket will go on "dry". If that doesn't work, at least it will be easy to pull down again next time.
Now I just need a day where the humidity isn't 100% so I can shoot the paint. I plan on using Eastwood 2K Hi Temp Ceramic Engine paint. Oh, and I still need to clean the block - that should be a good few hours of fun under the car...
Pictures attached of pan and fasteners. Those are grade 5 bolts with flat washers and lock washers.
Bob
Attachments

Sounds like an excellent plan to me. The oil pan is beautiful plus you have an excellent assistant.
I am not sure what to think about the bolt holes. I have been using the old bolts and feared the oil was going down the treads of the bolts and weeping out. I for one am waiting to see what happens, good luck and I think you have done about all you can to prevent a leak.
steve
I am not sure what to think about the bolt holes. I have been using the old bolts and feared the oil was going down the treads of the bolts and weeping out. I for one am waiting to see what happens, good luck and I think you have done about all you can to prevent a leak.
steve